


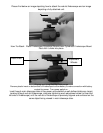

the telescope remains stationary without drifting rotationally about the Declination Axis. Tighten Cradle Lock
Knobs. The telescope is now balanced.
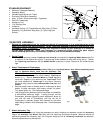
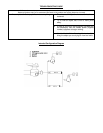
UNDERSTANDING THE EQUATORIAL MOUNT
The Equatorial Mount is designed to move in any direction. It can be set to allow
manual controls to track the movements of celestial bodies across the sky. This is
referred to as diurnal movement; movement of celestial bodies in the direction
opposite to that of the earth’s rotation and around the earth’s axis.
By aligning the telescope’s polar axis at celestial North, you will place the telescope in
parallel with the earth’s axis and thus be able to locate stars in the sky based on star
atlas information. To compensate for your position on earth, the polar axis is set in one
of three ways:
• Set up the telescope at night. Loosen the Declination Lock Knob (3) and rotate the telescope around the
declination axis until the arrow on the declination scale points to 90 degrees. Tighten the Declination Lock
Knob. The telescope is now roughly in parallel with the polar axis.
• Loosen the Horizontal Axis Lock Knob (13) and turn the telescope until the objective end faces due north. This
can be done by approximating the location of the pole star (Polaris or North Star) or by the use of a compass.
True North is then found by directing the telescope at Polaris, as magnetic North is slightly away from true
North.
Look up the latitude of your area in any geographical atlas. Loosen the Latitude Lock Knob (7) and set the latitude
scale to the correct latitude for your area. Aim the Finderscope (18) at Polaris. You will probably notice that Polaris
is not dead center in the Finderscope’s field of view. This is probably because your telescope is not absolutely
level with the ground. Loosen the Horizontal Axis Lock Knob (13) again and turn the telescope so that it is directly
aimed at Polaris. Tighten both the Horizontal Axis Lock Knob and Latitude Lock Knob. Polaris is 1 degree from the
North celestial pole. Therefore, the sighting of stars will have to be slightly adjusted as you locate them in the
heavens.
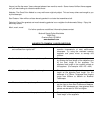
Never Look Directly At The Sun With Your Telescope
Permanent Damage To Your Eyes May Occur
Enjoying Your New Telescope
1. First determine your targeted object. Any bright object in the night sky is a good starting point. The Moon is a
great starting point. This is an object sure to please any budding astronomer or experienced veteran. When
you have developed proficiency at this level, other objects become good targets. Saturn, Mars, Jupiter, and
Venus are good second steps to take.
2. The first thing you need to do after assembling the telescope as planned is center the desired object in the
finderscope's cross hairs. Provided you did a reasonable job aligning the finderscope, a quick look through
the main telescope tube at low power should reveal the same image. With the lowest power eyepiece (the
one with the largest number printed on it) you should be able to focus the same image that you saw through
the finderscope. Avoid the temptation to move directly to the highest power. The low power eyepiece will
give you a wider field of view, and brighter image--thus making it very easy to find your target object. At this
point with a focused image in both scopes, you've passed the first obstacle. If you don't see an image after
attempting to focus it in, you might consider aligning your finderscope again. Once you pass this step, you'll
will enjoy the time spent ensuring a good alignment. Every object you center in the finderscope will be easily
found in the main telescope tube, which is important for continuing your exploration of the night sky.
3. The low power eyepieces are perfect for viewing the full moon, planets, star clusters, nebulae, and even
constellations. These should build your foundation. However, for more detail, try bumping up in magnification
to higher power eyepieces on some of these objects. During calm and crisp nights, the light/dark separation
line on the moon (called the "Terminator") is marvelous at high power. You can see mountains, ridges and