


5
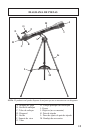
TELESCOPE ASSEMBLY INSTRUCTIONS
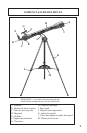
1. Your telescope has adjustable (telescoping) legs (Fig.1).
2. To set up the tripod, rst loosen the three leg adjusting clamps. Holding the
top of the tripod, extend the tripod legs to the desired height (with the legs
at equal lengths) and tighten the clamps on each leg to hold it in position
(Fig.1).
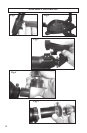
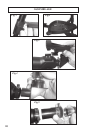
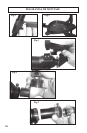
3. Attach the accessory tray (P) to the center leg braces on the tripod legs (Fig.2)
and insert accessory tray and bolt through center of tray into braces and
tighten bolt.
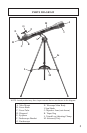
4. Remove telescope main body from the box. Attach telescope main body (H)
by aligning the hole in the telescope saddle with that in the yoke.
5. Remove the nderscope (G) with nderscope bracket (F) attached from the
box. Position the nderscope bracket on the telescope main body (Fig.3).
6. Put an eyepiece (H25mm) into the diagonal, then attach the diagonal to the
telescope, tightening the retaining screws (Fig.4). NOTE: In all astronomical
telescopes, the image appears upside down. With the use of the diagonal the
image appears erect but with a left to right inversion (mirror like). To use the
telescope for terrestrial view and to correct the mirrored image, remove the
diagonal and replace with the erecting eyepiece (Fig.5). We recommend the
use of the low magnication eyepiece when the telescope is used for terrestrial
viewing. Only refractor telescopes come with erector eyepieces. Reectors
(mirrors) are used mainly for astronomical purposes. The telescope is now
fully assembled and ready for use.
7. To use the Barlow, insert Barlow (Fig.5) into the focus tube. Secure by
tightening small retaining screw. Insert eyepiece into open end of Barlow
and secure.
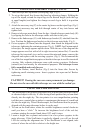
CAUTION! Viewing the sun can cause permanent eye damage.
Do not view the sun with this telescope or even with the naked eye.
1. The StarPointer is the quickest and easiest way to point your telescope exactly
at a desired object in the sky. It’s like having a laser pointer that you can shine
directly into the night sky. The star pointer is a zero magnication pointing
tool that uses a coated glass window to superimpose the image of a small red
dot into the night sky. Like all nderscopes, the StarPointer must be properly
aligned with the main telescope before it can be used.
2. To turn on the StarPointer, rotate the variable brightness control clockwise
until you hear a “click.” To increase the brightness level of the red dot,
continue rotating the control knob about 180° until it stops.
3. Locate a bright star or planet and center it in a low power eyepiece in the
main telescope. If the StarPointer is perfectly aligned, you will see the red
LED dot overlap the alignment star. If the StarPointer is not aligned, take
notice of where the red dot is relative to the bright star.
USING THE STAR POINTER