ASSEMBLY INSTRUCTIONS:
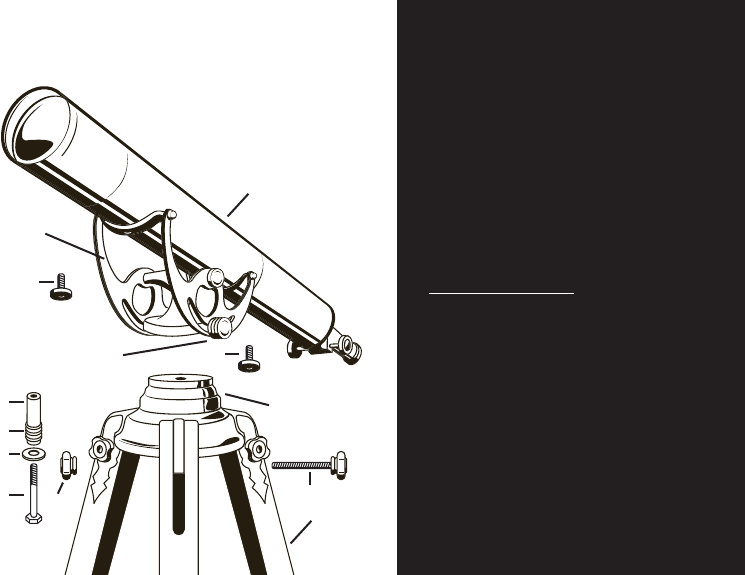
1. First attach the leg ornaments to the tripod legs using the brass nails included as shown.
2. Attach each leg to the base using the leg bolts (10) and leg knobs (5) provided.
3. Assemble parts 11, 18, 17 and 8 as shown. Place cradle on the base and insert assembly through
bottom of base into the bottom of the cradle. Secure bolt tightly with a 1/2 inch socket wrench.
4. Set the cradle in a horizontal position and lock into place by tightening the cradle lock nuts. Place
the telescope in cradle so that holes in telescope bottom are aligned with the holes in cradle. Secure
telescope with cradle screw (9).
Congratulations on becoming the owner of the BUSHNELL
®
HARBORMASTER
™
Telescope.
By following these simple precautions you can help preserve the life of this fine instrument.
CLEANING AND CARE OF THE BRASS:
DO NOT use polish or abrasives. Simply wipe with damp cloth and thoroughly dry.
Tripod: The wooden legs can be waxed with furniture polish with the same care given to furniture.
Lenses: Clean using a soft cloth. Abrasives or cleaners may scratch the glass or damage the lens
coating.
Brass has a tendency to have minor imperfections that should not be considered as defective. Rather,
these should be considered just for what they are—common occurrences within the brass that add to
the character and antiquity of this product.
It is our hope that you will enjoy and appreciate this fine example of Old World craftsmanship and its
authentic design.
TELESCOPE
CRADLE
BASE
LEGS
CRADLE LOCK NUT
9
8
17
18
11
10
5
9
HARBORMASTER™ TELESCOPE
The Bushnell
®
Harbormaster
™
Telescope
is packed in five groups:
• Telescope
• Base
• Cradle
• Legs
• Hardware - Leg Ornaments/brass nails
The Hardware Pack Includes:
•
2 ea. cradle screw (9)
• 3 ea. leg bolts (10)
• 1ea. center bolt (11)
• 1 ea. spring washer (18)
• 1 ea. spacer bushing (8)
• 1 ea. spring (17)
2 3
78-3576 6LIM.indd 4-5 1/28/05 4:02:53 PM


