


96” Allied Snowblower
- 5 -
ASSEMBLY INSTRUCTIONS
1. Fasten the two quick hitch arms (#57 & #58, left and right) to the main
body. Use eight 5/8” x 1 ¼” hex bolts, lock washers and hex nuts.
Note: Lift arms for quick coupling hitch are 30 ¾” long versus 35” for the
standard three point hitch.
2. Bolt the quick hitch (#56) to the snowblower body using two ½” x 1 ¼” hex
bolts, lock washers and hex nuts. Fasten to the lift arms using three 5/8" x
1 ½” hex bolts on each lift arm. Insert a 1" top link pin at the top and two 1
1/8" lift pins at the bottom of the hitch.
3. Bolt the hitch cross brace (#2) underneath the two quick hitch arms using
two 5/8" x 1 ½” hex bolts, lock washers, flat washers and hex nuts.
4. Mount the discharge spout (#3) using the spout clamp (#51) bolted to the
spout ring on the snowblower. Lubricate the spout ring and clamp.
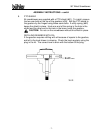
5. Hydraulic Spout Swivel:
a) Mount the swivel arm (#36) onto the swivel pin welded to the back
corner of the fan housing using a 1" ID flat washer (#37) and a 3/16"
x 1 ½” cotter pin (#52).
b) Wrap cable (#35) around spout and clamp to the ends of the swivel
using ¼” cable clamps (#16).
c) With the spout turned forward and the swivel arm centered with the
spout, clamp the cable to the spout cable anchor using another
cable clamp. Ensure that the spout is not jammed and that there is
no slack in the cable.
d) Use a standard 8" stroke cylinder (20 ¼” min., 28 ¼” max. pin
centers).
e) NOTE: A hydraulic cylinder and hose kit to control the spout
deflector is available as an option.
6. Hand Crank (Option):
a) Fasten hand crank assembly (#50) using two ½” x 1 ¼” hex bolts,
lock washer and hex nuts.
b) Thread cable (#53) through hole in hand crank to even lengths and
wrap around the tube to each side of the hole four turns in opposite
directions.
c) Turn spout to center forward position and clamp cable to cable
anchor on far side of spout using clamp (#16).