


Not for
Reproduction
www.snapper.com28
Maintenance
WARNING
DO NOT attempt any adjustments, maintenance, service or
repairs with the engine running. Stop engine. Stop blade.
Engage parking brake. Remove key. Remove spark plug
wire from spark plug and secure away from plug. Engine
and components are HOT. Avoid serious burns, allow all
parts to cool before working on machine. DO NOT attempt
to service or charge the battery while it is installed on the
machine.
!
!
Battery Service -
Valve Regulated Type
The battery provided with your unit is sealed and mainte-
nance-free. It requires no special care other than keeping it
properly charged.
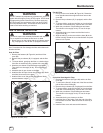
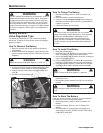
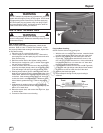
How To Remove The Battery
1. Raise the operator seat to gain access to the battery
compartment.
2. Disconnect the BLACK (Negative) cable (A, Figure 33)
from the negative battery terminal. Retain the mounting
hardware.
WARNING
Always disconnect the BLACK negative (-) cable first.
!
!
3. Disconnect the RED (Positive) cables (B) from the posi-
tive battery terminal. Retain the mounting hardware.
4. Unhook one end of the battery strap (C) from the wire-
form (D).
5. Carefully remove the battery (E).
Figure 33: Battery (valve regulated type)
B
F
C
A
E
D
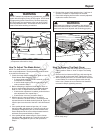
How To Charge The Battery
1. Remove the battery. Refer to “How To Remove The
Battery”.
2. Place the battery in a well-ventilated area.
3. Connect a 12-volt constant-voltage battery charger to
the battery terminals; RED to positive (+) and BLACK to
negative (-) terminal.
4. Charge the battery for 2 to 4 hours.
WARNING
The battery on this unit requires the use of a constant
voltage (CV) battery charger designed for valve regulated
(sealed) non-spillable batteries. Attempting to use a
standard battery charger may result in damage to the
battery. DO NOT use “BOOST” chargers on the battery.
DO NOT attempt to charge the battery while installed on
the unit.
!
!
How To Install The Battery
1. Raise the operator seat.
2. Install the battery (E, Figure 33) into the battery compart-
ment, orientating it in the wireform (D) as shown.
3. Secure the battery with the battery strap (C), hooking the
loose end onto the wireform.
4. Connect the RED positive (+) cables (B) to the positive
terminal (+) on the battery with the removed hardware.
5. Connect the black negative (-) cable (A) to the negative
terminal (-) on the battery with the removed hardware.
WARNING
Always connect the BLACK negative (-) cable last.
!
!
6. Apply a small amount of grease over the terminals to
prevent corrosion.
7. Reinstall the positive terminal cover (F) over the positive
terminal.
WARNING
Always shield the positive terminal with the positive terminal
cover.
!
!
How To Store The Battery
If the unit is to be stored out of season, it is recommended
the battery be removed, charged and stored.
1. Remove the battery. Refer to “How To Remove The
Battery”.
2. Charge the battery. Refer to “How To Charge The
Battery”.
3. Store the battery in an area away from the unit on a
wood surface. DO NOT STORE THE BATTERY ON A
CONCRETE SURFACE.