


3400 PSI Pressure Washer
14
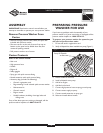
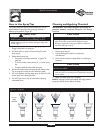
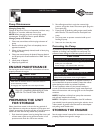
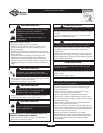
1. Detach spray gun and nozzle extension from high
pressure hose. Detach nozzle extension from spray
gun and remove o-ring and screen from nozzle
extension. Flush the screen, spray gun, and adjustable
nozzle extension with clean water to clear debris.
2. If screen is damaged, the o-ring kit contains a
replacement in-line filter screen and o-ring. If
undamaged, reuse screen.
3. Place in-line filter screen into threaded end of nozzle
extension. Direction does not matter. Push screen in
with eraser end of pencil until it rests flat at bottom of
opening.Take care to not bend screen.
4. Place o-ring into recess. Push o-ring snugly against
in-line filter screen.
5. Assemble nozzle extension to spray gun, as described
earlier in this manual.
Purge Pump of Air and
Contaminants
To remove air from the pump, follow these steps:
1. Set up pressure washer as described in “Preparing
Pressure Washer For Use”. Connect water supply and
turn water on.
2. Pull trigger on spray gun and hold.
3. When water supply is steady and constant, engage
trigger lock.
To remove contaminants from the pump, follow
these steps:
1. Set up pressure washer as described in “Preparing
Pressure Washer For Use”. Connect water supply and
turn water on.
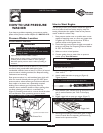
2. Start engine according to instructions in “To Start
Pressure Washer”.
3. Remove nozzle extension from spray gun.
4. Squeeze trigger on spray gun and hold.
5. When water supply is steady and constant, engage
safety latch and reattach nozzle extension.
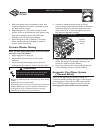
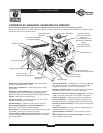
Nozzle Maintenance
A pulsing sensation felt while squeezing the spray gun
trigger may be caused by excessive pump pressure.The
principal cause of excessive pump pressure is a nozzle
clogged or restricted with foreign materials, such as dirt,
etc.To correct the problem, immediately clean the nozzle
using the tools included with your pressure washer and
follow these instructions:
1. Shut off engine and turn off water supply.
2. Remove spray tip from end of nozzle extension.
3. Remove in-line filter from other end of nozzle
extension.
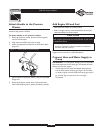
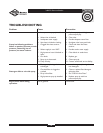
4. Use wire included in kit (or a small paper clip) to free
any foreign material clogging or restricting spray tip
(Figure 11).
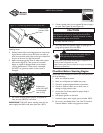
5. Using a garden hose, remove additional debris by back
flushing water through nozzle extension (Figure 12).
Back flush between 30 to 60 seconds.
6. Reinstall spray tip and in-line filter into nozzle extension.
7. Reconnect nozzle extension to spray gun.
8. Reconnect water supply, turn on water, and start engine.
9. Test pressure washer by operating with each Quick
Connect spray tip.
O–Ring Maintenance
Through the normal operation of your pressure washer,
o–rings, which keep the connections of the hoses and spray
gun tight and leak–free, may become worn or damaged.
An O-Ring Maintenance Kit is provided with your pressure
washer which includes replacement o-rings, rubber washer
and water inlet filter. Refer to the instruction sheet
provided in the kit to service your unit’s o-rings. Note that
not all of the parts in the kit will be used on your unit.
To remove a worn or damaged o–ring; use a small flathead
screwdriver to get underneath the o-ring and pry it off.
Use wire here to
remove debris
Figure 11 — Nozzle Maintenance
Figure 12 — Backflushing the Nozzle Extension
Nozzle Extension
Filter Screen
O-ring
Figure 10 — Clean In-Line Filter