


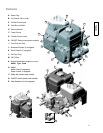

Maintenance
13
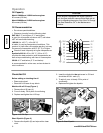
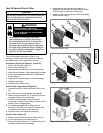
How To Service The Air Filter
Do not use pressurized air or solvents to clean the
filter. Pressurized air can damage the filter and
solvents will dissolve the filter.
CAUTION
Gasoline and its vapors are
extremely flammable and explosive.
Fire or explosion can cause severe
burns or death.
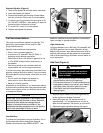
• Never start or run the engine with the air
cleaner assembly or the filter removed as a
fire or explosion could result. A dirty air filter
will cause a loss of engine power. If dirt or
dust enters the engine through the carburetor,
the result will be excessive wear or damage to
the engine. Replace a damaged or clogged air
cleaner or air filter immediately.
WARNING
The air filter system uses either a flat or oval
cartridge. Some models also include an additional
pre-cleaner that can be washed and reused.
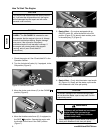
Pre-cleaner (Figure 20, Figure 21, Figure 22)
1. Remove the air filter cover (A).
2. Remove the cartridge (B).
3. Separate the pre-cleaner (C) from the cartridge.
4. Wash the pre-cleaner in liquid detergent and water.
5. Let the pre-cleaner thoroughly air dry. Do not oil
the pre-cleaner.
6. Assemble the dry pre-cleaner onto the cartridge.
7. Install the cartridge.
8. Assemble the air filter cover.
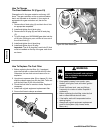
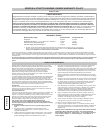
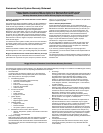
Flat Air Filter (Figure 20 and Figure 21)
1. Loosen screw(s) (D) that holds the air filter cover
(A).
2. Open the cover and remove the cartridge (B).
3. Remove the pre-cleaner (C), if equipped, from the
cartridge. Discard the old cartridge.
4. Install the new cartridge. If equipped with a
pre-cleaner, install lip (K) on the pre-cleaner at the
bottom of the cartridge pleats.
5. On models equipped with air filter shown in
Figure 20, insert the cover tabs (E) into the slots
(F) located at the bottom of the base (G).
6. Close the cover and tighten the screw(s).
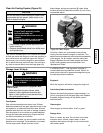
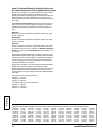
Oval Air Filter (Figure 22)
1. Remove the knob (H) and the air filter cover ( A).
2. Lift the cartridge (B) off of the base (G).
3. Remove the pre-cleaner (C), if equipped, from the
cartridge. Discard the old cartridge.
4. Install the new cartridge and pre-cleaner (if
equipped) into the base and onto stud (J). Make
sure cartridge fits securely into base (G).
5. Install air filter cover and secure with knob. Make
sure the knob is tight.
Figure 20: Flat Air Filter
A
C
B
G
D
E
F
K
A
C
B
G
D
K
Figure 21: Flat Air Filter
D
Figure 22: Oval Air Filter
H
A
B
C
G
J