


4
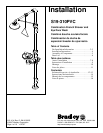
S19-310PVC Installation
4/27/07 Bradley Corporation • 215-1134 Rev. R; EN 06-532G
Installation InstructionsInstallation Instructions
Supplies Required:
• (4) 5/8" floor anchors and bolts
• Pipe sealant and teflon tape
• Piping to 2" IPS PVC water supply inlet on unit
• Piping to 2" IPS PVC drain outlet for eye wash on unit
• Adequate supply pipe supports
• Minimum 4" (102mm) drain to accommodate 30 gallons per minute discharge for
drench shower waste
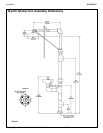
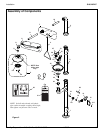
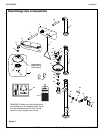
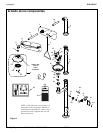
Step 1: Assemble and Install Drench Shower
1. To secure base to floor, install four suitable anchors (supplied by installer) for 5/8" bolts in the
floor (see Figure 1 on page 3).
2. Bolt the base to the floor anchors using 5/8" bolts (supplied by installer).
3. After the base is secured, assemble the remaining drench shower components as shown in Figure
1. Apply pipe sealant or tape (supplied by installer) to all male threaded pipe joints.
IMPORTANT: Some teflon sealants may cause stress cracks in the plastic
showerhead leading to failure. Use teflon tape when assembling
the showerhead.
4. The plastic showerhead should be assembled to the close nipple with teflon tape. The bottom
edge of the showerhead should be 7' (2134 mm) from the floor.
IMPORTANT: Provide adequate supports (supplied by installer) for supply pipe
using pipe hangers or other means. Do not rely on drench
shower unit to support supply piping.
5. Connect the water supply piping to the 2" PVC IPS inlet on the unit (piping supplied by
installer). Provide adequate supports (supplied by installer) for supply pipe using pipe hangers or
other means.
6. Connect the drain piping to the 2" PVC IPS drain outlet on the unit (piping supplied by
installer).
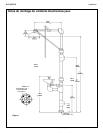
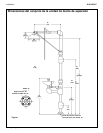
Step 2: Assemble and Install Eye/Face Wash
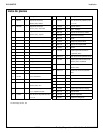
NOTE: See Figure 2 on page 5 for part identification.
1. While holding the elbow in the lower assembly piping, thread pipe #113-946 (Item #21) through
the hole in the lower assembly piping, and connect to elbow.
2. Install the reducer on top of the elbow.
3. Center the elbow, then tighten the pipe #113-946 (Item #21) in place.
4. Install the union and pipe nipple on pipe #113-946 (Item #21).
5. Place the gasket, then the strainer, on top of the lower assembly piping.
6. Place the eyewash bowl on top of the strainer.
7. Install the yoke assembly by connecting the stainless steel pipe, at the base of the yoke assembly,
to the reducer on the elbow.
8. Connect the pipe nipple to the valve piping assembly.
9. Open the water supply lines. Test for leaks and adequate water flow on the entire drench
shower/eye wash unit.