


Bracketing allows three consecutive shots to be taken at
power levels above, at and below the current setting level.
The bracketing sequence may be arranged to start at a low
power working upwards or alternatively begin at a high
power and work downwards. First set the desired power
setting.
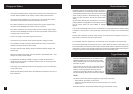
Set the desired bracket step size between 0.1 and 0.9 by
pressing SELECT to highlight the bracket settings and then
turn the Rotary Dial to set. Press MENU to highlight
START.
The unit will automatically check and warn if the selection is not possible within the existing setting
constraints. A warning occurs if the bracket step will take the unit outside of its normal operating
range.
The left most bracket step is always carried out first so ensure that this is negative to start from a
lower power or positive to start from a higher power.
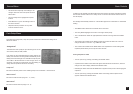
As an example, assume a single head in socket A is set for 6.0. First Select a -0.3 bracket step.
The screen indicates that the first flash will occur -0.3 stop below the present power setting. The
second flash will be at the present power setting and the final flash will be 0.3 stop above the present
power setting. A pointer under the step indicates the next flash and DONE indicates that the flash is
complete. At any time, pressing DONE will take the user out of bracketing mode.
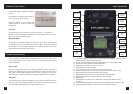
The three TRIGGER MODES are accessible from the
TRIGGER MODE menu and allow the user to create
delays, multiple flashes and to sequence flashes using
more than one pack.
These modes can also be used in conjunction with one
another. The actual use of these modes is left to the
creativity of the photographer. When they are not
required just leave them switched off. When turning off
the pack all settings within various modes are retained.
‘Delay’
This allows a timed delay between triggering the pack and the pack firing.
• Select ‘DELAY’ and switch on. Press done.
• Set time as required between 0 and 9.9 seconds in steps of 0.1 seconds.
• Press done..
Now there will be the chosen delay between the trigger and the flash occuring.
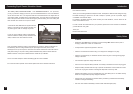
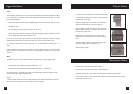
Charging the Battery
Bracket Mode Menu
Trigger Mode Menu
• One universal voltage charger is supplied with the pack and is provided with a set
of mains adaptors suitable for the majority of mains outlets around the world.
• Choose the adaptor suitable for your mains supply. If an unusual mains outlet is
encountered an appropriate travel adaptor will need to be found.
• If the battery cassette is to be charged inside the pack, plug the charger output
connector into the CHARGE jack socket on the top of the pack.
• If the battery cassette is to be charged outside the pack, plug the charger output
connector into the CHARGE jack socket on the side of the cassette. Avoid knocking
or placing strain on the connector.
• Connect the charger to the mains supply and switch on.
• A red indicator on the charger shows that the cassette is charging normally.
• In the unlikely event that the indicator shows yellow then there is a fault and the
cassette and charger should be disconnected.
• The green indicator briefly flickering shows the transition between charging and
trickle charge.
• When the indicator shows steady green the cassette is approximately 90% - 95%
charged and is being trickle charged.
• If possible leave the battery cassette to charge for a further 30-60 minutes to
ensure that it is fully charged. The Battery Cassette cannot be overcharged if the
charger is left connected.
• A full charge from a discharged state may take anything up to 6 hours depending
on the charger used.
• Please read the battery cassette safety and maintenance instructions at the end of
these instructions.
138