


$$")" $
$ "$#
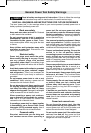
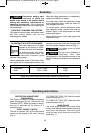
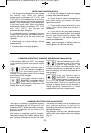
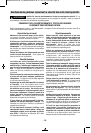
Your tool is equipped with charge condition
indicator lights (Fig. 1). The indicator lights
shows the charge condition of the battery
during operation.
To check the charge condition, press and hold
the charge condition indicator button with the
tool in the off position.
-10-
+:+-3>C
Continuous lighting 3 x green > 2/3
Continuous lighting 2 x green > 1/3
Continuous lighting 1 x green < 1/3
Flashing light 1 x green reserve
• $23=>9963=89>=?3>+,6/09<=>+>398+<C
9:/<+>398 Do not clamp in a vice or fastened
on a workbench.
• 989>?=/>996A3>29?>>2/2+8.1?+<.
79?8>/.$+5/-+</>2+>>2/2+8.1?+<.
3=89>.+7+1/.9<,/8> Injury could occur
when working without or using a damaged
hand guard. Have a damaged hand guard
replaced immediately by an authorized Bosch
Factory Service Center or Authorized Bosch
Service Station.
• '/+<:<9>/->3@/169@/=A236/A9<5381
$+5/-+</>2+>-?>=2//>:+<>=.989>,/8.
>9A+<.C9?<,9.C Sharp burrs develop from
the cut steel sheet and can cause injuries to
the operator. If required, press bending steel
sheet parts away from your body using
gloves.
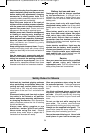
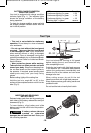
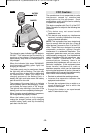
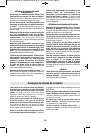
Before cutting, lightly oil the cutting line.
Hold the tool at a angle 80° to 90° to the
surface of the workpiece and do not tilt it to the
side. (Fig. 2).
Your tool should be running at full speed
before starting the cut, and turned off only
after completing the cut.
Guide the tool evenly with light feed pressure
in the direction cut. Excessive feed pressure
reduce the performance considerably and
shorten the life of the cutters and can cause
damage to the tool.
When cutting curves, do not tilt the tool
laterally and work with a light feed pressure.
Sharp cutters produce good cutting results and
protects the tool.
Do not load the tool so heavily that it stalls.
$996$3:=
80–90
˚
#"$"#
$$")!
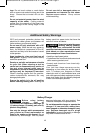
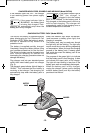
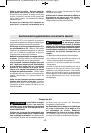
Release battery pack from tool by pressing on
both sides of the battery release tabs and pull
downward (Fig. 3).
To insert battery, align battery and slide
battery pack into tool until it locks into position.
Do not force.
0,+>>/<C</6/+=/>+,=+</
-<+-5/. 9< 9>2/<A3=/
.+7+1/..989>38=/<>38>9>996 Battery can
fall out during operation.
BATTERY
RELEASE TABS
FIG. 3
!
WARNING
FIG. 2
BM 2610022012 04-12_BM 2610022012 04-12 4/17/12 2:50 PM Page 10