


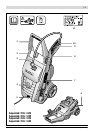

English | 11
Bosch Power Tools F 016 L70 545 | (14.1.11)
To store pres-
sure hose 3 or
supply cable
6, pull the
hose or cable
briefly (the
hose or cable
rolls up auto-
matically).
Note: Always pull out the pressure hose and
supply cable completely when using the pres-
sure washer.
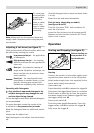
Adjusting 4 Jet-lance (see figure F)
The 4 jet-lance has 4 different modes, which can
be selected by rotating the nozzle.
Low pressure fan jet – for application
of detergents.
High pressure fan jet – for cleaning
sensitive surfaces like cars, garden fur-
niture etc.
Roto jet – for powerful cleaning of
larger areas like patios, driveways, etc.
Never use the roto jet mode to clean
motor vehicles.
Pencil jet – for cleaning with maxi-
mum power in smaller areas e. g. bar-
becues, chewing gum on patio etc.
Suitable for extremely dirty surfaces.
Operating with Detergents
f Only use Bosch approved detergents. Un-
suitable detergents may damage the unit
and the object being cleaned.
Fill the detergent tank 2 with diluted detergent,
as recommended.
To spray detergent rotate the nozzle of the
4 Jet-lance to low pressure fan jet mode.
Read the detergent label for additional instruc-
tions.
Always wet the object first.
Apply detergent to the object from the bottom
up.
Give the detergent time to work, but never leave
it to dry.
Rinse from top and work downwards.
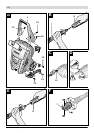
Flexi-jet-lance (depending on model)
(see figures B and E)
Turn the 4 jet-lance 7 90° anti-clockwise. Ex-
tract the 4 jet-lance.
Insert the flexi-jet-lance into the power gun 8.
Depress and turn the flexi-jet-lance 90° clock-
wise to lock in place.
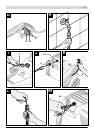
Operation
Starting and Stopping (see figure G)
Before starting en-
sure product is in
horizontal posi-
tion.
Starting
Connect the product to the mains supply ensur-
ing that the mains switch is in the off position.
Attach water supply hose (not supplied) to the
mains water supply and machine.
Open water tap.
Press the safety lock 10 to release the trigger 9.
Fully press the trigger 9 until there is a constant
flow of water to clear the air from the machine
and water supply hose. Release trigger 9. Press
the trigger safety lock 10.
Press on/off switch 4.
Point the power gun 8 downwards. Press the
trigger safety lock 10 to release the trigger 9.
Fully press the trigger 9.
20 mm
20 mm
OBJ_BUCH-792-002.book Page 11 Friday, January 14, 2011 12:37 PM