


17
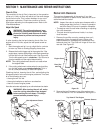
SECTION 7: MAINTENANCE AND REPAIR INSTRUCTIONS
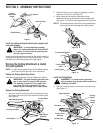
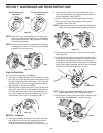
WARNING: To prevent serious injury, never
perform maintenance or repairs with unit
running. Always service and repair a cool
unit. Disconnect the spark plug wire to
ensure that the unit cannot start.
Maintenance Schedule
Perform these required maintenance procedures at the
frequency stated in the table. These procedures should
also be a part of any seasonal tune-up.
NOTE: Some maintenance procedures may require
special tools or skills. If you are unsure about
these procedures take your unit to any non-road
engine repair establishment, individual or
authorized service dealer.
NOTE: Maintenance, replacement, or repair of the emission
control devices and system may be performed by
any non-road engine repair establishment, individual
or authorized service dealer.
Line Installation
This section covers both SplitLine™ and standard single
line installation.
Always use Genuine Factory Parts™ 0.095 in. (2.41 mm)
replacement line. Using line other than the specified may
make the engine overheat or fail.
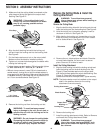
WARNING: Never use metal-reinforced line,
wire, chain or rope. These can break off
and become dangerous projectiles.
There are two methods to replace the trimming line:
• Wind the inner reel with new line
• Install a prewound inner reel
Winding the Existing Inner Reel
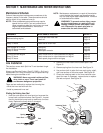
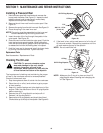
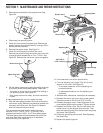
1. Hold the outer spool with one hand and unscrew the
bump knob counterclockwise. See Figure 31. Inspect
the bolt inside the bump knob to make sure it moves
freely. Replace the bump knob if damaged.
Figure 31
FREQUENCY MAINTENANCE REQUIRED REFER TO
Before starting engine
Fill fuel tank with fresh fuel
Check oil
Page 12
Page 19
Every 10 hours Clean and re-oil air filter Page 21
First change at 10 hours
Every 25 hours thereafter
Every 25 hours
Change oil
Change oil
Clean spark arrestor
Page 20
Page 20
Page 24
10 hours on new engine
Every 25 hours
Every 25 hours
Check rocker arm to valve clearance and adjust
Check rocker arm to valve clearance and adjust
Check spark plug condition and gap
Page 23
Page 23
Page 24
2. Remove the inner reel from the outer spool. See
Figure 31.
3. Remove spring from the inner reel. See Figure 31.
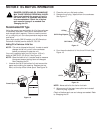
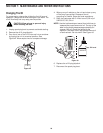
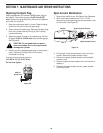
4. Use a clean cloth to wipe the inner reel, spring, shaft,
and inner surface of the outer spool. See Figure 32.
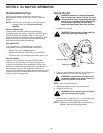
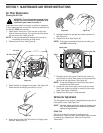
5. Check the indexing teeth on the inner reel and outer
spool for wear. If necessary, remove burrs or replace
the reel and spool. See Figure 33.
Inner Reel
Spring
Outer Spool
Bump Knob
Bolt
Indexing Teeth
Figure 33
Figure 32