


11
Section 3: Features and Controls
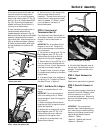
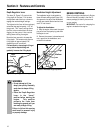
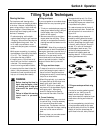
4. FOR WHEEL DRIVE mode (Figure 3-2):
Slide the wheel outward and align the
holes in the wheel hub (D, Figure 3-2))
and the wheel shaft (B). Insert the wheel
drive pin (A) through the wheel hub and
the wheel shaft. Secure the wheel drive
pin with the hairpin cotter (C) by pushing
the hairpin cotter in as far as it will go.
Repeat for the other wheel and then
remove the support from beneath the
transmission.
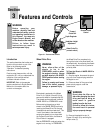
5. FOR FREEWHEEL mode (Figure 3-3):
Slide the wheel inward and insert the
wheel drive pin (A, Figure 3-3) only
through the hole in the wheel shaft (B).
Secure the wheel drive pin with the
hairpin cotter (C) by pushing the hairpin
cotter in as far as it will go. Repeat for the
other wheel and then remove the support
from beneath the transmission.
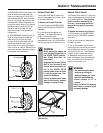
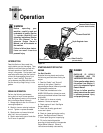
Forward Clutch Bail
The Forward Clutch Bail (E, Figure 3-4)
controls the engagement of forward drive
to the wheels and tines.
To Operate the Forward Clutch Bail:
1. Put the wheels in the WHEEL DRIVE
position (see the following “WARNING”
statement).
2. Lift and hold the bail against the
handlebar. The wheels and tines will
rotate in a forward direction.
3. Release the bail to disengage (stop)
the wheels and tines. All forward motion
will stop (the engine will continue to run).
Reverse Clutch Control
The Reverse Clutch Control (F, Figure 3-4)
controls the engagement of reverse drive
to the wheels and tines. This reversing
feature is used for maneuvering the
tiller only – never engage the tines in
the ground while going in the reverse
direction.
To Operate the Reverse Clutch Control:
1. Put the wheels in the WHEEL DRIVE
position (see the “WARNING” statement
at the left).
2. Stop all tiller motion by releasing the
Forward Clutch Bail.
3. Lift up the handlebar until the tines
clear the ground, look behind you to avoid
any obstacles, and then pull the reverse
clutch control knob out. The wheels and
tines will rotate in a reverse direction.
4. Release the reverse clutch control
knob to disengage (stop) the wheels and
tines. All reverse motion will stop (the
engine will continue to run).
Figure 3-2: WHEEL DRIVE position.
A
B
D
C
Figure 3-3: FREEWHEEL position.
Figure 3-4: Forward Clutch Bail (E) and Reverse
Clutch Control (F).
A
E
F
B
D
C
WARNING
Before starting the engine, be
sure that both wheels are in
the WHEEL DRIVE position.
See “Wheel Drive Pins” for
instructions.
Engaging the Forward Clutch
Bail or the Reverse Clutch
Control when the wheels are
not in the WHEEL DRIVE
position could allow the tines
to rapidly propel the tiller
forward or backward.
Failure to comply could cause
loss of tiller control, property
damage, or personal injury.
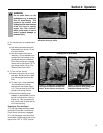
WARNING
• Use extreme caution when
reversing or pulling the
machine towards you. Look
behind to avoid obstacles.
• Never attempt to till in
reverse.
Failure to follow this warning
could result in personal injury
or property damage.