


Page 7
Model#CPSV003589
Page 7
1.888.753.7137
Page 8
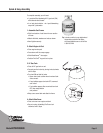
Placement
The use and installation of this product must conform
to local codes. In absence of local codes, use the
National Fuel and Gas Code, ANSI Z223.1/NFPA 54,
Storage and Handling of Liquified Petroleum Gases,
ANSI/NFPA 58 or CSA B149.1, Natural Gas and
Propane Installation Code.
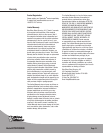
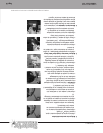
Properly positioning your SkeeterVac
®
device is
important to maximizing performance. Since the
SkeeterVac
®
device attracts mosquitoes it should be
placed at least 10 feet from your living areas.
Mosquitoes typically live in areas that are shady,
wet and / or moist. Determine the primary mosquito
habitat and place your SkeeterVac
®
device as close
as possible to it.
If you live in an area with consistent wind, place
your SkeeterVac
®
device upwind from the primary
mosquito habitat.
CAUTION: Tipping danger. Use stakes to
secure.
Once you have selected the location, secure the
SkeeterVac
®
device by placing a stake in each of the
(2) front feet.
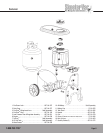
Maximum performance may require relocating your
SkeeterVac
®
device from time to time. Before moving
make sure rain cover and cylinder cover are secured.
To move, hold the handle and lift upward. Pull to the
new location.
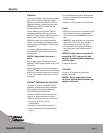
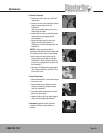
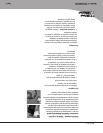
FineTune
®
: Customizing the Lure Output
The amount of octenol your SkeeterVac
®
device
dispenses is important to maximizing performance.
Some mosquito species are highly attracted to
octenol while others are less attracted.
This product contains an easy-to-use feature that
allows you to customize the amount of octenol
released to match the species in your environment.
1. Remove FineTune
®
lock by turning
counterclockwise
2. Remove foil seal from the Biting Insect Lure
3. Place lure back into holder with holes orienting
upward
4. From the illustrations provided on the engine label,
select the environment that best matches the area
you are protecting
5. Position the ring so it points to your environment
To Start
1. With the rain cover removed, turn gas ON at LP gas
tank by slowly turning valve counterclockwise 2
full turns and be prepared IMMEDIATELY to follow
step 2
2. IMMEDIATELY press and hold the red igniter button
down until you hear a “POP” sound indicating
ignition. Normally occurs within 20 seconds
3. The needle on the engine gauge should begin to
move into the green zone, indicating ignition is
complete
CAUTION: If needle does not move within 20
seconds after “POP”, shut gas off at tank
and wait 3 to 5 minutes before attempting to
restart the engine
4. Replace the rain cover
To Turn Off
Turn gas OFF at LP gas tank by turning valve
clockwise until it stops
CAUTION - The gas supply must be turned
off at the LP-gas tank when this outdoor gas
appliance is not in use.
Operation