


Outdoor LP Gas Mosquito Exterminator Model No. SV3000
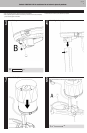
End of Season Storage
To lengthen the life of your SkeeterVac
®
device, perform these simple steps at the end of the
mosquito season.
1. Turn valve on LP gas tank “OFF”.
2. Disconnect regulator/hose assembly from tank by turning knob counterclockwise.
3. Remove tank cover.
4. Remove LP gas tank and store outdoors away from children and must not be stored in a
building, garage or other enclosed area.
5. Remove and properly dispose of the TacTrap™ and FineTune
®
lure.
6. Cover your SkeeterVac
®
device to protect from dust and store it in a cool dry place.
CAUTION: Storage of an outdoor gas appliance indoors is only permissible if the tank
is disconnected and removed from the outdoor gas appliance.
Product Registration
For faster warranty service, please register your product immediately at www.bluerhino.com or
call 1.800.762.1142.
Limited Warranty
Blue Rhino Global Sourcing, LLC (“Vendor”) warrants to the original retail purchaser of this
product, and to no other person, that if this product is assembled and operated in accordance
with the printed instructions accompanying it, then for a period of one (1) year from the date
of purchase, all parts in such product shall be free from defects in material and workmanship.
Vendor may require reasonable proof of your date of purchase. Therefore, you should retain
your sales slip or invoice. This Limited Warranty shall be limited to the repair or replacement of
parts, which prove defective under normal use and service and which Vendor shall determine
in its reasonable discretion upon examination to be defective. Before returning any parts, you
should contact Vendor’s Customer Service Department using the contact information listed
below. If Vendor confirms, after examination, a defect covered by this Limited Warranty in any
returned part, and if Vendor approves the claim, Vendor will replace such defective part without
charge. If you return defective parts, transportation charges must be prepaid by you. Vendor will
return replacement parts to the original retail purchaser, freight or postage prepaid.
This Limited Warranty does not cover any failures or operating difficulties due to accident,
abuse, misuse, alteration, misapplication, improper installation or improper maintenance or
service by you or any third party, or failure to perform normal and routine maintenance on
the product as set out in this owner’s manual. In addition, the Limited Warranty does not cover
damage to the finish, such as scratches, dents, discoloration, rust or other weather damage,
after purchase.
This Limited Warranty is in lieu of all other express warranties. Vendor disclaims all warranties
for products that are purchased from sellers other than authorized retailers or distributors,
including the warranty of merchantability or the warranty of fitness for a particular purpose.
VENDOR ALSO DISCLAIMS AND ANY ALL IMPLIED WARRANTIES, INCLUDING WITHOUT
LIMITATION THE IMPLIED WARRANTIES OF MERCHANTABILITY AND FITNESS FOR A PARTICULAR
PURPOSE. VENDOR SHALL NO LIABILITY TO PURCHASER OR ANY THIRD PARTY FOR ANY
SPECIAL, INDIRECT, PUNITIVE, INCIDENTAL, OR CONSEQUENTIAL DAMAGES. Vendor further
disclaims any implied or express warranty of, and assumes no responsibility for, defects in
workmanship caused by third parties.
This Limited Warranty gives the purchaser specific legal rights; a purchaser may have other
rights depending upon where he or she lives. Some jurisdictions do not allow the exclusion or
limitation of special, incidental or consequential damages, or limitations on how long a warranty
lasts, so the above exclusion and limitations may not apply to everyone.
Vendor does not authorize any person or company to assume for it any other obligation or
liability in connection with the sale, installation, use, removal, return, or replacement of its
equipment, and no such representations are binding on Vendor.
Blue Rhino Global Sourcing, LLC
Winston-Salem, North Carolina USA
(800) 762-1142
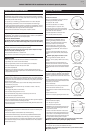
Troubleshooting
Problem Possible Cause Prevention/Cure
Engine will not light
Igniter does not work Check battery; replace if
necessary
No LP gas Check LP gas tank; replace if
necessary
Hold in control knob for 30
seconds. If it still does not
light, please call customer
Care.
If problems can not be correct by using these methods, please contact
1.800.762.1142 for assistance.
Cleaning and Care
CAUTION: All cleaning and maintenance should be done when SkeeterVac
®
is cool
and with the fuel supply disconnected.
CAUTION: DO NOT clean any SkeeterVac
®
part in a self cleaning oven.
CAUTION: This SkeeterVac
®
should be thoroughly cleaned and inspected on a regular
basis.
CAUTION: Abrasive cleaners will damage this product.
Before Each Use:
1. Keep the SkeeterVac
®
area clean and free from any
combustible materials, gasoline, and other flammable
vapors and liquids.
2. Do not obstruct the flow of the combustion of LP and the
ventilation air.
3. Keep the ventilation opening(s) of the LP gas tank area
free and clear from debris.
4. See “Cleaning Instructions” for proper cleaning
instructions.
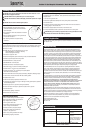
Cleaning Instructions / Routine Service
To ensure maximum performance and to lengthen the life of your SkeeterVac
®
device, perform
these steps each time your tank is empty. This model will consume a standard 20# LP gas
tank every 18-21 days.
Note: While unit is in use, check the following every 2-3 days:
• Check WaveDrawer™ and clean (if necessary).
• Check air passages for blockage.
1. Turn valve on LP gas tank “OFF”.
2. Disconnect hose/regulator gas line from tank by turning knob counterclockwise.
3. Remove empty tank replace with full LP gas tank.
4. Remove WaveDrawer™, empty and clean.
5. Slide WaveDrawer™ back into place.
6. Remove used TacTrap™ and dispose of properly.
7. Slide fresh TacTrap™ in place and remove protective paper.
8. Remove Finetune
®
cover by turning counterclockwise.
9. Remove used Finetune
®
lure (if necessary) and properly dispose.
Note: Finetune
®
Lure lasts 60 days.
10. Remove fresh Finetune
®
lure from package (if necessary). Dispose of packaging properly.
11. Place Finetune
®
lure back into holder with holes orienting upward.
12. Replace Finetune
®
cover.
13. Select the lure output by adjusting the Finetune
®
cover.
14. Check engine and gas lines for any sign of damage or missing parts. Repair any problems
before attempting to start.
15. Reconnect gas line to LP gas tank by turning knob clockwise.
16. Remove tank cover from empty LP gas tank and place on full LP gas tank.
17. Perform leak check.
18. Start following “Lighting” instructions.
19. Wash hands with soap and water.
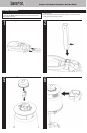
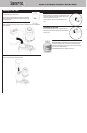
Replacing Igniter Battery
If you do not hear a clicking sound when the igniter
button is depressed, the battery may have lost its
charge. Replace battery as follows:
1. Turn LP gas tank valve “OFF”.
2. Open battery compartment by turning cap on
bottom of engine counterclockwise.
3. Remove used battery and properly dispose.
4. Place fresh AA battery into compartment –
negative (–) end goes in first.
5. Secure cap by turning clockwise until it stops.
6. Start following “Lighting” instructions.
Battery Placement
LP Gas Tank Ventilation Area