


1
3
9
R
E
P
L
A
C
E
I
F
D
A
M
A
G
E
D
10
11
B
C
A
D
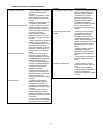
MULCHING TIPS
In the mulching configuration your new mower is designed to re-cut
the grass clippings into short lengths.
These clippings, which are dispersed as you mow will biodegrade
quickly and provide nutrients for the lawn.
• Set mower at highest cutting height when mowing in rough ground or
in tall weeds.
• Do not cut the lawn when it is wet. Wet grass tends to form clumps
with the mulching action. The best time to cut your lawn is in the
afternoon.
• For best results, adjust the mower cutting height so that the mower
cuts off only the top third of the grass blades.
• If your lawn is overgrown it may be necessary to increase the cutting
height to reduce the pushing effect and prevent overloading the
motor.
• For extremely heavy mulching make narrower cuts and mow slowly.
• Change your cutting pattern from week to week. Mow north to south
one week and east to west the next week. This will help prevent
matting and graining of the lawn.
CAUTION: Do not attempt to unclog the blade chamber by dropping
or tapping the mower on the ground. This can damage the mower.
DISCHARGING (AVAILABLE AS AN OPTION AT EXTRA
COST)
The mower, with optional discharge chute, can be used to discharge
grass clippings back to the lawn.
1. Discharging may be necessary if the grass is too long to mulch or
the bag fills too quickly.
2. Clippings may be further dispersed, if needed, by blowing them
with a yard blower.
3. In heavy grass conditions, a narrower pass may be required
BAGGING
It is recommended to bag the clippings for the first few spring
mowings and the last mowing of the season to discourage diseases.
1. Bagging the clipping is sometimes preferred to reduce tracking of
clippings into pools, hot tubs, and homes.
2. Clippings can be added to your compost bin and used later for a
natural fertilizer.
CLEANING AND STORAGE
DANGER: Be sure the mower is unplugged and the blade has
stopped.
Remove and clean any debris from the outside of the mower and
inside of guard before storage. Store under cover. See
MAINTENANCE section.
Cleaning out the underside of the mower is done easiest immediately
after mowing (ENSURE MOWER IS UNPLUGGED AND BLADE
HAS STOPPED). Arag, crumpled newspaper or paper towels, can be
used to wipe out caked clippings. Be careful of sharp edges of blade.
Aclean mowing deck improves the efficiency of the blade and
maintains high performance. When cleaning, DO NOT immerse
mower in water or squirt it with a hose or pressure washer. Use only
mild soap and damp cloth to clean the mower. Never let any liquid get
inside the mower; never immerse any part of the mower into a liquid.
NOTE: Do not store the mower on or adjacent to fertilizers or chemicals.
Such storage can cause rapid corrosion to metal parts.
PREVENTING CORROSION
Fertilizers and other garden chemicals contain agents that greatly
accelerate the corrosion of metals. If you use the mower in areas where
fertilizers or chemicals have been used, the mower should be cleaned
immediately afterwards.
Wipe all exposed parts with a damp cloth. You may lubricate only metal
parts with a light petroleum based oil. Do not lubricate wheels.
MAINTENANCE
Before each mowing session unplug the mower and ensure that the
blade has stopped. Check all nuts, bolts and screws to ensure proper
tightness, Be sure to check the blade fastening system.
IMPORTANT: To assure product SAFETY and RELIABILITY, repairs,
maintenance and adjustment should be performed by authorized
service centers or other qualified service organizations. Use only
identical replacement parts.
Inspect and thoroughly clean your mower at the beginning of each
mowing season for longer life and better performance.
From time to time turn the mower off and wait for the blade to stop.
Then unplug the power cord and turn the mower on its side. Using an
object such as a stick or rag, wipe out any accumulation of grass in the
blade area. Also clean out any grass or debris which may be packed
around the discharge/mulch door area. Be careful of the sharp edges
of the blade.
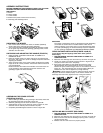
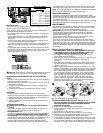
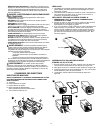
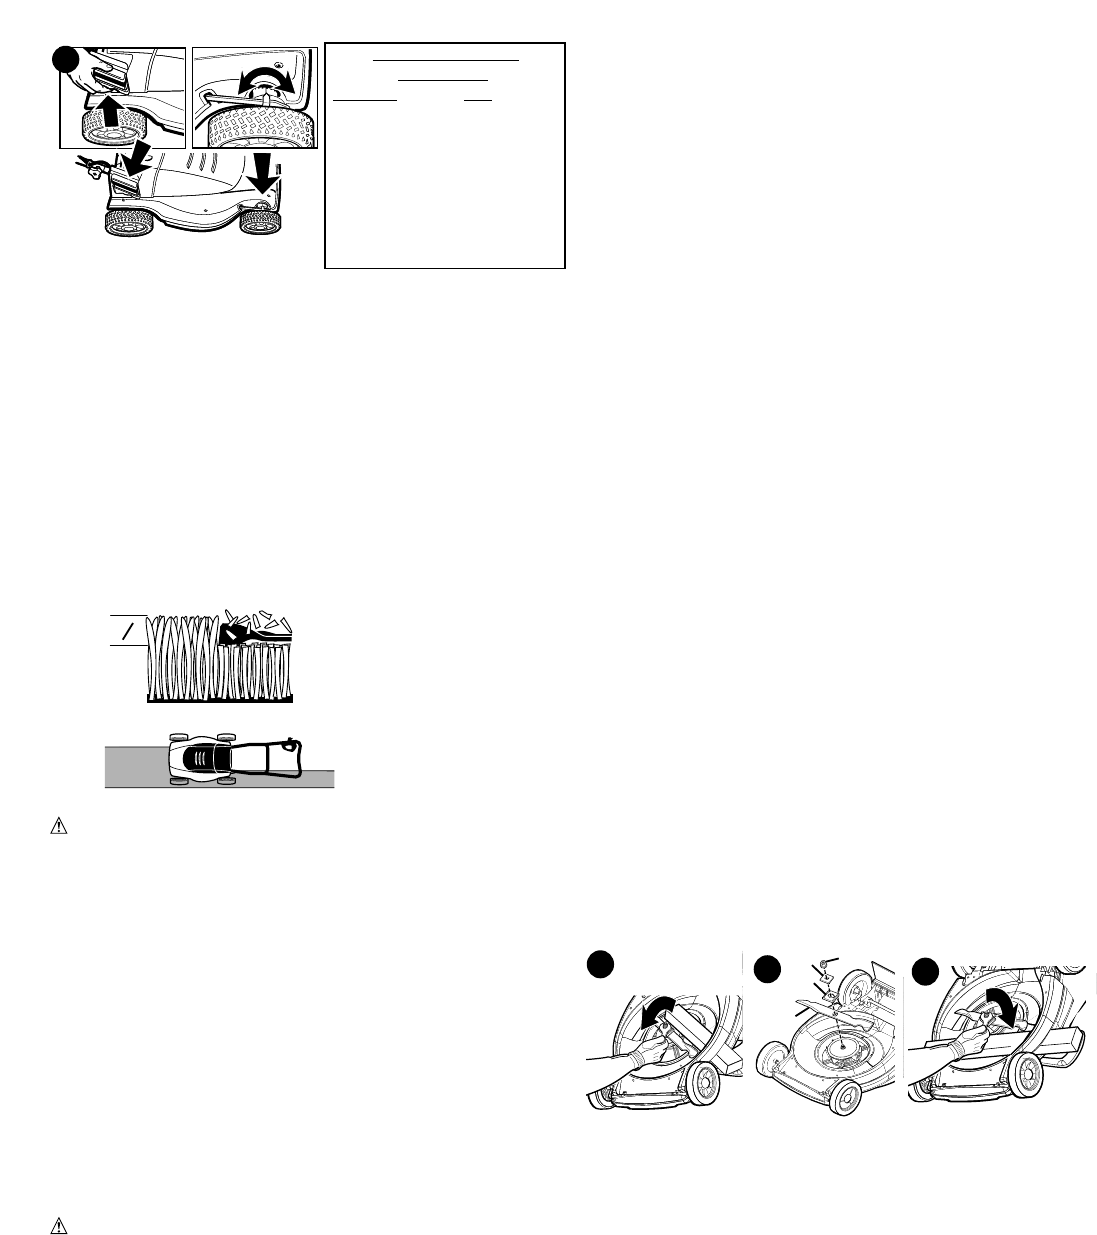
REMOVING AND INSTALLING BLADE
(FIGURE 9,10,11)
1. RELEASE SWITCH LEVER TO TURN MOWER OFF, WAIT FOR
THE BLADE TO STOP, AND UNPLUG MOWER. THEN TURN
THE MOWER OVER FOR ACCESS TO THE BLADE.
2. Use a piece of 2x4 wood (about 2 feet long) to keep blade from
turning while removing flange nut.
3. Wear gloves and proper eye protection.Be careful of sharp edges of
blade. Position wood and remove flange nut as shown in
Figure 9.
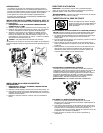
4. Remove square metal blade spacer, square plastic blade insulator,
and blade (Figure 10). Examine blade insulator for damage and
replace if necessary.
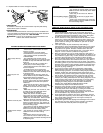
5. When replacing sharpened or new blade on shoulder of fan, make
sure the “GRASS SIDE” on the blade will be facing the ground when
the mower is returned to its normal upright position. After installing
blade, place blade insulator on blade such that the raised lips on
one side engage the edges of the blade. Then install the blade
spacer so that it sits inside the raised lips on the other side of the
blade insulator. Be sure to align the flats in the hole of the blade
spacer with the flats of the shaft, rotating the blade and blade
insulator together as necessary. Position piece of wood to keep
blade from turning (Figure 11). Install flange nut with the flange
against the blade spacer and securely tighten.
Fig. 10 A. nut, B. spacer, C. insulator, D. blade
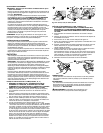
SHARPENING AND BALANCING THE BLADE:
(FIGURE 12,13)
1. BE SURE THE SWITCH LEVER IS RELEASED AND THE BLADE
HAS STOPPED AND THE CORD UNPLUGGED BEFORE
REMOVING THE BLADE.
2. At all times be careful of sharp edges of blade.
3. Remove blade from mower. See instructions for removing and
installing blade.
4. Secure blade in a vise as shown in Figure 12.
5. Wear proper eye protection and be careful not to cut yourself.
6. Carefully file the cutting edges of the blade with a fine tooth file or
sharpening stone, maintaining the original cutting angle.
7. Check balance of blade by placing center hole in blade over a nail
or round shank screwdriver, clamped horizontally in a vise. If either
end of the blade rotates down, file off additional material from that
end. Blade is properly balanced when neither end drops. (Figure 13)
6
C
U
T
H
E
I
G
H
T
B
E
S
T
M
U
L
C
H
I
N
G
C
U
T
H
E
I
G
H
T
B
E
S
T
M
U
L
C
H
I
N
G
C
U
T
H
E
I
G
H
T
B
E
S
T
M
U
L
C
H
I
N
G
C
U
T
H
E
I
G
H
T
B
E
S
T
M
U
L
C
H
I
N
G
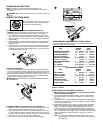
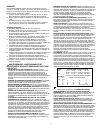
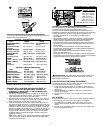
CUTTING HEIGHT
POSITIONS
Position Cut
1 (LOW) 1-1/4 in. 31.7mm
2 1-1/2 in. 38.1mm
3 1-3/4 in. 44.4mm
4 2 in. 50.8mm
5 2-1/2 in. 63.5mm
6 3 in. 76.2mm
7 3-1/4 in. 82.5mm
8 (HIGH) 3-1/2 in. 88.9mm
8