


8
INSTALLING AND REMOVING THE BATTERY PACK
WARNING: Make certain the lock-off button is engaged to prevent switch actuation before
removing or installing battery.
TO INSTALL BATTERY PACK:
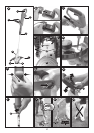
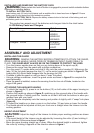
Insert battery pack (2) firmly into trimmer until an audible click is heard as shown in figure C. Ensure
battery pack is fully seated and fully latched into position.
TO REMOVE BATTERY PACK: Depress the battery release button in the back of the battery pack and
pull battery pack out of
trimmer.
ASSEMBLY AND ADJUSTMENT
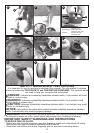
INSTALLING THE GUARD
WARNING: REMOVE THE BATTERY BEFORE ATTEMPTING TO ATTACH THE GUARD,
EDGE GUIDE OR HANDLE. NEVER OPERATE TRIMMER WITHOUT GUARD FIRMLY IN
PLACE. THE GUARD MUST ALWAYS BE ON THE TRIMMER TO PROTECT THE USER.
•Turnthetrimmerupsidedownsothatyouarelookingdownatthespoolcap(8).
• Remove the screw from the guard with a phillips screwdriver.
•Turntheguard(7)upsidedownandslideitfullyontothemotorhousing(5).Makesurethe
tabs (10) on the guard engage the ribs (11) on the motor housing as shown in figure D. The
locking tab (24) should have snapped into the housing slot (25).
•Continue to slide the guard on until you hear it “snap” into place.
•Usingaphillipsscrewdriver,inserttheguardscrewasshowninfigure E to complete the
guard assembly.
•Once the guard is installed, remove the covering from the line cut-off blade, located on the
edge of the guard.
ATTACHING THE AUXILIARY HANDLE
•To attach the handle (3), press in on the buttons (12) on both sides of the upper housing as
shown in figure F.
•Positionthehandleasshowninfigure G, matching up the grooved side of the handle with
the grooved button. Partially push the handle on so that it will hold the buttons in when you
release them with your hand.
•Push the handle completely onto the housing and position it slightly until it “snaps” into place
(figure H).
•Toadjustthehandleupordown,pressinonthebutton(13)andraiseorlowerthehandle.
•The handle should be adjusted so that your front arm is straight when the trimmer is in the
working position.
HEIGHT ADJUSTMENT
CAUTION: Adjust the length of the trimmer to obtain proper working positions as shown
in figure J.
•The overall height of the trimmer can be adjusted by loosening the collar (4) and rotating it
in the direction of the arrow shown in figure I.
•Move the upper housing straight up or down. When the desired height is achieved, tighten
the collar by rotating it opposite of the direction shown in figure I.
LI-ION Battery Packs and Chargers
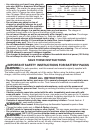
This product can accept any of the batteries and chargers listed in the chart below.
Batteries: LI-ION LBX20
LBXR20
LBXR2020
LB2X4020
Chargers: LI-ION LCS1620
L2AFCBST
L2AFC
Description Cat. #