


6
u Never touch the cutting line while the appliance is running.
u Do not put the appliance down until the cutting line has
come to a complete standstill.
u Use only the appropriate type of cutting line.
Never use metal cutting line or shing line.
u Be careful not to touch the line trimming blade.
u Take care to keep the mains cable away from the cutting
line. Always be aware of the position of the cable.
u Keep hands and feet away from the cutting line at all
times, especially when switching on the motor.
u Before using the appliance and after any impact, check for
signs of wear or damage and repair as necessary.
u Never operate the appliance with damaged guards or
without guards in place.
u Take care against injury from any device tted for trimming
the lament line length. After extending new cutter line
always return the machine to its normal operating position
before switching on.
u Always ensure that the ventilation slots are kept clear of
debris.
u Do not use the lawn trimmer (edge trimmer), if the cords
are damaged or worn.
u Keep extension cords away from cutting elements.
Labels on appliance
The following warning symbols are found on the appliance:
+
Read the manual prior to operation.
F
Wear safety glasses or goggles when operating this
appliance.
8
Keep people and animals at least 6 m away from the
cutting area.
R
Do not expose the appliance to rain or high humidity.
Electrical safety
#
This appliance is double insulated; therefore no earth
wire is required. Always check that the power supply
corresponds to the voltage on the rating plate.
u If the supply cord is damaged, it must be replaced by the
manufacturer or an authorised Black & Decker Service
Centre in order to avoid a hazard.
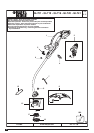
Features
This appliance includes some or all of the following features.
1. On/off switch
2. Handle
3. Cable restraint
4. Power inlet
5. Secondary handle
6. Adjustment button
7. Tube
8. Guard
9. Line trimming blade
10. Spool housing
11. Cutting line
12. Edge guide
Assembly
Warning! Before assembly, make sure that the appliance is
switched off and unplugged.
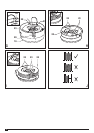
Fitting the guard (g. A)
u Remove the hexagonal screws (13) from the head (14).
u Place the guard (8) onto the appliance as shown.
u Firmly press the guard until it snaps into place.
u Secure the guard with the hexagonal screws.
u Tighten the hexagonal screws using the hexagonal key
(15) provided.
Warning! Never use the appliance unless the guard is
properly tted.
Releasing the cutting line
In transit, the cutting line is taped to the spool housing.
u Remove the tape holding the cutting line (11) to the spool
housing (10).
Connecting the appliance to the mains
u Connect the female plug of a suitable extension cable to
the power inlet (4).
u Loop the cable through the cable restraint (3).
u Insert the mains plug into a mains outlet.
Warning! The extension cable must be suitable for outdoor use.
Use
Warning! Let the tool work at its own pace. Do not overload.
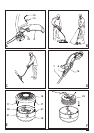
Setting the appliance to trimming or edging mode
(g. B - D)
The appliance can be used in trimming mode as shown in
g. B or in edging mode to trim overhanging grass along lawn
edges and ower beds as shown in g. C.
Trimming mode (g. B & D)
For trimming, the trimmer head should be in the position
shown in g. B. If it is not:
u Depress the adjustment button (6).
u Rotate the tube (7), while releasing the button.
u When the head is in position, the button will lock into place.
Note: The tube will only rotate in one direction.