


7
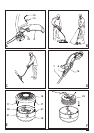
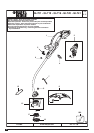
Edging mode (g. C & D)
For edging, the trimmer head should be in the position shown
in g. C. If it is not:
u Depress the adjustment button (6).
u Rotate the tube (7), while releasing the button.
u When the head is in position, the button will lock into place.
Note: The tube will only rotate in one direction.
Adjusting the height of the appliance (g. D)
This appliance has a telescopic mechanism, allowing you to
set it to a comfortable height. There are three height settings.
To adjust the height setting, proceed as follows:
u Depress the adjustment button (6).
u Gently pull the tube (7) out of the motor housing (16) to
the desired height, while releasing the button.
u When the tube is in position, the button will lock into place.
Switching on and off
u To switch the appliance on, squeeze the trigger lever (1).
u To switch the appliance off, release the trigger lever.
Warning! Never attempt to lock the trigger lever in the on
position.
Hints for optimum use
General
u In order to achieve optimum cutting results, only cut dry
grass.
Trimming
u Hold the appliance as shown in g. B.
u Gently swing the trimmer from side to side.
u When cutting long grass, work in stages from the top.
Take small cuts.
u Keep the appliance away from hard objects and delicate
plants.
u If the appliance starts running slowly, reduce the load.
Edging
Optimum cutting results are achieved on edges deeper than
50 mm.
u Do not use the appliance to create edges.
To create edges, use an edging spade.
u Guide the appliance as shown in g. C.
u To make a closer cut, slightly tilt the appliance.
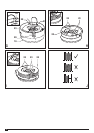
Fitting a new spool of cutting line (g. E & G)
Replacement spools of cutting line are available from your
Black & Decker dealer (cat. no. A6495).
u Keep the tabs (17) depressed and remove the spool cover
(18) from the housing (10).
u Remove the empty spool (19) from the spool housing.
u Remove any dirt and grass from the spool cover and
housing.
u Place the new spool onto the boss in the spool housing
with the lines parked in the slots (23) (g. F).
u Insert the line ends through the appropriate eyelets (20) in
the housing (10). Pull the slack line until it pulls out of the
parked slots (23) (g. G).
u Align the tabs (17) on the spool cover with the cut outs (21)
in the housing.
u Push the cover (18) onto the housing (10) until it snaps
securely into place.
Note: Make sure that the cover is positioned, listen for two
audible clicks to ensure both tabs (17) are correctly located.
Warning! If the cutting lines protrude beyond the trimming
blade (9), cut them off so that they just reach the blade.
Winding new line onto an empty spool (g. H - J)
You may wind new cutting line onto an empty spool.
Replacement packs of cutting line are available from your
Black & Decker dealer (cat. no. A6171).
u Remove the empty spool from the appliance as described
above.
u Remove any remaining cutting line from the spool.
u First wind new line onto the uppermost part of the spool:
- Feed 2 cm of cutting line into one of the slots in the
upper section of the spool as shown.
- Wind the cutting line onto the spool in the direction of
the arrow. Make sure to wind the line on neatly and in
layers. Do not criss-cross.
- When the wound cutting line reaches the recesses (22),
cut the line.
- Temporarily park the line in the slots (23) on one side of
the spool as shown.
u Repeat the above procedure for the second cutting line on
the lower section of the spool. Park the line in the unused
slots (23).
u Proceed as described above to t the spool on the
appliance. Do not forget to release the cutting line from
the parking slots (23).
Warning! Only use the appropriate type of Black & Decker
cutting line. Ensure that cutting line is present in both sections
of the spool.
Mains plug replacement (U.K. & Ireland only)
If a new mains plug needs to be tted:
u Safely dispose of the old plug.
u Connect the brown lead to the live terminal in the new plug.
u Connect the blue lead to the neutral terminal.
Warning! No connection is to be made to the earth terminal.
Follow the tting instructions supplied with good quality plugs.
Recommended fuse: 5 A.