


9
A
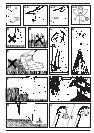
Do not use your trimmer without
its guard.
B
Do not cut wet grass; best results are
achieved when the grass is dry.
Trimming
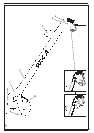
• To switch on your trimmer, squeeze the
trigger switch (3).
• To switch the unit off, release the
trigger switch.
• To carry the trimmer when not in use,
it is preferred that you use the secondary
handle (2).
C
Cut at an angle and with the tip of the
cutting line (9).
D
Swing the trimmer gently from side to side.
E
Do not overload the trimmer. It operates best
at high speeds.
F
On long grass, start at the top and take
small cuts.
G
Use the edge of the guard (10) to keep the
trimmer away from hard surfaces and
delicate items.
Edging (GL540)
H
Best results are achieved on edges greater
than 50mm deep.
Note: Your trimmer is a maintenance tool for
trimming overhanging grass and should not
be used to create edges. Edges can be
created using an edging spade.
J
If your trimmer is for use with a ‘detachable’
cord, loop a length of cord through the cord
restraint (5) to avoid the plug and socket
coming apart accidentally, if the cord is pulled.
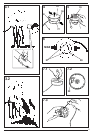
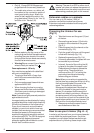
How to convert between the
trimming and edging mode (Fig. 3)
In addition to conventional trimming, your
trimmer can be used to trim overhanging
grass along lawn edges and flower beds.
3
To convert your trimmer between the
trimming and edging mode:
• With the trimmer switched off, place one
hand on the switch handle (4) and the
other on the trimmer body (1). Press the
button (7) on the front of the trimmer
body. Keeping the button depressed,
rotate the trimmer body anti-clockwise
and then release the button. Continue to
rotate the trimmer body until it locks into
position (Fig. 3.1).
• The most effective way to use your
trimmer in edging mode is to stand by
the side of it (Fig. 3.2). Guide the front
edge of the trimmer (14) along the lawn
so that the cutting line just trims the
grass overhanging the lawn edge (Fig. H).
Replacement line
A new spool containing 10 metres of nylon line may
be purchased from your Black & Decker dealer.
Alternatively, replacement packs containing 25 to
50 metres of line are available.
For maximum reliability never put on a heavier or
lighter line (eg. fishing line) which will prevent the
automatic feed from functioning, cause motor failure
or reduce cutting performance.
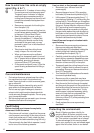
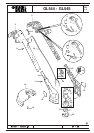
How to fit a new spool of cutting line
(Fig. 4 & 5)
• Disconnect your trimmer from the
power supply.
4
• Remove the spool cover by pushing the
2 spool cover tabs (16) inwards and
upwards (Fig. 4), then pull off (it is not
necessary to push both tabs in at the
same time). The empty spool can now
be withdrawn from the drive shaft.
• Remove any dirt or grass that may have
collected inside the spool housing and
cover.
• Unwind approximately 9cm (3.5") of
cutting line (9) from the new spool (19)
and temporarily park the cutting line end
in one of the ‘L’ shaped slots to prevent
the line unravelling.
5
• Feed the cutting line through the eyelet
and then push the spool onto the centre
drive shaft while pulling the free end of
the line to release it from the ‘L’ shaped
slot. To fully seat the spool, rotate as
necessary, taking care not to trap the
cutting line underneath the spool and
making sure that there is a minimum of
9cm (3.5") protruding from the
spool housing.
• Replace the spool cover by aligning
both tabs on it (16) with the slots in the
spool housing and pushing them into
place. Make sure that both tabs are
securely located.
ENGLISH