


TROUBLESHOOTING
SERVICE INFORMATION
FULL TWO-YEAR HOME USE WARRANTY
MAINTENANCE
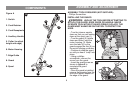
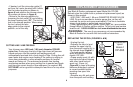
• Align the tabs on the spool cap with the cut outs in the housing.
• Push the spool cap onto the housing until it snaps securely into
place.
• If the cutting line protrudes beyond the trimming blade, cut it off
so that it just reaches the blade. If the automatic line feed still
does not work or the spool is jammed, try the following
suggestions:
• Carefully clean the spool and housing.
• Remove the spool and check if the lever in the spool housing
can move freely.
• Remove the spool and unwind the cutting line, then wind it on
neatly again. Replace the spool into the housing.
All Black & Decker Service Centers are staffed with trained
personnel to provide customers with efficient and reliable power tool
service. Whether you need technical advice, repair, or genuine
factory replacement parts, contact the Black & Decker location
nearest you. To find your local service location, refer to the yellow
page directory under "Tools—Electric" or call: 1-800-544-6986 or
visit www.blackanddecker.com
Black & Decker (U.S.) Inc. warrants this product for two years
against any defects in material or workmanship. The defective
product will be replaced or repaired at no charge in either of two
ways.
The first is to return the product to the retailer from whom it was
purchased (provided that the store is a participating retailer).
Returns should be made within the time period of the retailerʼs
policy for exchanges (usually 30 to 90 days
after the sale). Proof of purchase may be required. Please check
with the retailer for their specific return policy regarding returns that
are beyond the time set for exchanges.
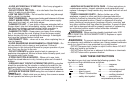
WARNING: To avoid serious injury, switch off and unplug the
tool before performing any maintenance.
1. Keep the air intake slots clean to avoid overheating.
2. Your trimmer line can dry out over time. To keep your line in top
condition, store spare pre-wound spools or bulk line in a plastic,
sealable bag with a tablespoon of water.
3. Plastic parts may be cleaned by using a mild soap and a damp rag.
4. The line cutter on the edge of the guard can dull over time. It is
recommended you periodically touch-up the sharpness of the
blade with a file.
IMPORTANT: To assure product SAFETY and RELIABILITY,
repairs, maintenance and adjustment should be performed by
authorized service centers or other qualified service organizations,
always using identical replacement parts.
TOOL RUNS SLOWLY
• Check that the spool housing can rotate freely. Carefully clean it if
necessary.
• Check that the cutting line does not protrude more than
approximately 5-3/8 inches (136mm) from the spool. If it does, cut
it off so that it just reaches the line trimming blade.
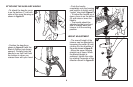
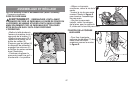
AUTOMATIC LINE FEED DOES NOT WORK
• Keep the tabs depressed and remove the spool from the spool
housing in the trimmer head.
• Pull the cutting line until it protrudes approximately 5-3/8 inches
(136mm) from the spool. If insufficient cutting line is left on the
spool, install a new spool of cutting line.
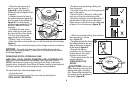
• Ensure that the line is not crisscrossed on the spool as detailed
in figure N. If it is, unwind the cutting line, then wind it back on the
spool neatly so that the lines do not cross.
10