9
greater the capacity of the cable; that is, 16 gauge has more
capacity than 18 gauge. When using more than one extension to
make up the total length, be sure each extension contains at
least the minimum wire size.
CHART FOR MINIMUM WIRE SIZE (AWG)OF EXTENSION
CORDS
NAMEPLATE RATING AMPS – 0 – 10.0
Total Extension Cord Length (ft) 25 50 75 100 125
Wire Gauge 18 18 16 16 14
9. Use only the supplied charger when charging. The use of any
other charger could damage the battery or create a hazardous
condition.
10. Use only one charger when charging.
11. Do not attempt to open the charger. There are no customer
serviceable parts inside. Return to any authorized Black &
Decker service center.
12. DO NOT incinerate the battery pack even if they are severely
damaged or completely worn out. The batteries can explode in a
fire.
13. A small leakage of liquid from the battery pack cells may occur
under extreme usage, charging or temperature conditions. This
does not indicate a failure. However, if the outer seal is broken
and this leakage gets on your skin:
a. Wash quickly with soap and water.
b. Neutralize with a mild acid such as lemon juice or vinegar.
c. If the battery liquid gets in your eyes, flush them with clean water
for a minimum of 10 minutes and seek immediate medical
attention. MEDICAL NOTE: The liquid is a 25-35% solution of
potassium hydroxide.
Charging the Battery Pack
THE BATTERY PACK IS NOT FULLY CHARGED AT THE
FACTORY. BEFORE ATTEMPTING TO CHARGE THE BATTERY
PACK, THOROUGHLY READ ALL OF THE SAFETY
INSTRUCTIONS.
The charger is designed to use standard household 120 volt 60 Hz
power.
1. Plug the charger (9) into any standard 120 Volt 60 Hz electrical
outlet. NOTE: Do not charge by means of an engine
generator or DC power source. Use only 120V AC.
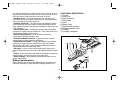
2. Slide the charger receptacle (10) onto the battery pack (6) as
shown in figure B and let the battery pack charge initially for 9
hours. After the initial charge, under normal usage, your battery
pack should be fully charged in 3 to 9 hours.
3. Unplug charger, and remove the battery pack. Place the
battery pack in the tool (figure C) and be certain that it is
inserted fully into the tool cavity until it “clicks” into place.
NOTE: Remove the battery pack by pressing down on the
release button on the back of the battery pack (figure D) and
slide out.
Important Charging Notes
1. After normal usage, your battery pack should be fully charged in
3 to 9 hours. If the battery pack is run-down completely, it may
take up to 9 hours to become fully charged. Your battery pack
was sent from the factory in an uncharged condition. Before
attempting to use it, it must be charged for at least 9 hours.
2. DO NOT charge the battery pack in an air temperature below
40°F (4,5 °C) or above 105°F (40,5 °C) This is important and will
prevent serious damage to the battery pack. Longest life and
best performance can be obtained if battery pack is charged
when air temperature is about 75°F (24°C).
3. While charging, the charger may hum and become warm to
touch. This is a normal condition and does not indicate a
problem.
4. If the battery pack does not charge properly—(1) Check current
at receptacle by plugging in a lamp or other appliance. (2)
Check to see if receptacle is connected to a light switch which
turns power off when you turn out the lights. (3) Move charger
and battery pack to a surrounding air temperature of 40°F (4,5
°C) to 105°F (40,5 °C) (4) If the receptacle and temperature are
90520380 Lopper w batt revised 8/27/07 10:57 AM Page 9


