• KEEP GUARDS IN PLACE AND IN WORKING ORDER.
• KEEP HANDS AND FEET AWAY FROM CUTTING AREA.
• DO NOT CHARGE APPLIANCE IN RAIN OR IN WET LOCATIONS.
SAVE THESE INSTRUCTIONS
ADDITIONAL IMPORTANT SAFETY INSTRUCTIONS
• WARNING: When using electric tools, basic safety precautions should always be followed to reduce risk
of fire, electric shock, and personal injury, including the following:
• Do not incinerate the battery even if it is severely damaged or is completely worn out. The battery can
explode in a fire. Check with local codes for possible special disposal instructions.
• If any leakage of liquid from the battery cells occurs, discontinue use immediately and return the battery to
your local Black & Decker Service Center or authorized service facility.
• Never attempt to open the battery for any reason. If the plastic housing of the battery breaks or cracks,
immediately discontinue use and do not recharge.
• Do not charge appliance in rain or in wet locations.
• Use only the following type and size battery: Black & Decker 243215 - 12V.
• Do not open or mutilate the battery. Released electrolyte is corrosive and may cause damage to the eyes or
skin. It may be toxic if swallowed.
• Exercise care in handling batteries in order not to short the battery with conducting materials such as rings,
bracelets and keys. The battery or conductor may overheat and cause burns.
• If the battery case cracks due to a fall or other impact and the electrolyte gel leaks out, wipe it up with a
cloth, neutralize the acid with any alkaline substance such as ammonia solution of baking soda. If the
electrolyte gets on your skin, immediately flush with water and consult a doctor.
• Do not use battery for anything other than with this product or other designated Black & Decker product.
CHARGING YOUR BATTERY
NOTE: READ BEFORE CHARGING YOUR BATTERY
• The lead acid battery for your trimmer is only partially charged at the factory. Before using your trimmer, the
battery must be charged. This may take up to 12 hours.
• LED Indicator Light
The power plug to your charger bracket is equipped with one LED indicator light. The red light comes on
when the plug is inserted into the electrical outlet to indicate that the trimmer battery is charging. (The LED
will not light up if the battery is not attached to the charger.) The indicator light will glow indicating that
charging is taking place and will remain on as long as the charger is plugged into the battery. The
charger will switch into its maintenance charge mode (trickle charge) to keep the battery fresh indefinitely.
Always keep your charger plugged in during the growing season.
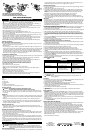
A. CHARGING ON CHARGER BRACKET
• Install the trimmer onto the charger bracket by positioning the battery handle cavity, over the hook (A) shown
in Fig. 6 of the charger bracket.
• Rotate the trimmer down, keeping the hook engaged with the battery handle cavity, and position the
battery cavity over the rib (B) of the charger bracket, as shown in Figure 6.
• Plug the charger cord into any standard 120 volt, 60 Hz outlet. Charging will begin immediately and
continue at a slow trickle rate until you remove the trimmer from the bracket.
• Note you may also hang the battery only for charging as shown in Figure 6A.
B. CHARGING THE BATTERY PACK REMOTE FROM THE HANGING BRACKET
• Remove charger from outlet.
• Remove the trimmer from the charger bracket.
• See Figure 7 and remove the plug support from the charger bracket.
NOTE: The rest of the unit less the battery, can be stored on the charger bracket while the battery is
charging.
• Remove the Battery Pack from the trimmer. See Figure 4 and Figure 5.
• Plug the plug support into the Battery Pack. See Figure 8.
• Now you can sit the battery on a level surface for charging.
• Plug the charger cord into any standard 120 Volt, 60 Hz outlet. Charging will begin immediately and
continue at a slow trickle rate until you remove the charger from the outlet.
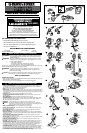
ASSEMBLY INSTRUCTIONS
Before assembling your Cordless String Trimmer, check that you have received the following in the shipping
carton.
See Figure 1.
A. Battery Pack.
B. Trimmer/Edger.
C. Guard.
D. Charger and Charger Bracket.
E. Hardware Bag with (2) screws and (2) plastic anchors.
ATTACHING THE GUARD
• WARNING: NEVER OPERATE TOOL WITHOUT GUARD FIRMLY IN PLACE.
THE GUARD MUST ALWAYS BE ON THE TOOL TO PROTECT THE USER.
• Assemble the guard as shown in Figure 2, over the lug on the motor housing, then slide guard forward to
lock on the lug. Then with a phillips screw driver, screw the three preassembled screws in the guard into the
motor housing.
BATTERY PACK
NOTE: The lead-acid battery in your trimmer is quite heavy. In order to avoid dropping it and causing damage
or personal injury, lay the trimmer down on a workbench or other rigid frame before assembling the battery
to the unit.
• The battery can be assembled to the unit by lining up the molded in arrow on the battery housings see
Figure 3, with the pictorial of an unlocked lock that is on the mating part. Push the two together at this point
and slide the battery assembly down so the arrow lines up with the locked lock pictorial molded into the
mating part. The battery will self lock into place.
REMOVING THE BATTERY PACK
• Depress the two buttons, as shown in Figure 4. Keeping the buttons depressed, slide the battery pack up
until the arrow on the housings line up with the unlocked lock arrow on the mating part see Figure 5. Now the
battery is free to be removed.
MOUNTING THE CHARGER AND CHARGER BRACKET
• Remove the two screws and two plastic anchors from the plastic hardware bag.
• Use the charger bracket and mark the locations of the holes required. Be sure the charger bracket is mounted
high enough, see Figure 6 so that the trimmer can hang freely with the guard off the floor and the location is
close to an outlet for charging the trimmer.
• Drill a 1/4” (6mm) diameter hole at each marked location.
• Insert the plastic anchors into the holes and insert one of the screws in each one. Tighten the screws until the
heads are above the anchors just enough so that the charger bracket will fit between the anchor and the screw
head.
• Place the charger bracket on the wall (narrow end up) and make sure that the power cord is positioned in the
bottom recess. Press the charger bracket over the screw heads and slide it down until it sits firmly on the screws.
• Firmly tighten both screws.
OPERATING INSTRUCTIONS
•
CAUTION: ALWAYS WEAR EYE PROTECTION.
• CAUTION: Inspect area to be trimmed and remove any wire, cord, or string-like objects which could
become entangled in the rotating line or spool. Be particularly careful to avoid any wire which
might be bent outwardly into the path of the tool, such as barbs at the base of a chain link fence.
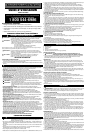
AUXILIARY HANDLE ADJUSTMENT
• For maximum comfort and control, adjust the auxiliary handle to suit your height. Shorter users adjust handle
15
16
17
to a lower position (away from you) and taller users, adjust handle to an upper position (towards you). The
handle should be adjusted so that your front arm is straight as shown in Figure 10.
OPERATE THE TRIMMER/EDGER
• To turn trimmer on, push the lock out button, shown in Figure 9, forward and, then squeeze the trigger. To turn the
tool off, release the trigger.
• Slowly swing trimmer side-to-side as shown in Figure 10.
• To convert for maintenance edging, turn off the tool. (See Figure 11) Holding the trimmer with one hand by the
auxiliary handle, grasp the collar and push in direction of arrow and rotate the trimmer head until it stops, (half
turn), release your hand, (rotate clockwise when viewed from the switch end). The tool is locked in the edger
position.
Rotate the wire edge guide forward and down into place before edging, as shown in Figure 12.
• To operate as a maintenance edger, position trimmer above sidewalk as shown in Figure 13.
• Return to trimming position by turning the tool off, push in direction of arrow and rotating the trimmer head
counter clockwise until it stops. When using the tool in the trimmer mode you may choose to fold the wire edge
guide up out of the way.
LINE FEEDING
Your trimmer uses .065” (1.65mm) diameter nylon line to cut grass and weeds quickly and easily. In time, the tip of
the nylon line will become worn and the auto feed mechanism will automatically feed and trim a fresh length of line.
The cutting line will wear faster if the cutting is done along sidewalks or other abrasive surfaces or heavier weeds
are being cut. The automatic feed mechanism senses when more cutting line is needed and feeds and trims the
correct length of line whenever it is required. You don’t even have to think about it. Do not bump unit on ground in
attempt to feed line or for any other purpose.
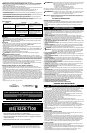
REPLACING SPOOL/CLEARING JAMS AND TANGLED LINES
From time to time, especially when cutting thick or stalky weeds, the line feeding hub may become clogged with sap
or other material and the line will become jammed as a result. To clear the jam, follow the steps listed below.
• Turn off the trimmer and remove the battery.
• Press the release tabs on the line spool cover, as shown in Figure 14 and remove the cover by pulling it straight off.
• Lift the spool of nylon line out of the hub and clear any broken line or cutting debris from the spool area.
• In case of jams and tangled line unwrap about one foot (30cm) of line to ensure that it is undamaged. If it is OK
rewind it and insert the line end through the eyelet in the spool hub, as shown in Figure 15. Pull the line through the
hole to maintain tension while placing the spool down into the hub with the notched side exposed, as shown in
Figure 16.
• Press the spool down GENTLY and rotate it until you feel it drop into place. (When in place, the spool will turn a
few degrees left and right freely.)
• Snap the hub cover back on, insert the battery and turn the tool on. In a few seconds or less you’ll hear the nylon
line being cut automatically to the proper length.
REWINDING SPOOL FROM BULK LINE (USE ONLY .065” DIAMETER LINE)
Bulk line for your trimmer/edger is available at extra cost from your local dealer or Black & Decker Service Center.
To install bulk line, follow the steps below.
• Turn off the trimmer and remove the battery.
• Press the release tabs on the line spool cover, as shown in Figure 14 and remove the cover by pulling it straight off.
• Remove the spool from the tool and remove and discard all line on the spool.
• Insert one end of the bulk line into the hole in the spool shown in Figure 17 about 1/2” (12mm).
• Hold the line in the hole and pull the rest of the line through the slot in the spool, shown in Figure 17.
• Snugly and evenly wind the bulk line onto the spool in the direction of the arrow on spool in Figure 17 until it is
nearly full.
• Insert the line end through the eyelet in the spool hub, as shown in Figure 15. Pull the line through the hole to
maintain tension while placing the spool down into the hub with the notched side exposed, as shown in Figure 16.
• Press the spool down GENTLY and rotate it until you feel it drop into place. (When in place, the spool will turn a
few degrees left and right freely.)
• Snap the hub cover back on, insert the battery and turn the tool on. In a few seconds or less you’ll hear the nylon
line being cut automatically to the proper length.
TROUBLE SHOOTING GUIDE
Problem Possible Cause Solution
MAINTENANCE
CLEANING
• Use only mild soap and damp cloth to clean the tool. Never let any liquid get inside the tool; never immerse any
part of the tool into a liquid.
•
WARNING: Remove or disconnect battery before servicing, cleaning or removing material from the
gardening appliance.
Accessories
• Recommended accessories for use with your tool are available from your local dealer or authorized service center.
If you need assistance regarding accessories, please call: 1-800-54-HOW-TO.
• Use Black & Decker replacement spool No. AF-100.
• Reload nylon line (either bulk or prewrapped replacement spool) as shown in this manual.
• USE ONLY .065" (1.65mm) DIAMETER NYLON MONOFILAMENT LINE.
Heavier line will overload the motor, cause overheating and will impair the automatic feed. This line is available at
your local dealer or authorized service center.
• Do not use fishing line or other lines that are not recommended.
•
WARNING: The use of any accessory not recommended for use with this tool could be hazardous.
Service Information
IMPORTANT: To assure product SAFETY and RELIABILITY, repairs, maintenance and adjustment should be
performed by Black & Decker service centers or other qualified service organizations, always using identical
replacement parts. Black & Decker offers a full network of company-owned and authorized service locations
throughout North America. All Black & Decker Service Centers are staffed with trained personnel to provide
customers with efficient and reliable power tool service.
Whether you need technical advice, repair, or genuine factory replacement parts, contact the Black & Decker
location nearest you.
To find your local service location, refer to the yellow page directory under “Tools—Electric”
or call: 1-800-54-HOW-TO.
Full Two-Year Home Use Warranty
Black & Decker (U.S.) Inc. warrants this product for two years against any defects in material or workmanship. The
defective product will be replaced or repaired at no charge in either of two ways:
The first, which will result in exchanges only, is to return the product to the retailer from whom it was purchased
(provided that the store is a participating retailer). Returns should be made within the time period of the retailer’s
policy for exchanges (usually 30 to 90 days after the sale). Proof of purchase may be required. Please check with
the retailer for their specific return policy regarding returns that are beyond the time set for exchanges.
The second option is to take or send the product (prepaid) to a Black & Decker owned or authorized service center
for repair or replacement at our option. Proof of purchase may be required. Black & Decker owned and authorized
service centers are listed under “Tools-Electric” in the yellow pages of the phone directory.
This warranty does not apply to accessories. This warranty gives you specific legal rights and you may have other
rights which vary from state to state. Should you have any questions, contact the manager of your nearest
Black & Decker Service Center.
This tool is not intended for commercial use.
See ‘Tools-Electric’
– Yellow Pages –
for Service & Sales
Imported by
Black & Decker (U.S.) Inc.,
701 E. Joppa Rd.
Towson, MD 21286 U.S.A.
1. Unit won’t run.
2. Line won’t feed.
3. Line fails to cut off.
A. Battery not charged.
B. Battery not properly attached.
A. Line tangled in spool.
A. Line cutter in guard is
damaged or missing.
B. Line extends past guard.
A. Charge for at least 12 hours.
B. Remove and reattach
battery/handle.
A. Unwrap 24” of line and rewind.
A. Return to service center for
replacement/repair.
B. Rewind or trim line to line
cutter.