


Part No. 890379 Form No. F081398A
Page 8 of 8
Before Requesting Service Review These Suggestions
20
Engine Service and Warranty
Contact your nearest engine manufacturer's autho-
rized servicing dealer.
22.1
22
BILLY GOAT INDUSTRIES INC.
P.O. BOX 308 (1803 S JEFFERSON) LEE'S SUMMIT, MO 64063 / USA
PHONE: 816-524-9666 FAX: 816-524-6983
WARRANTY PROCEDURE
Please fill in the WARRANTY CARD and send the upper part to Billy Goat.
The WARRANTY terms are stated on the lower part which remains with the
user. Whenever a Billy Goat Machine is faulty due to a defect in material
and / or workmanship, the owner should make a warranty claim as follows:
The Machine should be taken to the dealer from whom it was
purchased or to an authorized Billy Goat dealer.
The owner should present the remaining half of the Warranty
Registration Card, or, if this is not available, the invoice or receipt.
The Warranty Claim will be filled in by the authorized Billy Goat Dealer,
who will send it with the faulty part to Billy Goat headquarters.
The Quality / Service department at Billy Goat headquarters will study
the claim and parts and will notify their conclusions.
The decision by the Quality / Service department at Billy Goat
headquarters to approve or reject a Warranty claim is final and
binding.
Note: To process a Warranty Claim, it is necessary to quote the Model
& Serial number who are printed on the Billy Goat Serial Plate.
Purchased
from
Purchase
Date
21
Serial Plate
Record your machine model, serial number
and date-of-purchase and where purchased
min
-1
Operator
1803 S. Jefferson
P.O. Box 308
Lee's Summit,
MO 64063 / USA
Tel (816) 524-9666
Fax (816) 524-6983
Model Serial No.
Unit(Weight) Engine Power
lbs. kg kW rpm
TROUBLESHOOTING
Problem Possible Cause Solution
Will not vacuum or has poor vacuum performance. · Dirty or full debris bag or filter. · Clean debris bag and filter. Shake bag clean or
wash.
· Nozzle height set too high or too low . · Adjust nozzle height.
· Hose kit cap missing. · Check for hose kit cap.
· Clogged nozzle or exhaust. · Unclog nozzle or exhaust (see page 5)
· Excessive quantity of debris. · Allow air to feed w ith debris.
Abnormal vibration. · Loose or out of balance impeller. · Check impeller and replace if required.
· Loose engine. · Check Engine.
Engine will not start. · Throttle in off position. · Check throttle
· Engine not in full choke position. · Check throttle, choke position
· Out of gasoline or bad or old gasoline. · Check throttle, choke position and gasoline.
· Spark Plug wire disconnected. · Connect spark plug wire.
· Gas Valve off. · Turn on gas valve.
· Dirty air cleaner. · Clean or replace air cleaner. Contact a qualified
service person.
· Safety Interlock disengaged on bag plate. · Bag not fully engaged or Rod in bag is bent.
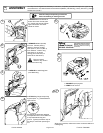
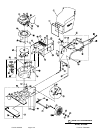
MAINTENANCE
IMPELLER REMOVAL
1. Wait for engine to cool and disconnect spark plug.
2. Drain fuel and oil from the engine.
3. Remove engine, impeller and mounting plate by removing nuts
(item 26) around outside of housing.
4. Leaving engine fastened to plate, remove impeller bolt (item 50)
and lock washer and slide impeller off crankshaft ( A puller may be
required).
CAUTION: Do not drop impeller.
5. If impeller does not slide off crankshaft, place two crowbars
between impeller and housing on opposite sides. Pry impeller away
from engine until it loosens. Using a penetrating oil can help loosen a
stuck impeller.
6. If the impeller cannot be loosened, obtain a 1” (25.4mm) longer
bolt of the same diameter and thread type as the impeller bolt.
Invert engine and impeller and support engine above ground to
prevent recoil damage. Thread longer bolt by hand into the
crankshaft until bolt bottoms. Using a suitable gear or wheel puller
against the bolt head and the impeller back-plate (near the blades),
remove impeller from shaft.
7. To reinstall impeller, use a new impeller bolt and lockwasher
8. Tighten impeller bolt. Torque impeller bolt to 50 Ft. Lbs. (68 N
.
m).
9. Reinstall engine, impeller, and mounting plate onto housing in
reverse order of removal.
10. Before connecting spark plug wire, slowly pull engine starting
rope to insure that impeller rotates freely.
11. Reinstall spark plug wire.
Use only a qualified mechanic for any
adjustments, disassembly or any kind
of repair .
DISCONNECT SPARK PLUG WIRE
BEFORE SERVICING UNIT.
WARNING: TO AVOID PERSONAL INJURY, ALWAYS TURN
MACHINE OFF, MAKE SURE ALL MOVING PARTS COME
TO A COMPLETE STOP.
RECONNECT SPARK PLUG WIRE,
GUARDS, BAG, CAPS AND / OR
HOSE BEFORE STARTING ENGINE.
ENGINE: See engine manufacturer
operator's instructions.
17.1
17
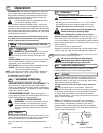
Engine (See Engine Manual)
Check for excessive vibration
Clean Debris Bag
Inspect for loose parts
Maintenance Operation
Follow these hourly
maintenance intervals.
Maintenance Schedule
Inspect for worn or damaged parts
Every 5 hrs
or (Daily)
Every
Use
17.2
For damaged or imbalanced
impeller
88
L
A
L
A
p
96