


Part No. 430149 Form No. F121903A
Page 13 of 16
MAINTENANCE
Use only a qualified mechanic for
any adjustments, disassembly or
any kind of repair .
DISCONNECT SPARK PLUG WIRE
BEFORE SERVICING UNIT.
WARNING: TO AVOID PERSONAL INJURY, ALWAYS
TURN MACHINE OFF, MAKE SURE ALL MOVING
PARTS COME TO A COMPLETE STOP.
ENGINE: See engine manufacturer
operator's instructions.
17.1
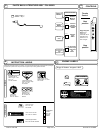
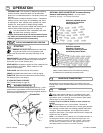
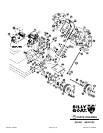
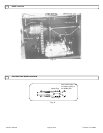
IMPELLER REMOVAL
17
17.1
17. 2
17.1
IMPELLER REMOVAL continued
12. (Self propelled models only) When impeller is installed,
slide belt into drive pulley.
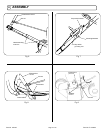
13. Reattach front intake plate and front wheel bracket
in reverse order of removal.
14. (Self propelled models only) Check operator's bail to
ensure that it operates properly. If not, see drive adjust
ments on page 14). Note: Drive must completely disengage
with bail released and must engage when bail is depressed
within 1.0" (25.4mm) of the operator's handle.
15. (Self propelled models only) Reinstall clutch guard.
16. Reconnect spark plug wire.
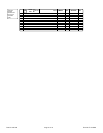
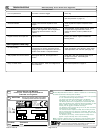
Follow these hourly
maintenance intervals.
Maintenance Schedule
More frequent service is required for extremely dusty conditions.
Maintenance Operation
Every
Use
Every 50
hours
Every 25
hours
Every 5 hrs
or (Daily)
Check for excessive vibration
Date of Service Service Performed
Maintenance History
RECONNECT SPARK PLUG WIRE AND
GUARDS BEFORE STARTING ENGINE.
Grease wheel zerks
Inspect for damaged parts
Inspect for loose parts
Lubricate Drive Chain
Oil control pivot points
Check tire pressure (p. 14)
1. Disconnect spark plug wires.
2. Elevate front of machine using stable support blocks
between housing and ground so that front wheel
is not touching ground.
3. Remove front wheel bracket and front intake plate from the
housing.
4. (Self propelled models only) Remove the clutch guard
from the left side of the unit between housing and engine.
5. Remove impeller bolt and lock washer.
6. (Self propelled models only) Slide belt toward engine, out
of belt groove in impeller hub drive pulley.
7. If impeller slides off freely, proceed to (step 12).(Note: Do not
pull or pry on impeller blades.)(Do not drop impeller).
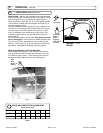
8. If impeller does not slide off crankshaft, place two crowbars
between impeller and housing on opposite sides. Pry impeller
away from engine until it loosens. Using a penetrating oil can
help loosen a stuck impeller.
9. If the impeller cannot be loosened, obtain a 1” (25.4mm) longer
bolt of the same diameter and thread type as the impeller bolt.
Invert engine and impeller and support engine above ground to
prevent recoil damage. Thread longer bolt by hand into the
crankshaft until bolt bottoms. Using a suitable gear or wheel
puller against the bolt head and the impeller back-plate (near the
blades), remove impeller from shaft.
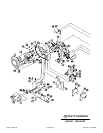
10. Slide impeller off of crank shaft and remove impeller from
housing.
11. Reinstall new impeller and all applicable spacers, new
impeller bolt and lockwasher in reverse order of removal.
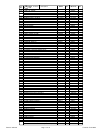
(See the parts drawing on pages 8 and 9 for parts break-
down and parts list on page 10 for proper impeller bolt
torque specifications.)
Engine (See Engine Manual)
Check belt adjustment (p. 14)