


Part No. 350245 Form No. F011003A
Page 5 of 12
ENGINE: See engine manufacturer’s instructions
for type and amount of oil and gasoline used.
Engine must be level when checking and filling oil and
gasoline.
ENGINE SPEED: Controlled by throttle lever on the engine.
Under normal conditions, operate at full throttle to accom-
plish your task.
FUEL VALVE: Move fuel valve to "ON" position (Honda
only).
CHOKE: Operated with lever on the engine.
THROTTLE: Move throttle control on engine to fast position.
Pull starting rope to start engine.
IF YOUR UNIT FAILS TO START:
See Troubleshooting on page 12.
INTENDED USE: This machine is designed for removing
thatch from your lawn, renovation of existing lawns, and to
assist in overseeding operations. The machine should not
be used for any other purpose than that stated above.
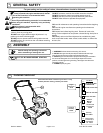
Inspect machine work area and machine before operat-
ing. Make sure that all operators of this equipment are
trained in general machine use and safety.
Do not operate if excessive vibration occurs. If excessive
vibration occurs, shut engine off immediately and check for
damaged or worn reel, loose pulley bolts or set screws, loose
engine or lodged foreign objects. (See trouble shooting
section on page 12).
16
Operation
STARTING ENGINE
RAKING OPERATION
Like all mechanical tools, reasonable care must
be used when operating machine.
MOW: Mow the lawn to it's normal cut height
DRY: Be sure grass is dry. Wet conditions can cause in-
creased damage to healthy grass.
SET DEPTH: With engine off, set the raking depth so that the
blades just touch on a flat surface (i.e. driveway, or sidewalk).
START ENGINE: See above.
ENGAGE BLADES: Pull back on the bail on the operators
handle. NOTE: When engaging the blades in heavy load
conditions (i.e. heavy thatch, or very uneven turf), push down
on the operators handle lifting the front wheels slightly.
Engage the blades. Slowly lower the unit into the turf.
RAKE: Rake a small test area and examine the results.
Thatch should be removed and deposited on top of the healthy
grass. If excessive damage occurs to healty grass, adjust the
blade depth to decrease damage. Continue raking the yard,
working in one direction (i.e. north-south, or east-west).
NOTE: If a large drop in engine RPM occurs, or the unit pulls
you forward and bounces during operation the blade depth is
set too low.
REMOVE THATCH: After raking, a layer of thatch will be
deposited over the top of the lawn. This thatch must be
removed prior to any fertilizing, seeding, or watering of the
lawn. We suggest the use of a lawn vacuum or wheeled
blower for collection and removal of the thatch.
DO NOT- Use this machine on any surface other than a lawn.
DO NOT- Use this machine on slopes in excess of 19°.
DO NOT-
Allow persons unfamiliar with this equipment to operate it.
DO NOT- Allow children to operate this equipment.
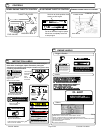
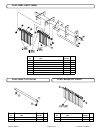
The blades can be raised or lowered into the ground by height
adjusment lever on the engine base. The resulting blade
depth can be adjusted higher or lower.
See ADJUSTING BLADE DEPTH.
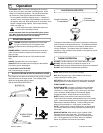
BLADE POSITION & DEPTH CONTROL LEVER
Clockwise:
To lower blades
Counter Clockwise:
To raise blades
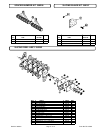
ADJUSTING BLADE DEPTH
The depth of the blades can be raised or lowered by rotating the
knob on the top of the adjustment lever. The blades are lowered
by rotating the knob clockwise, and raised by rotating the knob
counter-clockwise. The relative depth of the blades can be
gauged by using the depth scale located on the right front corner
of the engine base.
BLADES UP
TRANSPORT
BLADES DOWN
RUNNING