


Part No. 500264 Form No. F071300A
Page 3 of 12
For your safety and the safety of others, these directions should be followed:
Do not operate this machine without first reading
owner's manual and engine manufacturer's manual.
Use of Eye and Breathing protection is recom-
mended when using this machine.
·DO NOT place hands or feet beneath cutting deck, near
debris outlet or near any moving parts.
·DO NOT start engine or operate unit with bystanders in or
near the work area.
·DO NOT start or operate machine with blade or drive clutch
engaged.
PUT OIL IN ENGINE BEFORE STARTING.
Read all safety and operating instructions
before assembling or starting this unit.
·DO NOT operate during excessive vibration.
·DO NOT perform any maintenance or inspection until engine has
been turned off and has come to a complete stop, and the spark
plug has been removed
·DO NOT operate machine with guards removed.
·DO NOT use this machine for cutting areas containing rock,
glass, string like material, wire, rags, cans, metal, or other non-
organic material.
·DO NOT operate this machine on slopes greater than specified
on page 1.
·DO NOT operate machine near any hot or burning debris, or any
toxic or explosive material.
·DO NOT allow children to operate this equipment.
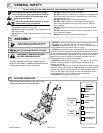
GENERAL SAFETY
ASSEMBLY
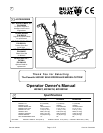
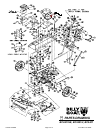
Your Billy Goat Brush Cutter is shipped from the
factory in one carton, completely assembled except
for the upper handle, and front guard bar.
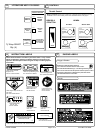
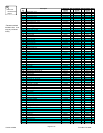
Literature
Assy
Check
Literature Assy
500263
Per Model
PACKING CHECKLIST
9
10
11
Check
Briggs & Stratton
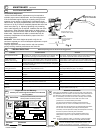
1. REMOVE unit from carton and allow upper handle (item 40) to lay on
ground behind unit. Set guard bar(Item 31) to the side for now.
2. REMOVE hardware items 115, 117, 141, 143, & 144 from temporary
storage positions on lower handle (items 51, & 52).
3. ATTACH upper handle to lower as shown below, and securely tighten
all fasteners. For easy alignment of handles during installation, loosen
the four screws that secure the lower handles. Line up and hand tighten
all handle hardware before final tightening. Note: Be sure the engine
starter rope is properly installed in the starter rope guide (item 145)
before tightening the corresponding fasteners.
4. REMOVE hardware items 102, 103, 117, 119, 124, 141, & 152 from
temporary storage positions on deck and skid assy at front of unit
(items 2, 155, & 156)
5. ATTACH guard bar(Item 31) to deck as shown below. Install the center
bolts(Item 153) first, and install the bolts that fasten through the sides of
the deck last. Securely tighten all fasteners. Note: Hardware items 117,
119, & 141 are used to secure both the front skid attachment and the
sides of the guard bar. Be sure both are securely attached.
6. CONNECT spark plug wire to spark plug.
Engine
Manual
Check
Honda(English)
Use of Ear Protection is recommended while
operating this machine.
These items should be included in your carton. If any
of these parts are missing, contact your dealer.
DISCONNECT SPARK PLUG WIRE
BEFORE ASSEMBLING UNIT.
Check
Bar Support WA
500235
Check
Handle Upper
Assembly
500256
Check
Honda W/Electric
Start (English)