


Part No. 500264 Form No. F071300A
Page 11 of 12
MAINTENANCE continued
17
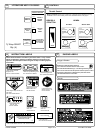
Transaxle
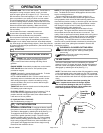
Drive Belt
Blade Drive Belt
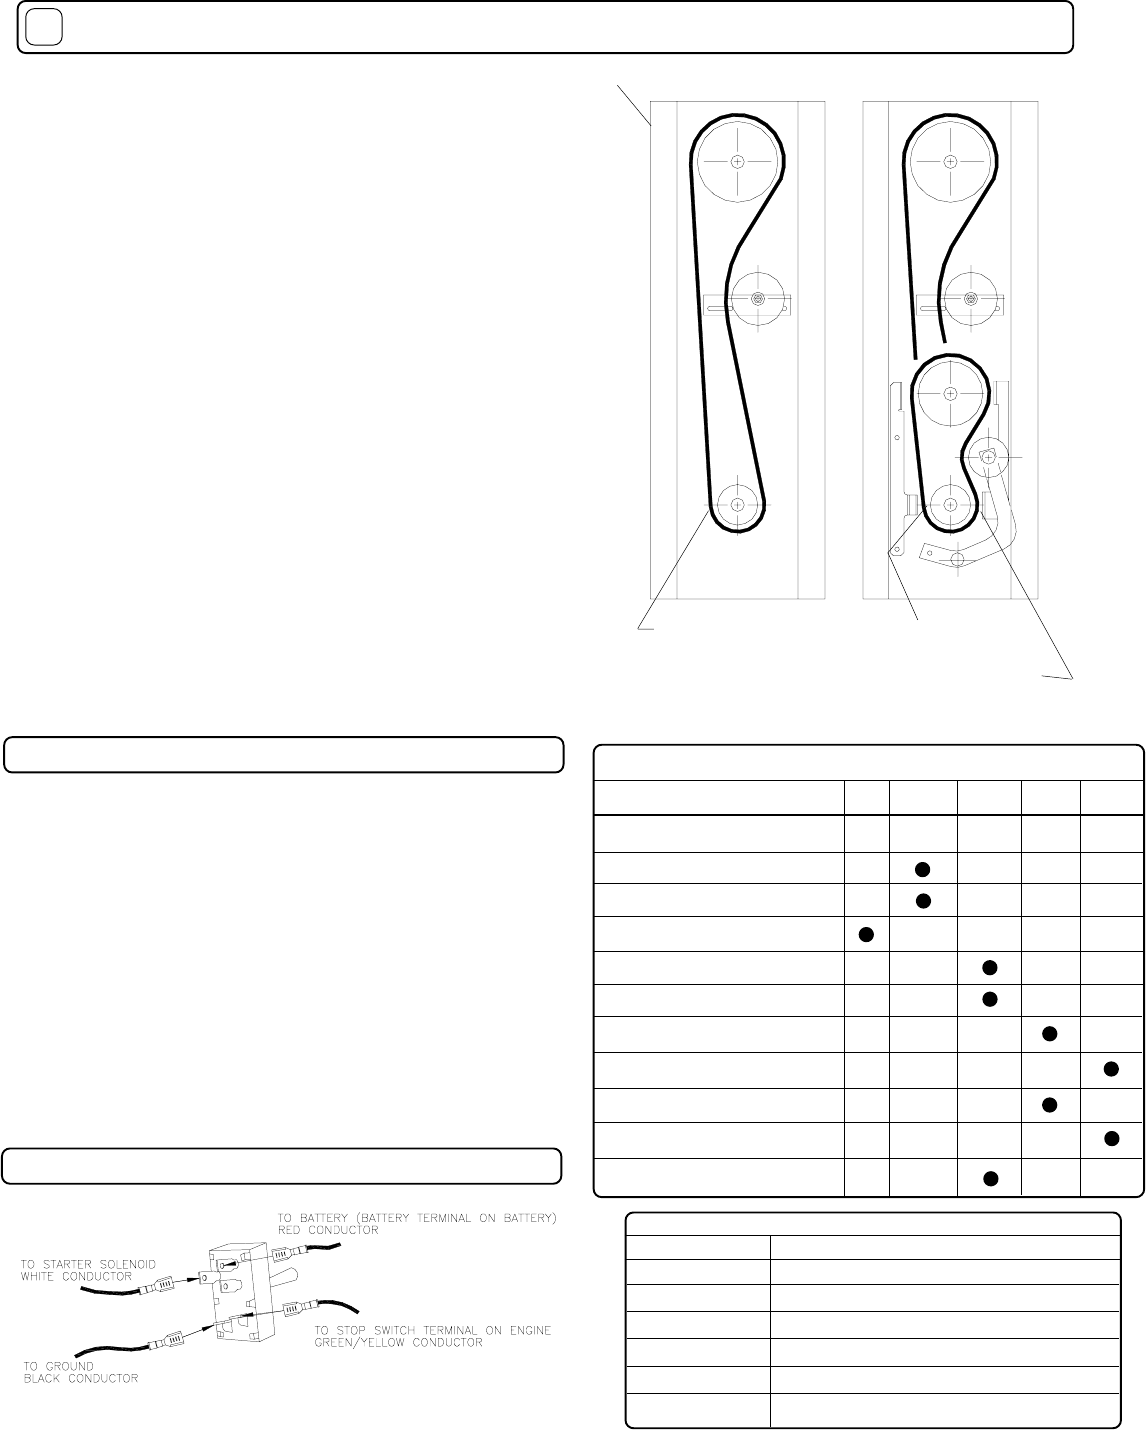
Fig. 3
Belt in top groove
of engine pulley
Belt in bottom groove
of engine pulley
Engine (See Engine Manual)
Check for excessive vibration
Inspect for loose parts
Maintenance Operation
Follow these hourly
maintenance intervals.
Maintenance Schedule
Inspect for worn or damaged parts
Every
Use
Every 50
hrs
Every 5 hrs
or (Daily)
Every 25
hrs
Sharpen Blade
Inspect belts for wear
Replace blade and traction belts
Check blade clutch cable tension
MAINTENANCE HISTORY
Service Performed
Date of Service
Every
100-150 hrs
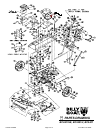
1. Disconnect spark plug wire.
2. Remove the two screws holding the engine base door (item 7),
and remove the door.
3. Examine the condition of the belt and note the position of the idler
assembly and the amount of tension on the blade belt.
3. Loosen the two nuts (Item 117) on top of the engine base, holding
the idler arm assembly (Item 26) in place .
4. Reset tension on belt by reaching in through top of engine base
with a long screwdriver or other pry bar and pushing the idler pulley
over against the belt to increase tension. While holding the belt
under tension tighten the two screws that hold the idler arm in place.
5. Replace engine base door and verify blade belt tension setting by
operating the unit in the conditions that caused it to slip
originally.NOTE: If belt continues to slip it may be worn out and
require replacement before proper operation can resume.
BLADE DRIVE BELT TENSION ADJUSTMENT
6. With the guides loose slip the blade drive belt(29) out of the
groove on the drive pulley and down past the pulley. Note: It is
necessary to remove the transaxle drive belt(10) from its groove to
allow removal of the blade drive belt.
7. Pull the belt back through the hole in the top of the engine base
and remove it from the machine. NOTE: Removal of the belt from the
blade drive pulley requires some force to walk the belt past the front
portion of the pulley.
8. Install new belt into groove on blade drive pulley. Push remaining
length of belt back through engine base toward clutch/brake drive
pulley.
9. Reach through from rear of machine and pull new belt through and
install it in the groove on the clutch/brake drive pulley. NOTE: Make
sure the blade belt is properly seated in the clutch/brake drive
pulley(Item 23) and not resting in the gap between the clutch/brake
pulley(23) and the transaxle drive pulley(46)
10. Tighten four screws to secure belt guides (item 149 & 150) in
place. NOTE: Be sure belt is correctly routed when replacing. (See
Fig. 3)
11. Set tension on belt by reaching in through top of engine base with
a long screwdriver or other pry bar and pushing the idler pulley over
against the belt to increase tension. While holding the belt under
tension tighten the two screws (107) that hold the idler arm in place.
Note: Proper belt tension can be verified by checking the tight side
(non-idler side)belt deflection. The belt should deflect 3/16”-1/4” with
force applied perpendicular to the belt after tensioning.
12. Replace engine base door (item 7) and tighten screws to hold it in
place
13. Reconnect spark plug.
Inspect battery for damage or leak
Check battery terminal for corrosion
STARTER SWITCH WIRING
Lubricate throttle control cable and
linkage.