


GB - 26
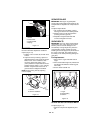
9. Reinstall one nut to keep the inside
bearing cap in place.
10. Remove bearing cap/bushing and washer
from right side of unit.
11. Reinstall nuts on screws through side
frame to keep screws in place.
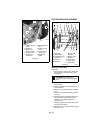
12. Slide friction disc assembly and hex shaft
to the right until the left end of shaft is
clear of left bearing. Tap lightly if
necessary, to loosen. The shaft slides out
of the small pinion gear and washer.
13. Carefully lift shaft and friction disc out of
unit. As you remove the assembly, the
washers between the bearing and sliding
forks will be loose. Do not lose the
washers.
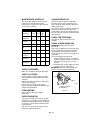
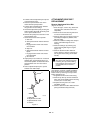
Replace Friction Disc
1. Remove three (3) hex bolts and nuts
holding friction disc to shift carrier.
2. Remove the old friction disc. Put the new
friction disc in place, flat side to the shift
carrier.
3. Reinstall the three (3) bolts and nuts into
the new friction disc and hub. Torque to
5-6 lbf-ft (6.8 to 8.13 N•m).
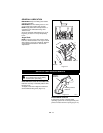
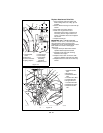
Reinstall Friction Disc
1. Reinstall the shift carrier, the small pinion
gear and washer onto the hex shaft. The
washer goes between the bearing and the
pinion gear.
2. Slide the shaft and attached parts into the
frame, through the right side hole first,
then the left. Pinion gear must mesh with
the large gear.
3. Reinstall the flange bearing and washers
into the shift forks. Be sure the washers
are inside the forks.
4. Reinstall the bearing and outside bearing
cap on the left side of the frame.
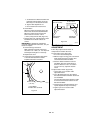
5. On the right side of the frame, place the
washer on the end of the shaft.
6. Reinstall the bearing cap/bushing on the
right side of frame.
7. Reinstall roll pins in shaft. Be sure pins
are centered in shaft.
8. Reinstall shift rod with hairpin and
washer.
9. Reinstall tires with lockpins.
10. Install bottom cover.
11. Set unit upright.
12. Replace spark plug wire on spark plug.
SHORT TERM
IMPORTANT: NEVER spray unit with high
pressure water or store unit outdoors.
Run with attachment clutch engaged a few
minutes after each use to free unit of any loose
or melting snow.
Close fuel shut-off valve.
Inspect unit for visible signs of wear, breakage
or damage.
Keep all nuts, bolts and screws properly
tightened and know unit is in safe working
condition.
Store unit in a cool, dry protected area.
LONG TERM
Clean unit thoroughly with mild soap and low
pressure water and lubricate (see
Maintenance). Touch up all scratched painted
surfaces.
Remove weight from wheels by putting blocks
under frame or axle.
When storing unit for extended periods of
time, remove all fuel from tank and carburetor
(run dry). Refer to Engine Manual.
STORAGE
WARNING: AVOID INJURY. Read
and understand the entire Safety
section before proceeding.