


GB - 22
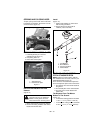
Install
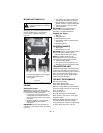
(Figure 19)
1. Install battery on the unit with battery
hold-down bracket.
2. Connect positive (+) cable first, then
negative (–) cable.
3. Apply petroleum jelly or dielectric grease
to battery cable ends and terminals.
4. Tip seat back (see TIPPING SEAT
FORWARD on page 18).
Cleaning Battery and Battery Cables
(Figure 19)
1. Tip seat forward (see TIPPING SEAT
FORWARD on page 18).
2. Disconnect negative (–) cable first, then
positive (+) cable.
3. Clean battery cable ends, negative (–)
terminal, and positive (+) terminal with a
wire brush and rinse with a weak baking
soda solution.
4. Connect positive (+) cable first, then
negative (–) cable.
5. Apply petroleum jelly or dielectric grease
to battery cable ends and terminals.
6. Tip seat back (see TIPPING SEAT
FORWARD on page 18).
Charging the Battery
(Figure 19)
Follow First Aid directions for contact with
battery fluid.
• External Contact: Flush with water.
• Eyes: Flush with water for at least 15
minutes and get medical attention
immediately!
• Internal Contact: Drink large quantities
of water. Follow with Milk of Magnesia,
beaten egg or vegetable oil. Get medical
attention immediately!
• In case of internal contact, DO NOT
induce vomiting!
IMPORTANT: DO NOT fast charge. Charging
at a higher rate will damage or destroy
battery.
IMPORTANT: ALWAYS follow information
provided on battery and battery charger.
Contact battery and battery charger
manufacturers for detailed instructions.
1. Remove battery from unit (see Battery
Removal and Installation on page 21).
2. Place battery in a well-ventilated area.
3. Connect positive (+) lead of charger to
positive (+) terminal, and negative (–)
lead of charger to negative (–) terminal.
4. Charge battery according to battery
charger and battery manufacturers’
instructions.
5. Install battery on unit (see Battery
Removal and Installation on page 21).
Jump-Starting
Ariens does not recommend jump-starting
your unit. Jump-starting can damage engine
and electrical system components. See your
engine manual for more detailed information.
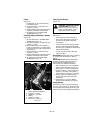
Figure 19
1. Battery Hold-Down Bracket
2. Negative (–) Cable
3. Negative (–) Terminal
4. Battery
5. Positive (+) Cable
6. Positive (+) Terminal
1
5
2
4
6
3
WARNING: FROZEN BATTERIES
CAN EXPLODE and result in
death or serious injury. DO NOT
charge a frozen battery. Let the
battery thaw before charging.