


4
www.aquaprosystems.com
877.278.2797
Operating Instructions and Parts Manual
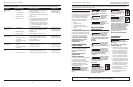
1. Check electrical connections and fuse
box / control panel
2. Disconnect power then check for
restrictions or blockage in air discharge
line
3. Replace motor
4. It is possible that if the blower is started
and stopped repeatedly in a short time
period, the thermal overload could
interrupt the circuit. Allow the unit to
cool and disconnect power. Restart after
5 - 15 minutes (depending on warmth
of ambient conditions).
1. Disconnect power then check for debris
or foreign object lodged in blower
motor
2. Replace motor
3. Verify voltage is correct for blower
1. Check electrical connections
Verify voltage is correct for blower
2. Install additional blowers, or reduce
piping restrictions
3. Re-orient check valve
1. Check for debris or foreign object
lodged in discharge line
2. Re-orient check valve
1. Check blower voltage requirements,
make certain line voltage is correct
2. Verify correct wire gage is being used
Blower will not
start
Blower hums but
will not run
Blower runs but
delivers little air
Internal blower
overload trips
Blower runs too
slow
1. Power Off
2. Internal blower
overload trips
3. Brushes worn out
4. Nuisance trips
1. Rotor locked
2. Brushes worn out
3. Wrong voltage
1. Low voltage
2. Blower too small for
application
3. Check valve installed
incorrectly
1. Blocked or restricted
air line
2. Check valve installed
incorrectly
1. Incorrect line voltage
2. Incorrect wire size
Symptom Possible Cause(s) Corrective Action(s) Safety Alert
Troubleshooting Chart - All repairs must be completed by licensed or certified professionals.
Disconnect power
BEFORE taking any
corrective action(s)
Disconnect power
BEFORE taking any
corrective action(s)
Disconnect power
BEFORE taking any
corrective action(s)
Disconnect power
BEFORE taking any
corrective action(s)
Disconnect power
BEFORE taking any
corrective action(s)
Please read and save these instructions. Read carefully before attempting to assemble, install, operate or maintain the product described.
Protect yourself and others by observing all safety information. Failure to comply with instructions could result in personal injury and/or
property damage! Retain instructions for future reference.
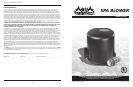
Description
The Air Blower is designed for outdoor
spa applications. It is designed for low
noise and a high air flow rate. The unit
is UL listed and the motor is protected
with a resetting thermal overload
device. The blower is designed for
permanent electrical connections.
The box contains the following:
• Blower
• Mounting Bracket
• UL Approved Check Valve
• Conduit Cover Plate, Gasket, and
Screws
• Instruction Manual
Unpacking/Unit Inspection
After unpacking the blower, carefully
inspect for any damage that may have
occurred during transit. Check for
loose, missing or damaged parts.
DAMAGE TO THE UNIT DURING
TRANSPORTATION IS NOT THE
RESPONSIBILITY OF THE
MANUFACTURER.
Important Safety
Instructions
When installing and using this
electrical equipment, basic safety
precautions should always be
followed.
READ AND FOLLOW ALL
INSTRUCTIONS.
Safety Guidelines
This manual contains information that
is very important to know and
understand. This information is
provided for SAFETY and to PREVENT
EQUIPMENT PROBLEMS. To help
recognize this information, observe
the following symbols:
Danger indicates
an imminently
hazardous situation which, if not
avoided, will result in death or serious
injury.
Operating Instructions and Parts Manual
Warning indicates
a potentially
hazardous situation which, if not
avoided, COULD result in death or
serious injury.
Caution indicates
a potentially
hazardous situation which, if not
avoided, MAY result in minor or
moderate injury.
Notice indicates
important
information, that if not followed, may
cause damage to equipment.
General Safety
Information
CALIFORNIA PROPOSITION 65
This product or its
power cord may
contain chemicals, including lead,
known to the State of California to
cause cancer and birth defects or other
reproductive harm. Wash hands after
handling.
GENERAL
To reduce the risk
of injury, do not
allow children to use this product
unless they are closely supervised at all
times.
Install blower no
less than 1 foot
(305 mm) above the maximum water
level to prevent water from contacting
electrical equipment. Install in
accordance with the installation
instructions.
Blower is designed
for outdoor use.
Install blower at least two feet above
the ground in an area free of debris,
chemicals, or sprinklers.
ELECTRICAL
Disconnect power before
attempting to install, service,
relocate or perform any
maintenance. Tag and disconnect
power and lock the fuse box / control
panel to prevent unexpected
application of power.
Risk of
Electric
Shock. Install blower at least
5 feet (1.5 m) from pool / spa
water using nonmetallic
plumbing.
To reduce
the risk
of electrical shock, connect
the green colored wire inside
the electrical box to the
grounding terminal of your electrical
service or supply with a continuous
green insulated solid copper conductor
minimum No. 8 AWG (8.4 mm2) solid
copper conductor between this unit
and any metal equipment, metal
enclosures of electrical equipment,
metal water pipe, or conduit within 5
feet (1.5 m) of the unit.
SAVE THESE INSTRUCTIONS.
Installation
Guidelines
Failure to observe
installation
guidelines, could result in death or
serious injury.
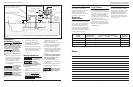
See Figure 1 for recommended
installation diagram.
1. Install at least 5 feet (1.5 m) from
pool / spa water using nonmetallic
plumbing. Install blower no less
than 1 foot (305 mm) above the
maximum water level to prevent
water from contacting electrical
equipment. Install in accordance
with the installation instructions.
2. The check valve supplied with the
unit must be installed in a vertical
orientation above the water level
in an easily accessible location for
serviceability. Take care to orient
the check valve with the arrow
pointing in the direction of the air
flow inside the pipe.
3. Use a separate dedicated 2-inch
rigid PVC supply line from the
blower to the spa.
1
www.aquaprosystems.com 877.278.2797
REMINDER: Keep your dated proof of purchase for warranty purposes!
Attach it to this manual or file it for safekeeping.
PRO1002403, PRO1502403, PRO2002403,
PRO100120, PRO150120, and PRO200120