


11
9
10
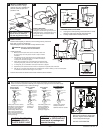
Turn on water supply.
Submerge the FLOAT CUP
under the water for 30 seconds.
Adjust the water to desired level
by turning WATER LEVEL
ADJUSTMENT ROD and
moving FLOAT CUP up or
down.
- 3 -
7301690-100 Rev. E
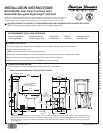
FLUSH PUSH BUTTONS
• The large flush button should line up over the
white actuator on the flush tower in the tank.
• The small flush button should line up over the
gray actuator on the flush tower in the tank.
• Pressing both buttons at once will result in a
short flush.
LARGE FLUSH BUTTON
FOR SOLID WASTE
1.6 gal/flush
6 Liter/flush
SMALL FLUSH BUTTON
FOR LIQUID WASTE
1.1 gal/flush
4.1 Liter/flush
TIPS:
With the lid removed, directly press the flush button in
the tank to confirm that the toilet is working properly.
If not, follow troubleshooting guide.
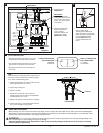
1. Install Threaded Rods into holes in bottom of push
buttons approximately 1/2" (12mm).
2. Lightly snug Locking Nut.
3. Place Lid on Tank.
4. Push Button to test flush. If more stroke is
needed, loosen Locknut and turn Threaded Rod
counterclockwise one (1) turn.
5. Replace Lid. Repeat until flush action is achieved.
6. If Valve stays open, turn Threaded Rod clockwise
one (1) turn and lightly snug Locknut.
12
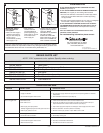
CARE AND CLEANING
When cleaning your toilet, wash it with mild, soapy water, rinse thoroughly with clear water and dry with a soft cloth. Avoid detergents,
disinfectants, or cleaning products in aerosol cans. NEVER use abrasive scouring powders or abrasive pads on your toilet seat. Some
bathroom chemicals and cosmetics may damage the seat's finish.
WARNING: Do not use in-tank cleaners. Products containing chlorine (calcium hypochlorite) can seriously damage fittings in the
tank. This damage can cause leakage and property damage.
American Standard shall not be responsible or liable for any tank fitting damage caused by the use of cleaners containing
chlorine (calcium hypochlorite).
!
Install and adjust push
button rods for about
1/16" (1-1/2mm)
clearance between rod
end and valve button.
SEE STEP 11 - TIPS
IMPORTANT:
Refill Float Adjustment
If short flush does not refill
the bowl, turn thumbscrew
CCW 1 turn, flush, repeat
if necessary.
Diagram 1
SEE STEP 10
REFILL NIPPLE
VALVE
BODY
THREADED
SHANK
SHANK
WASHER
FILL
VALVE
FLOAT
CUP
REFILL
TUBE
ADJUSTABLE
HEIGHT
WATER LEVEL
ADJUSTMENT
ROD
LOCK NUT
HALF
16
14
12
10
8
6
4
2
Rod Adjustment
SEE STEP 11
Locknuts
Threaded Rods