


(2)
SUGGESTED BATH INSTALLATION METHOD
SPIC AND SPAN
®
IS A REGISTERED TRADEMARK OF PROCTER & GAMBLE
FIG. 1
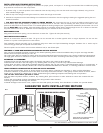
TYPICAL RECESS INSTALLATION
34 Typ.
(864mm)
19-3/4
(502mm)
60-3/16
(1529mm)
30
(76
2mm)
3
2
(813m
m)
TUB W
I
DTH
LEVELING
STRINGERS
19-3/4
(502mm)
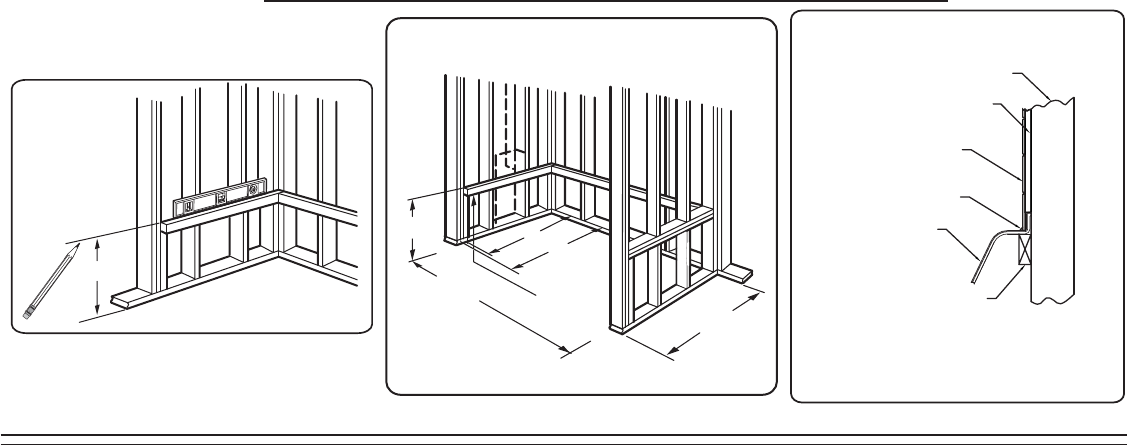
SUGGESTED WHIRLPOOL/BATH INSTALLATION METHOD
Leveling Stringer
1 x 3 (25 x 76mm) WOOD
Finished Wall
Waterproof Dry Wall
or Cement Board
Sealant
Tub
Stud
(Wood or Steel)
SECURE THE BATH TO THE STUDS AS SHOWN FOR
WOOD OR STEEL STUD CONSTRUCTION.
753450-100 REV. B
INSTALLATION AND FRAMING INSTRUCTIONS
Locate studs as required. Insure roughing-in dimensions are proper, plumb, and square. It is strongly recommended that an additional opening
be provided for access to the drain components.
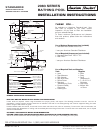
1. As shown in Fig. 1, mark the position of the underside of the deck by tracing a line onto the studs at the height indicated, using a level or
other suitable straight edge.
2. With the top of the stringer touching the traced line, attach the stringer to the studs.
3. Install drain components to the bath following the manufacturer's instructions. See the roughing-in drawing for suggested opening size and
location dimensions.
4. THIS BATH MUST BE SUPPORTED ALONG IT'S ENTIRE BOTTOM. We recommend the use of mortar as bedding material (sand is not
recommended). Apply enough bedding to support the complete bottom of the bath. After the bedding has been poured, and before it sets,
position the bath within the recess until the rim is leveled against the leveling stringers (see "Typical Recess Installation") shown below. The rim of
the bath MUST NOT support weight. Allow the bedding material to completely harden before applying weight to the rim or bottom of the bath.
Any finish material such as tile or wallboard must be self-supporting if it contacts the deck of the bath.
DRAIN CONNECTION
Using recommended drain opening, connect bath drain to waste line. Tighten all drain joints securely.
POST INSTALLATION CLEAN-UP
Remove all construction debris from bath. Tile grout can be removed with a wooden popsicle stick or tongue depressor. Do not use wire
brushes or any other metal implement on bath surface.
Post installation clean-up generally can be completed using warm water and liquid dishwashing detergent. Stubborn dirt or stains may be
removed using granular Spic and Span
®
mixed with water.
Painter's naphtha can be used to remove excess adhesives and/or wet oil-base paint.
FEATURES of YOUR NEW AMERICAN STANDARD ACRYLIC BATHTUB
Your new acrylic bathtub has been molded in the newest plumbing fixture material available today. Acrylics are tough durable
finishes that are simple and easy to care for.
The colors have been formulated to match other American-Standard fixtures and enhance your choice of bathroom decorations.
The high gloss surface is resistant to impact and chemicals and will retain its lasting luster with proper care and maintenance.
AFTERCARE and CLEANING
• Always fill the tub with temperate water. Excessively hot water may cause surface damage
• Remove bath mat after use and hang to dry. Allowing bath mat to dry in the tub may cause surface damage.
• Clean after use with a mild liquid household detergent cleaner. Do not use Lestoil, Lysol Disinfectant (spray or concentrate), or
Lysol Basin, Tub and Tile Cleaner, Windex, Mr. Clean, Dow Disinfectant Bathroom Cleaner, or cleaning products in aerosol cans.
HARSH CHEMICALS SHOULD NEVER BE USED ON ACRYLIC SURFACES.
• Do not use wire brushes, knives or sharp objects to remove stains, cigarette tar deposits, or other surface blemishes.
• Abrasive cleaners or powders must not be used, since they will dull the surface. If the glossy surface looses its sheen, dulled
areas can be restored by rubbing with a white "automotive type" polishing compound and waxing with a "liquid wax."
• Do not wax areas where you walk or stand.
• Do not allow nail polish remover, acetone, dry cleaning fluid, paint remover or other solvents to come into contact with the
surface.
• Clean the surrounding surface immediately after using caustic drain cleaners.
• Burning cigarettes will damage the surface.
• Should damage to the fixture occur, repairs can be made quickly and easily. Your distributor or builder can provide details.