


•
Lay the table on its back before making height adjustments.
•
It is critical that the five bolts connecting each foot piece to the uprights are kept securely tightened
to ensure lasting strength and stability. We recommend that you retighten these seasonally.
•
The easiest way to “seat” the heads of the bolts into the wood for the assemblies that include
butterfly nuts is to temporarily replace the butterfly nut with one of the black adjustment knobs.
This will give you the grip you need to pull the bolt head into the wood.
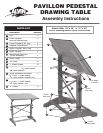
1.
Open hardware bag and separate into like parts for ease of identification.
2.
Check wood parts and hardware against parts listing to ensure all are included.
3.
Attach foot to lower upright using
1
1
⁄
1
⁄
1
2
⁄
2
⁄
"
bolts . Note that nuts are pre-inserted in lower
upright. Repeat step for second foot. Be sure that all bolts are tightened
very
securely
.
4.
With lower uprights facing inward, attach both lower crossbars using
3
⁄
3
⁄
3
4
⁄
4
⁄
"
screws .
into pre-drilled holes in feet. Be sure to use the 28" crossbars.
5.
Attach both diagonal cross braces to lower uprights using
3
⁄
3
⁄
3
4
⁄
4
⁄
"
screws into pre-drilled holes.
6.
Attach upper crossbar into pre-drilled holes in lower uprights using
3
⁄
3
⁄
3
4
⁄
4
⁄
"
screws .
7.
Connect upper uprights to outside of lower uprights using two adjustment knob
assemblies . Be sure that nylon washer is positioned between wood and brass washer to avoid
scratching wood during height adjustment.
8.
Connect metal board cleat assembly to outside of upper uprights using angle adjustment
hardware . Be sure that end of cleat with tilt-arm connection is facing front of the table and that
nylon washer is positioned between cleat and upright.
9.
Connect slotted end of tilt arms to holes in upper uprights using tilt-arm assembly
hardware . Be sure that nylon washers are positioned between brass tilt arms and wood uprights
to avoid scratching wood during adjustment.
Attach foot to lower upright using
B
bolts . Note that nuts are pre-inserted in lower
I
Attach foot to lower upright using
A
With lower uprights facing inward, attach both lower crossbars using
B
With lower uprights facing inward, attach both lower crossbars using
C
screws .
J
Attach both diagonal cross braces to lower uprights using
D
screws into pre-drilled holes.
J
Attach upper crossbar into pre-drilled holes in lower uprights using
E
screws .
J
Connect upper uprights to outside of lower uprights using two adjustment knob
F
Connect upper uprights to outside of lower uprights using two adjustment knob
B
Connect upper uprights to outside of lower uprights using two adjustment knob
assemblies . Be sure that nylon washer is positioned between wood and brass washer to avoid
K
Connect metal board cleat assembly to outside of upper uprights using angle adjustment
G
Connect metal board cleat assembly to outside of upper uprights using angle adjustment
F
Connect metal board cleat assembly to outside of upper uprights using angle adjustment
hardware . Be sure that end of cleat with tilt-arm connection is facing front of the table and that
L
Connect slotted end of tilt arms to holes in upper uprights using tilt-arm assembly
G
Connect slotted end of tilt arms to holes in upper uprights using tilt-arm assembly
F
Connect slotted end of tilt arms to holes in upper uprights using tilt-arm assembly
hardware . Be sure that nylon washers are positioned between brass tilt arms and wood uprights
M
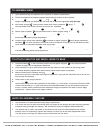
1.
Set board cleats in the horizontal position and set upper uprights in the lowest position.
Tighten all height and tilt adjustment hardware.
2
.
Place tabletop on rug or other soft surface with the side you have chosen to use facing down.
3
.
Turn base assembly upside down and carefully center board cleats on tabletop.
4
.
Attach board cleats to tabletop using
5
⁄
5
⁄
5
8
⁄
8
⁄
"
screws . Tighten securely. You may find it easiest to
pre-punch or pre-drill holes after marking their positions. If you pre-drill, be careful not to drill all the
way through the tabletop.
5
.
Return table to the upright position.
6
.
Pencil ledge is included with the table but is optional to use. To attach to front edge of tabletop,
locate center of top and mark placement of two holes
5
1
⁄
1
⁄
1
2
⁄
2
⁄
"
from center. Pre-punch or pre-drill holes.
These holes should be 11" apart and should be centered between the top and bottom surfaces of
the top. Partially insert screws and then slide pencil ledge into position with slots in pencil ledge
facing down. Tighten screws until ledge is secure.
Set board cleats in the horizontal position and set upper uprights in the lowest position.
G
Set board cleats in the horizontal position and set upper uprights in the lowest position.
F
Pencil ledge is included with the table but is optional to use. To attach to front edge of tabletop,
H
screws . Tighten securely. You may find it easiest to
N
ALVIN & COMPANY, INC., P.O. Box 188, Windsor, CT 06095 • ph 800.444.2584 • fax 800.777.2896 • www.alvinco.com
TO ASSEMBLE BASE
TO ATTACH TABLETOP AND PENCIL LEDGE TO BASE
HINTS FOR ASSEMBLY AND USE
A6222 Rev. June 2006