


5
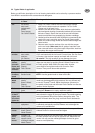
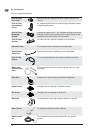
2.2 Operation elements
and model survey
See illustration at the end of
this manual.
1 Start/stop switch
2 Water inlet (with fi lter)
3 High pressure connection
(only models without hose
reel)
4 High pressure hose
5 Electric cable
6 Click & Clean spray lance
7 Spray gun with lock
8 Click & Clean Tornado
®
PR
nozzle
9 Click & Clean Powerspeed
®
nozzle
10 Click & Clean foam sprayer
11 Nozzle cleaning tool
12 Trolley handle (telescopic
handle)
13 Hose reel (not standard)
14 Hose hook
15 Model tag
16 Quick coupling
17 Button for telescopic handle
18 Turnable cable hook
Specifi cations: See model tag
(15) of machine.
Sound pressure level meas-
ures in accordance with ISO
3744 EEC directive 2000/14/
EEC: L
pA
= 69,9 dB(A), L
WA
= 84
dB(A).
We reserve the right to alter the
specifi cations.
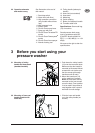
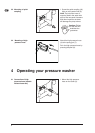
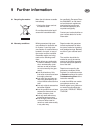
3 Before you start using your
pressure washer
3.1 Mounting of trolley
handle and hose hook
(standard models)
1. Push down the trolley handle
(12) over the two metal tubes.
Make sure that the handle is
mounted as illustrated. Mount
screws with nuts (make sure
that the screws go through
handle as well as tube).
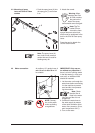
2. Mount the hose hook (14)
on the machine (2 screws).
Note: the hose hook can be
mounted on the front as well
as on the back. Front position
is to be used if the product is
used together with a special
wall hook for wall storage.
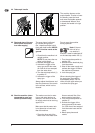
3.2 Mounting of hose reel
handle (models with
hose reel)
1. Click the hose reel handle
on to the trolley handle (no
screws).