


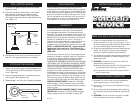

1. Attach the hanger bracket to the electrical box
capable of reliably supporting at least 50 pounds.
Insert the screws through the slotted holes in the
bracket and attach to the electrical box. Tighten
both screws to the electrical box. (Figure 1)
NOTE: If bracket
and/or electrical box
are not securely
attached, the fan
could wobble.
2. Insert electrical wire
into slotted hole in
pipe and run wires out
the other end of pipe.
(Figure 2)
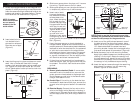
3. Insert holding cup into pipe and place on motor
shaft. Line up holes and insert bolt through
washer, pipe, second washer, spring washer and
nut. Tighten nut and insert cotter pin into end
of bolt. Bend ends of cotter pin arms to lock into
place. (Figure 3)
INSTALLATION INSTRUCTIONS
4. Slide lower canopy down the pipe until it covers
the wiring. Tighten screw to hold in place.
5. Slide upper canopy on over the pipe and allow it
to temporarily rest on top of lower canopy.
6. Insert motor leads
through the hanger
ball and slide the ball
midway down the
pipe. Insert the spring
pin through the top
holes of the pipe. Align
the grooves in the ball
with the pin and pull
up to fully seat the ball.
Tighten screw in side
of hanger ball. If
ground wire is not
attached, insert screw
through ring at end of
green ground wire and tighten to top of hanger
ball. (Figure 4)
7. Hang the upper canopy on hook attached to
hanger bracket. Make sure the electrical box is
properly secured. If Romex cable (plastic sheathed)
was used to wire the electrical box, the presence
of a third wire connected to the electrical box
indicates that the box is grounded. This ground
wire may be a bare wire (no insulating jacket),
or a green insulated wire. The two supply wires
will be white and black insulated wires.
8. If the wiring to the electrical box is enclosed in
electrical conduit pipe, the ground wire may not
be present. The conduit itself could serve as the
ground.
GROUNDING:
9. Romex (plastic sheathed) Cable: If romex cable
was used to wire the electric box, connect the
green ground wire attached to the hanger ball
and the green ground wire in the Romex cable
using a 72B listed wire nut.
9a. Conduit Pipe: If the wiring to the electrical box
is enclosed in electrical conduit pipe, connect the
ground wire to the ground screw in the electrical
box.
10. Electrical Supply: Connect the fan motor white
wire to the supply white (Neutral) wire using a
listed wire nut. Connect the fan motor black wire
and the supply black (hot) wire using a listed wire
nut.
Pipe
Bolt
Plain
Washer
Figure 3
Plain
Washer
Spring
Washer
Nut
Cotter
Pin
Shaft
Cup
Figure 4
Wires
Ground
wire &
Screw
Hanger
Ball
Screw
Pin
Pipe
NOTE: Check to see that all connections are tight,
including the ground and that no bare wire is visible
at the wire nuts, except for the ground wire.
11. Insert one of the phillips head screws in one of
the side holes of the mounting bracket, being
careful not to fully tighten. Leave a minimum of
1/8" distance between the screw head and
mounting bracket. Locate the hole opposite the
first screw and repeat this procedure. (Figure 6)
12. Raise the canopy up to the mounting bracket.
Apply light pressure upward on the canopy while
rotating it to the right. Rotate the canopy until
the two screws from step #11 drop into the side
hook slots in the canopy. Continue rotating until
the canopy is fully locked and stops rotating.
13. Insert the last two screws through the remaining
side holes of the canopy into the mounting
bracket. Tighten all four screws.
Figure 5
White Fan
(Neutral)
Black Fan
(Hot)
Green
Jumper Wire
Supply Ground
Green or Bare
Black Supply
(Hot)
White Supply
(Neutral)
Figure 6
Figure 1
Electrical Box
Mounting
Bracket
Screw
Figure 2
Pipe
Wire
Slotted
Hole
Canopy
Slot
Mounting
Bracket