


5
FIGURE 5
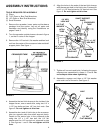
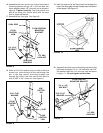
9. Place a wheel (long end of hub first) onto the end
of the axle that has no cross hole. See figure 4.
10. Place a 1/2" flat washer onto the axle and then
lightly tap a hub cap onto the axle until it is snug
against the washer and wheel hub. See figure 4.
FIGURE 4
11. Place a wheel onto the end of the axle that has a
cross hole. The long end of the hub goes to the
inside. See figure 5.
12. Assemble a 5/32" x 2" cotter pin through the
notched wheel hub and the axle. See figure 5.
13. Place a hub cap onto the end of the axle. Using a
small hammer, lightly tap the hub cap until it is
snug against the wheel. See figure 5.
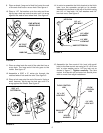
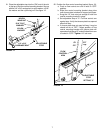
FIGURE 6
14. In order to assemble the hitch bracket to the hitch
tube, turn the spreader upright on its wheels.
Assemble the bracket to the top of the hitch using
two 1/4" x 1" hex bolts, 1/4" lock washers and 1/4"
hex lock nuts. See figure 6.
FIGURE 7
1/2" FLAT
WASHER
HUB CAP
END WITH NO
CROSS HOLE
HUB CAP
5/32" x 2"
COTTER PIN
CROSS
HOLE
1/4" x 1"
HEX BOLT
1/4" LOCK
WASHER
1/4" HEX
LOCK NUT
HITCH PIN
HAIR COTTER PIN
FLOW CONTROL
LINK
FLOW
CONTROL
ARM
1/4" HEX
LOCK NUT
1/4" x 3/4"
HEX BOLT
SMALLEST
HOLE
NYLON
WASHER
15. Assemble the flow control link (end with small
hole) to the flow control arm using a 1/4" x 3/4" hex
bolt, a nylon washer and a 1/4" hex lock nut as
shown in figure 7. Tighten carefully. The flow
control link should not be loose but should pivot
with no more than slight resistance.