


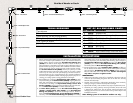

LIST OF ALL ENCLOSED PARTS
QTY PART NO DESCRIPTION
1 52505 Sediment Filter
2 52519 Pre-Fabricated Misting Line (6' section)
2 52516 Flexible Nylon Tube (6' section)
6 52502 .014 Misting Nozzle
1 52511 Brass Elbow
2 52510 Brass Union
1 52513 Brass End Plug
10 52509 Vinyl-Coated Clamp, Screw and Anchor
TOOLS REQUIRED
Tape Measure
Screwdriver
Power Drill with 1/4" Bit (if using anchors)
Tubing Cutter (if customizing length)
5/8" Open-End Wrench
9/16" Open-End Wrench
1. Start by measuring the length of your patio perimeter (or perimeter of the
area to be misted). Proper installation of your new Aeromist Professional
Misting System requires mounting the Pre-Fabricated Misting Line
(52519) on the bottom outside edge of the fascia, header or beam of
patio perimeter. It is important to mount the line along the bottom edge, to
prevent mist from spraying on structure. This installation will create a curtain
of mist around your patio or misted area and provide maximum cooling.
The Aeromist Extension Kit (52501) extends your system by 6 ft. Add
multiple extension kits to custom fi t a misting system to your patio or misted
area mist up to 150 ft (more with optional pump). See the enclosed ac-
cessories brochure or go to www.aeromist.com for a sample of additional
accessories and upgrades available including high-pressure pumps for in-
creasing your misting system’s cooling performance and length.
2. Start installation by connecting Flexible Nylon Tube (52516) to outlet
compression fi tting on the Sediment Filter (52505). Finger tighten brass
fi tting, then insert tubing until it bottoms out in fi tting. Complete seal with
one wrench turn of fi tting. Use Vinyl-Coated Clamps, Screws And
Anchors (52509) to secure nylon tubing and fi lter to the side of the struc-
ture. Use Brass Union (52510) to connect additional tubing.
3. Use Brass Elbow (52511) to connect Pre-Fabricated Misting Line
(52519) to Flexible Nylon Tube (52516), secure Pre-Fabricated
Misting Line (52519) to the bottom outside edge of fascia, header or
beam with Vinyl-Coated Clamps, Screws And Anchors (52509). If
necessary, cut the Pre-Fabricated Misting Line (52519) with a tubing
cutter. Never use a saw to cut copper tubing, this will leave burrs and pre-
vent the compression joints from sliding over the tubing. Space clamps on
Pre-Fabricated Misting Line (52519) 24" apart. Use Brass Union
(52510) to join sections of Pre-Fabricated Misting Line (52519)
.
Terminate system with Brass End Plug (52513).
4. Connect garden hose to inlet of Sediment Filter (52505) and fl ush sys-
tem for several minutes before inserting nozzles. While system is fl ushing
start inserting the .014 Misting Nozzles (52502) nozzles nearest the
fi lter fi rst. Shut water off to insert last nozzle. Caution: hand-tighten
only. Never use pliers to tighten nozzles.
MAINTENANCE
• When turning the misting system off, it is benefi cial to drain the water out
of the line by disconnecting the garden hose at the fi lter. This will help
eliminate mineral buildup.
• Nozzles require cleaning or replacement periodically. Clean nozzles by
soaking in vinegar or calcium removal product overnight.
• Replace fi lter annually, water conditions may require replacement sooner.
• Winterize your misting system by removing all nozzles. Be sure all water
is drained from misting lines. This will prevent water from freezing and
damaging the mist line. For summer season start-up, follow Step 4 in the
Installation Instructions.
Note: Misting system is intended for outdoor use only.
INSTALLATION INSTRUCTIONS