LITHIUM
BATTERIES
ALKALINE
BATTERIES
-22ºF 158ºF
-4ºF 158ºF
(-30ºC) (70ºC)
(70ºC)
(-20ºC)
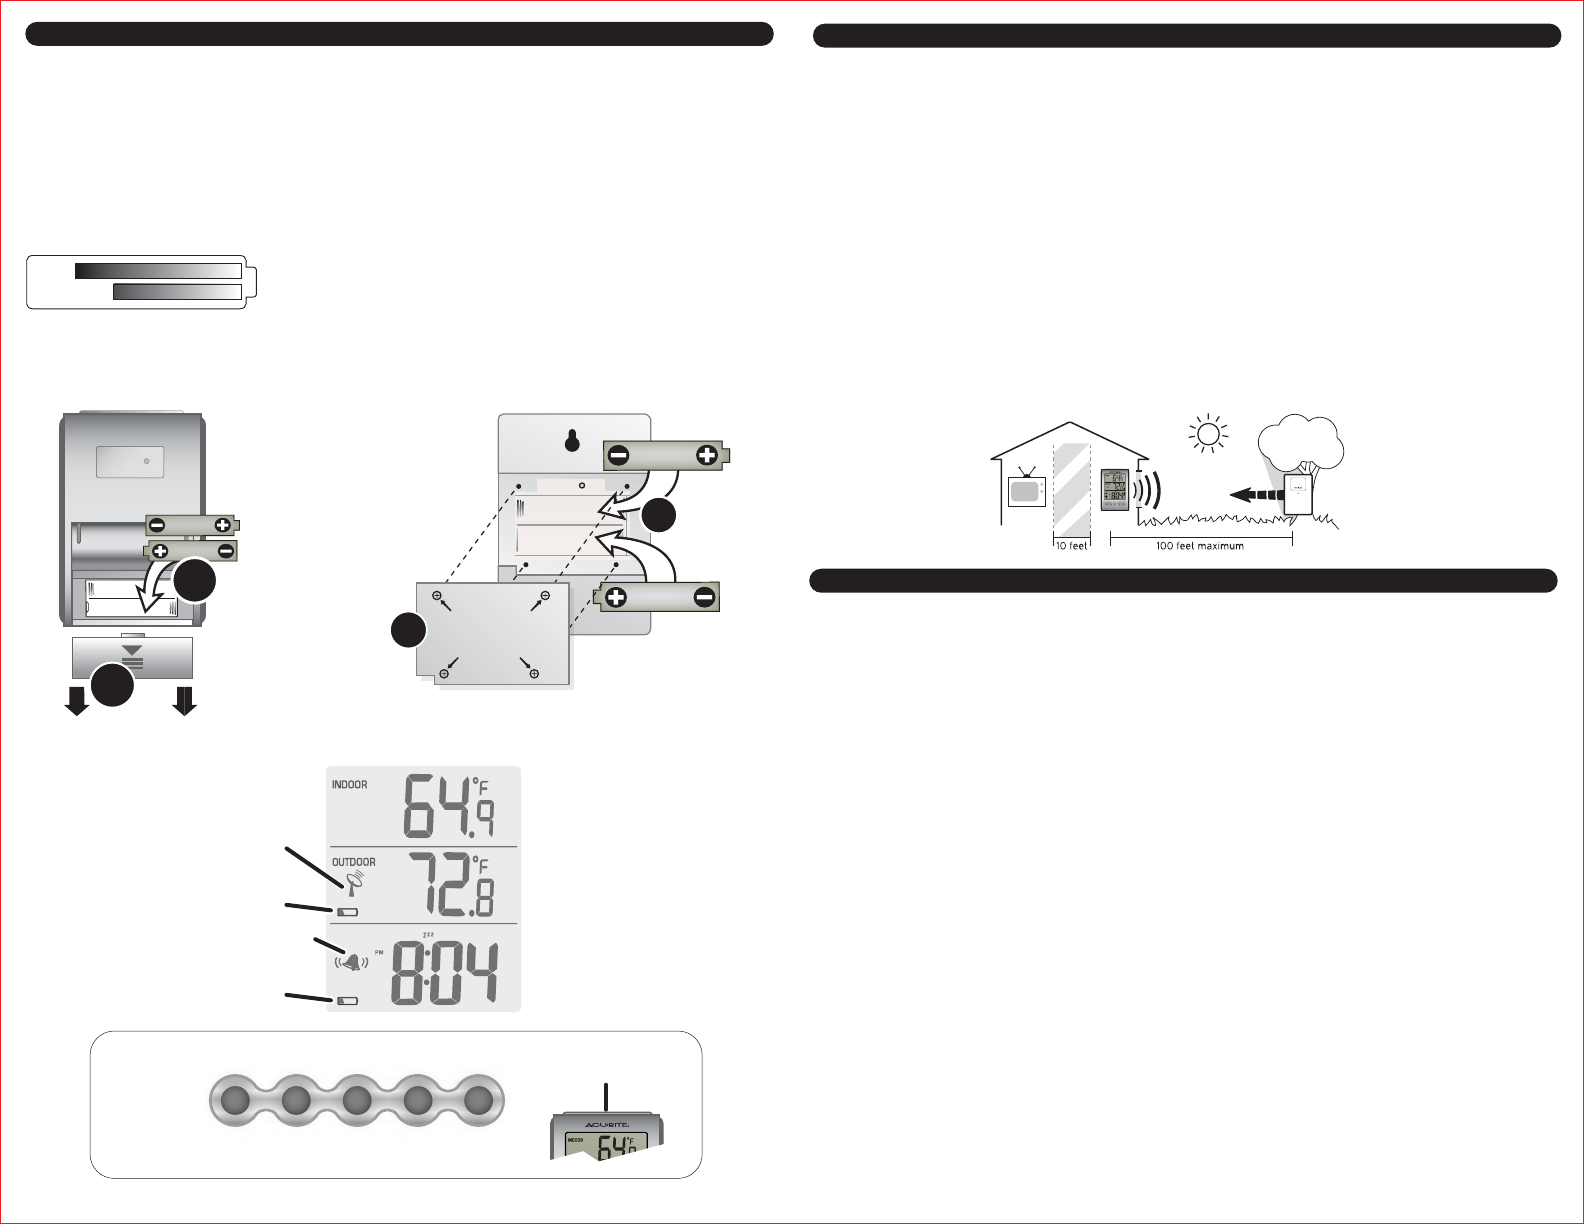
Operating Range of Batteries
Severe cold (below -4º F/-20º C) can cause alkaline
batteries to freeze and function improperly. Use lithium
batteries in extremely low temperature conditions to
ensure continued operation for wireless sensors placed
outdoors.
NOTE: The main unit is intended for indoor use only. Choose a dry location away from dust,
dirt, mold, smoke and avoid temperature extremes. Do not drop the clock. It is a sensitive
electronic device and not designed to withstand high impact blows of any kind.
Install 2 “AAA” batteries into the main unit FIRST. Next, Install 2 “AA” batteries (lithium is
recommended for areas where the temperature may fall below -4ºF) into the wireless
sensor.
3 SETUP
Set an Alarm Time:
1) Press and hold the “ALARM” button for 5 seconds, the hour flashes on and off.
2) Adjust the HOUR setting by pressing the “+” or “-” buttons (NOTE the AM & PM).
3) Confirm and move on to the MINUTE setting by pressing the “ALARM” button.
4) Adjust the MINUTE setting by pressing the “+” or “-” buttons.
5) Confirm and exit alarm setting mode by pressing the “ALARM” button again.
To Turn the Alarm On or Off: press and release the “ALARM” button (which will immidi-
ately display the alarm time that is currently set) and then press the “+” button. Press the
“ALARM” button again to exit.
Reset the Alarm:
To turn the alarm off (while it is ringing) for 24 hours, press the “ALARM” button.
5 USING the MAIN UNIT
Snooze/Light:
Press the “SNOOZE” button to silence the alarm for 10 minutes. The “SNOOZE” button also
activates the backlight for 5 seconds.
ºC/ºF:
Press and release the “ºC/ºF” button to switch between Celsius and Fahrenheit mode.
Set the Time:
1) Press and hold the “TIME” button for 5 seconds to begin the manual time set mode. The
hour will flash on and off.
2) Adjust the hour by pressing the “+” or “-” buttons (NOTE “PM”). Confirm and move on to
the minute setting by pressing the “TIME” button.
3) Adjust the minutes by pressing the “+” or “-” buttons. Confirm and exit time set mode by
pressing the “TIME” button.
To switch between 12 & 24 hour time display modes: Press the “+ / 12/24” button
4 CHOOSE WHERE TO PLACE THE MAIN UNIT and WIRELESS SENSOR
Main Unit: Choose wall mount or table-top placement.
• Choose a location for main unit that is at least 10 feet away from other electronic
devices that may interfere with the wireless signal.
• Wall mounting: Use the mounting slot on the back of main unit to hang on the wall.
• Table-top placement: The main unit has an integrated fold-out stand for table-top
placement.
Wireless Sensor: When placing the sensor, consider these things:
• Although the sensor is designed for outdoor use, placement in a protected area will
prolong its life.
• Mounting: Use the mounting slot on the back of the unit to hang it from a wall or vertical
surface.
• The sensor must be within 100 feet (30 meters) of each of the main units.
• The sensor is resistant to weather and to water. It is NOT WATERPROOF.
• Prolonged exposure to cold weather may cause damage to the LCD panel.
• Wireless sensor must be placed outdoors to observe outdoor temperature.
MAIN UNIT
(BACK)
WIRELESS SENSOR
(BACK)
1
AAA
AAA
2
AA
AA
REMOVE 4 SCREWS
TO OPEN BATTERY
COMPARTMENT
REMOVE
BATTERY
COMPARTMENT
COVER
1
2
INSTALL
2 “AAA”
BATTERIES
INSTALL
2 “AA”
BATTERIES
Alarm has
been set
FUNCTION
BUTTONS
(FRONT)
Low Battery Indicator
Low Battery Indicator
Wireless Sensor Signal
Capture (once a minute)
Indoor Temperature
Outdoor Temperature
Time & Alarm
TIME +
_
ALARM
12/24
ºC/ºF
SNOOZE
(& backlight)
LOW
LOW


