


9
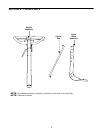
DEPTH STAKE
The depth bar controls the tilling depth. Refer to
SECTION 6: HOW TO USE YOUR TILLER on page
10.
ENGINE CONTROLS
See the separate engine manual for additional
information and functions of the engine controls.
PRIMER BUTTON (if equipped)
The primer button is located behind the air cleaner. It
is used to enrich the fuel mixture in the carburetor
when starting a cold engine.
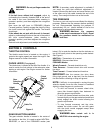
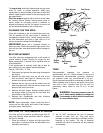
HANDLE ADJUSTMENT
The handle may be adjusted to be raised or lowered in
line with the tiller. To adjust the handle position loosen
the handle height adjustment crank a few turns. Pivot
handle up or down to desired position. Tighten crank.
See Figure 6.
CLUTCH CONTROL BAIL
The clutch control bail is located below the handle.
See Figure 6. Lifting the clutch control bail against the
handle engages the wheel and tine drive mechanisms.
NOTE: Never engage clutch lever while shifting.
SECTION 5: OPERATION
NOTE: Engine is shipped WITHOUT oil.
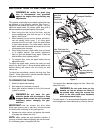
WARNING: Read, understand, and
follow all instructions and warnings on
the machine and in this manual before
operating.
BEFORE STARTING
Service engine with gasoline and oil as instructed in
the separate engine manual packed with your tiller.
Read instructions carefully.
WARNING: Use extreme care when
handling gasoline. Gasoline is extremely
flammable and the vapors are explosive.
Never fuel machine indoors or while the
engine is hot or running.
TO START ENGINE
NOTE: When pushing the unit with the engine off,
you will hear a ratcheting sound (gear noise) which is
normal.
WARNING: Be Sure No One Is Standing
In Front Of The Tiller While The Engine Is
Running Or Being Started.
1. Place gear selection lever in NEUTRAL.
2. Place the throttle control lever in the FAST (rabbit)
position. Place the engine speed control in the
START position.
3. Move choke lever to CHOKE position or if
equipped, push primer two (2) or three (3) times.
Wait about two (2) seconds between each push.
NOTE: A warm engine may not require choking.
4. Stand at side of tiller. Grasp the starter handle and
pull out slowly, until it pulls slightly harder. Let rope
rewind slowly.
5. Pull starter handle rapidly. Do not allow handle to
snap back. Allow it to rewind slowly while keeping
a firm hold on the starter handle.
6. Repeat steps 3 and 4 until engine starts.
7. As engine warms up and begins to operate evenly,
move choke lever gradually to RUN position. If
engine falters, return to choke position, then slowly
move to RUN position.
NOTE: Refer to engine manual for additional engine
information.
NOTE: After starting engine and prior to using the
tiller, be certain to check the clutch adjustment as
described in “Checking the Clutch Adjustment” section
of Assembly Instructions.
TO STOP ENGINE
1. Move throttle control to the STOP position.
2. Disconnect spark plug wire and ground to prevent
accidentally starting while equipment is
unattended.
NOTE: After the first ten hours of operation, recheck
the clutch adjustment. Refer to “Checking the Clutch
Adjustment” section of the Assembly Instructions.