


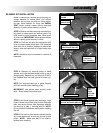
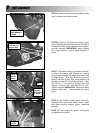
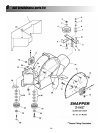
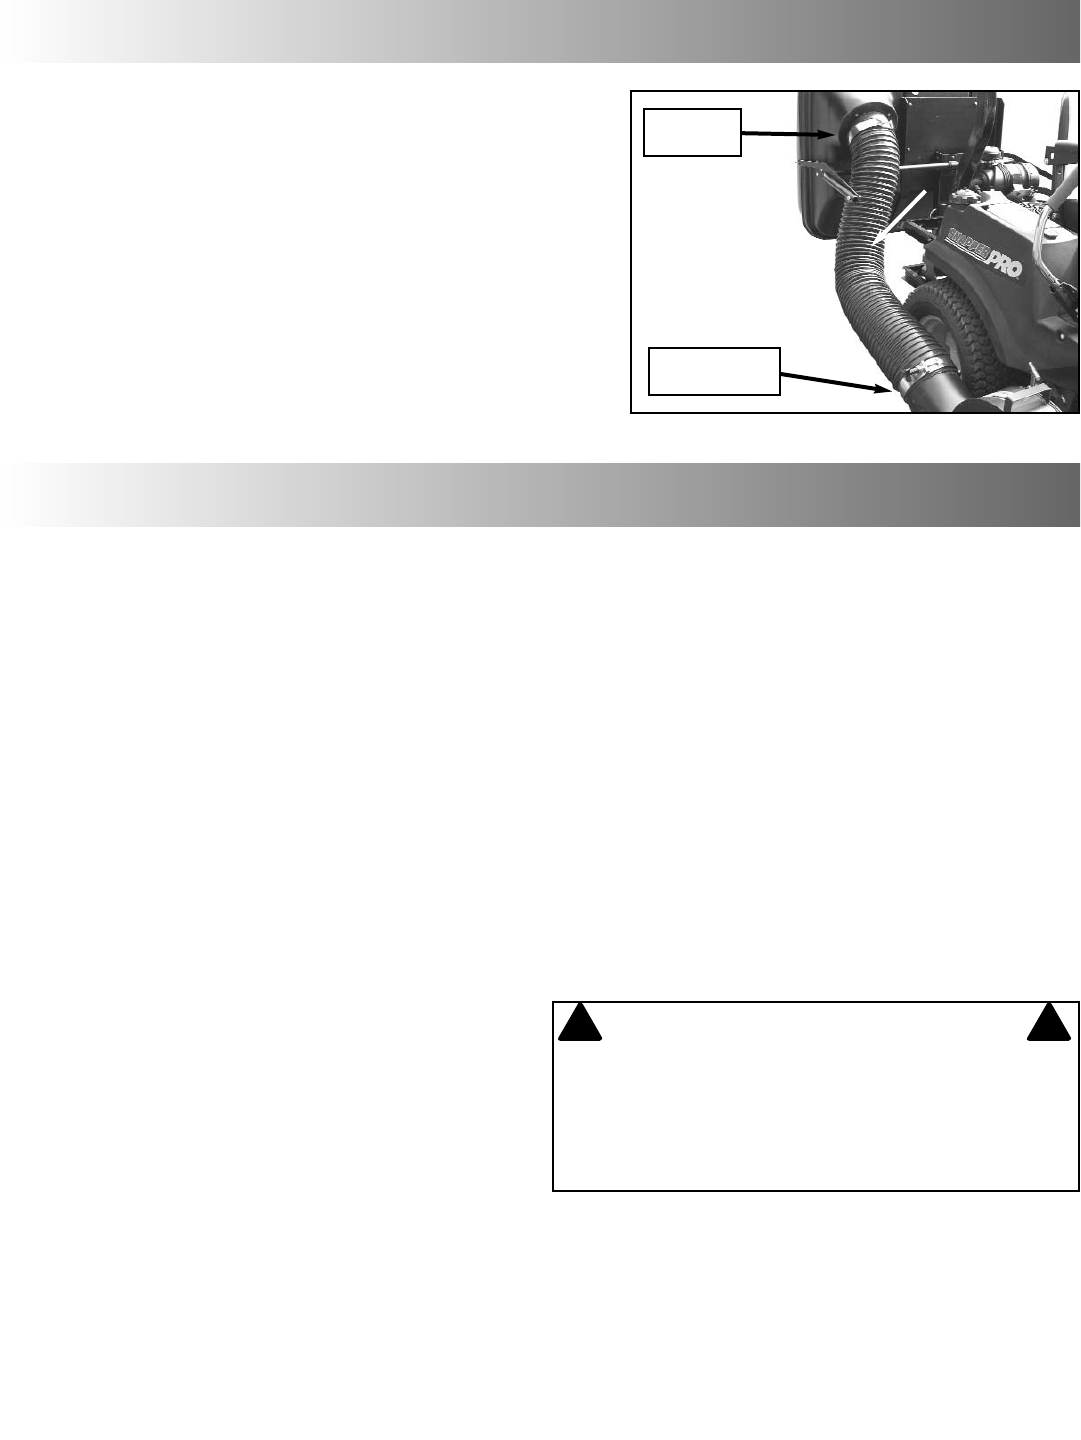
STEP 16: Slip one hose clamp onto each side of
discharge hose, and install hose between blower
and clamshell. NOTE: Install hose so that clamp
with nut is on the clamshell side, and the clamp
with the black quick-release knob is on the blower
side. Tighten both clamps securely.
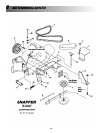
unit assembly
3
9
CLAMP
WITH NUT
CLAMP WITH
BLACK KNOB
unit operation & maintenance 4
INTRODUCTION
Follow operation and maintenance instructions in the
Operator’s Manual provided with the Snapper Mid-
Mount Z-Rider.
GRASS CATCHER OPERATION
1. Select desired cutting height. Choose a setting that will
not attempt to cut off too much at once, overloading the
machine.
2. After starting engine and allowing a brief warm up peri-
od, move engine speed control to highest setting.
3. Drive machine to cutting area. Engage blades.
4. Select a slow forward ground speed until familiar with
conditions. Do not select a speed that is too fast, caus-
ing the machine to become overloaded.
5. The weight of the grass catcher and contents will affect
the stability and handling of the machine. Avoid sudden
starts and sharp turns. Reduce speed on slopes, and
DO NOT operate machine on slopes exceeding 10
degrees (18% grade). Operate machine up and down
slopes. DO NOT operate machine across the face of
slopes. Turn blades off when traveling up slope.
6. Empty grass catcher often to minimize effect on stabili-
ty and handling. Over filling the catcher will reduce per-
formance and cause clogging of the hose, blower and
deck.
7. Do not operate the machine with the Grass Catcher
open. The entire Grass Catcher must be installed, the
catcher closed and latched properly before operating.
EMPTYING GRASS CATCHER
1. Empty Grass Catcher often to avoid overfilling.
Overfilling reduces performance and causes clogging of
hose, blower and deck.
2. Turn blades off. Drive machine to location the clippings
are to be dumped. DO NOT operate blades in reverse.
If you must back machine to dump clippings in desired
location, LOOK and SEE behind and down for children,
pets and hazards before and while backing.
3. Stop motion of machine by returning Motion Control(s)
to Neutral (N). Set Park Brake. Stop engine.
4. Lift up on handle sufficiently to allow all clippings to exit
catcher. If the dumped pile is too high to allow the catch-
er to close, you may be required to use a rake or simi-
lar implement to distribute the clippings.
5. After dumping, to maintain peak performance, check
the catcher screen located on the inside of the Rear
Cover Assembly to make sure it is clean and free of any
build up. Clean as required with brush or broom.
6. Close catcher. Push down firmly on handle to insure it
is properly latched.
7. Re-start engine and drive machine to cutting area. Set
engine speed to highest setting, engage blades and
resume operation.
IF THE GRASS CATCHER BECOMES CLOGGED
The grass catcher may become plugged if the conditions
are too severe, the catcher is overfilled, or the machine is
used improperly. If plugging does occur, attempt the follow-
ing:
1. Engine speed too slow – set engine speed control to
“FAST” position.
(Continued On Next Page)
WARNING
DO NOT attempt to remove any clogs from deck, blow-
er, or hose with engine or blade running. STOP engine.
STOP blades. Set brake. Remove key. Make sure
blades and all rotating components have come to a
complete stop before removing any catcher or unclog-
ging any catcher component.
! !