SignatureSignature
SignatureSignature
Signature
SeriesSeries
SeriesSeries
Series
TMB Optical
TMB-80
Thoma
s
M. B
a
ck
Congratulations on your purchase of our 80mm f/6.3 TMB-80
apochromatic FPL-53 ED triplet refractor. Its truly outstanding
optical and mechanical quality will provide you with many years
of highly portable observing and imaging enjoyment.
MOUNTING POSSIBILITIES
Your new TMB-80 is usable with many different types of
telescope mounts. A suitably sturdy altazimuth mount, such as the
Vixen Porta mount, is a good choice for general visual use. The
venerable German equatorial mount is also a popular choice, as it
can be used for both visual and imaging purposes.
The TMB-80 has a removable L-shaped combined tripod adapter
and dovetail mounting shoe. The dovetail is sized and shaped (with
slanted sides) to fit the dovetail slot on the head of many equatorial
and altazimuth mounts. It will mount without modification directly
onto Celestron Advanced Series; Meade LXD-75; and Vixen Great
Polaris, Porta, and Sphinx mounts, among others.
In addition, the mounting shoe has two 1/4”-20 thread mounting
holes that allow it to be installed on any suitably sturdy camera
tripod that has a standard 1/4”-20 thread mounting bolt.
The front hole balances the scope for 1.25” diagonal and eyepiece
use with the lens shade extended. The rear hole balances it when a
camera or 2” diagonal and eyepieces are mounted. The mounting
shoe can also be unbolted, rotated 180° on the scope body, and
reinstalled. This will move the balance point further back on the
scope body to help balance the TMB-80 if very heavy 2” accessories
are used. Cork pads on the underside of the mounting shoe help
keep the scope from swiveling when mounted on a tripod.
FOCUSER
Your TMB-80’s backlash-free 2” dual-speed Crayford focuser
terminates in a 2” compression ring eyepiece holder. This allows
visual use with 2” accessories and imaging with large format CCD
cameras. The non-marring soft brass compression ring won’t scratch
your star diagonal barrel as an ordinary thumbscrew can.
There is also a 2” to 1.25” compression ring adapter for visual
use with 1.25” accessories and for imaging with standard format
CCD, webcam, and 35mm photo adapters. The barrel of this adapter
is threaded to accept standard 2” filters and has a slight taper at the
top that engages the compression ring of the 2” adapter. This
prevents the 1.25” adapter from slipping out of the focuser should
the 2” focuser’s thumbscrew accidentally loosen during use.
The precision-made focuser has dual-speed focusing. There are
two coarse focusing knobs. The right knob also has a smaller
concentric knob with a 11:1 ratio reduction gear for microfine
focusing. This provides exceptionally precise image control during
high power visual observing or critical film or CCD imaging. The
focus knobs have ribbed gripping surfaces so they are easy to
operate, even while wearing gloves or mittens in cold weather.
The focuser drawtube has a long 80mm (3.1”) travel. It has a
scale marked on the top in 1mm increments so you can note
individual focuser positions for easy return to the correct focus
when switching between visual use and photography. A knob under
the focuser lets you lock in your photographic focus.
A built-in camera angle adjuster (focuser rotation system) lets
you rotate the focuser a full 360°. This lets you rotate an attached
camera to line up in either a landscape or portrait orientation (or
any orientation in between) without losing focus. It also lets you
put your star diagonal and eyepiece into the most comfortable
observing position as you move from one area of the sky to another.
Turn the red ribbed ring at the front of the focuser to the left to
loosen the focuser, rotate the focuser to the desired orientation,
then turn the red ring back to the right to temporarily lock in the
focuser’s new orientation.
FINDERSCOPE MOUNTING
Your TMB-80 is supplied with an attachment point for a quick-
release finder bracket on the upper left front side of the focuser. It
has a screwdriver-slotted insert that can be unscrewed to provide a
mounting point for any of a number of red dot type non-magnifying
finders. Contact your telescope dealer for an appropriate finder if
you do not already have one that is suitable.
COOL DOWN TIMES
For any optical system to give its best wavefront (for the sharpest
and highest contrast images), the optics must be at or very near the
temperature of the surrounding air. The “cool down” time needed
to reach ambient temperature varies considerably, as the temperature
of the scope must change from a typical 72° Fahrenheit indoor
temperature to an outdoor temperature that can range from a high
of over 100° down to 10° below zero or less. In small doublet
refractors, the cool down (or heat up) time is quick, usually less
than 30 minutes. In subfreezing temperatures, it may take a small
refractor twice that time or more to reach its best performance.
This is particularly true with triplet refractors, where the thermal
load of the center lens is isolated from the surrounding air by the
lenses on either side of it. This slows the transfer of the center lens
heat load to the outside air.
If you’d like to shorten the wait to reach thermal equilibrium,
placing the telescope in an unheated garage for an hour or two
before observing can speed up the cool down process considerably.
Another technique to shorten cool down time is to retract the
insulating dew shield to allow direct exposure of the cell and lens
to the night air so they can reach thermal equilibrium faster. Once
the lens has cooled, extend the dew shield again. This provides a
faster cool down time, and generally will still keep the lens from
dewing up. Only on the highest dew point nights will the objective
lens form dew on its front optical surface.
The best way to avoid dew forming on the lens after you bring
the telescope into the house is to take your closed scope case outside
when you observe, so it can also reach ambient temperature. When
you are finished observing, cap the telescope with its dust caps
and place it into the carrying case. Bring it into the house and let it
slowly warm back up to room temperature, then remove the dust
caps to allow any trace of dew to evaporate. Once the objective is
free from dew, replace the dust caps and store the scope away.
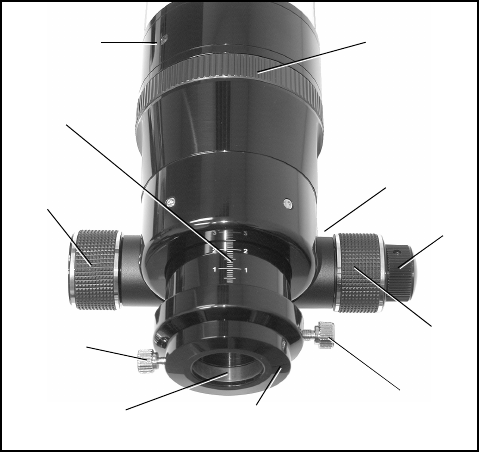
Coarse
focus
knob
1.25” accessory
adapter
Fine
focus
knob
Coarse
focus
knob
Finderscope
mounting
point
2” accessory
adapter lock knob
1.25”
accessory
adapter
lock knob
Focusing scale
on drawtube
Soft brass
compression ring
Camera angle
adjuster
(rotating
focuser)
locking collar
Drawtube
lock knob
under
focuser


