


0FHC9
First Watch Weather Station
USER MANUAL
(FIG. 1)
(FIG. 2)
(FIG. 3)
(FIG. 4)
OVERVIEW
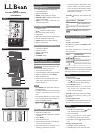
FRONT VIEW (FIG. 1)
1. 12 / 24 hr clock, date and alarm area
2. Indoor temperature
3. Outdoor temperature
4. MODE: Change settings or display
5.
SNOOZE / LIGHT: Activate snooze function /
Turn on the backlight
6. MEM: View current, maximum and
minimum temperature
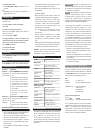
BACK VIEW (FIG. 2)
1. Wall mount hole
2. / : Increase / decrease setting
3. AL: View alarm status; set alarm
4. Table stand
5. CH: Swi
tch remote outdoor sensor display
6.
°C / °F
: Select temperature unit
7. RESET: Reset unit to default settings
8. Battery compartment
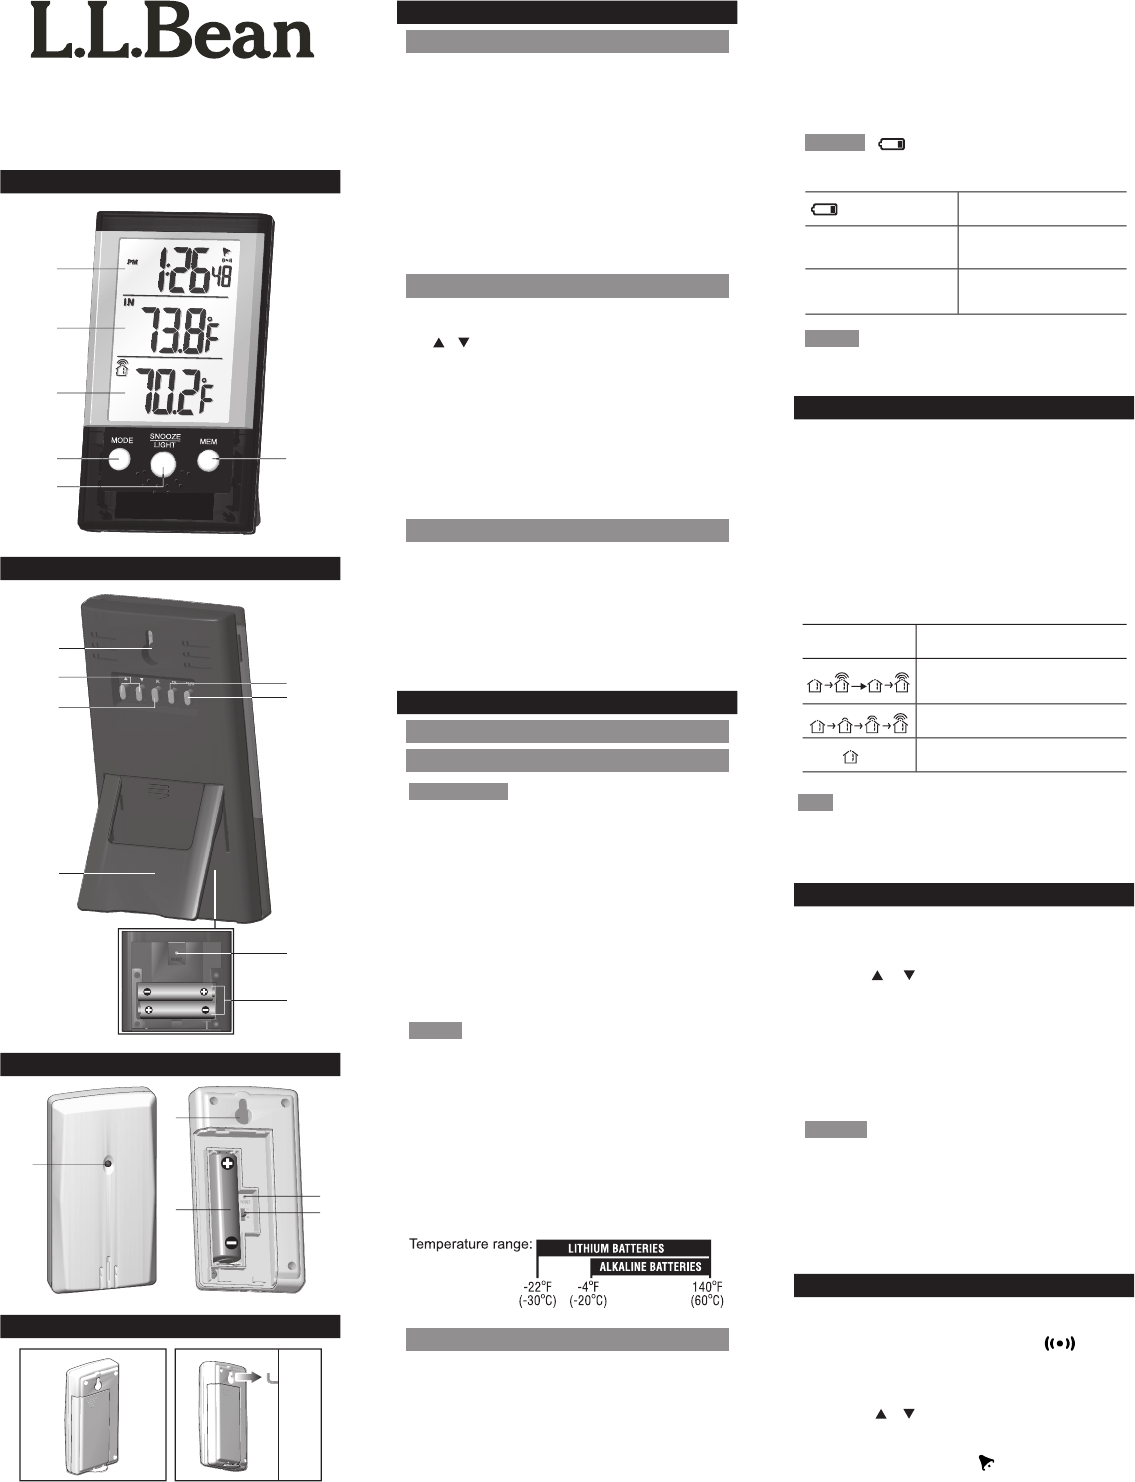
REMOTE OUTDOOR SENSOR (FIG. 3)
1. LED status indicator
2. Wall mount hole
3. Battery compartment
4. RESET hole
5. CHANNEL switch
GETTING STARTED
INSERT BATTERIES - REMOTE
OUTDOOR SENSOR
IMPORTANT Set up the remote outdoor sen-
sor fi rst before setting the main unit.
1. Slide open the battery door.
2. Insert the batteries, matching the polarities.
3. Select a channel, then press RESET.
4. Close the battery door.
5. Place the sensor outdoors within 30 m
(98 ft) of the main unit using the wall
mount (see FIG. 4).
NOTE
• Press RESET after each battery change or
channel selection.
• The remote outdoor sensor must be placed
outdoors, and protected from rain and
snow.
• Use alkaline batteries for longer usage
and consumer grade lithium batteries in
temperatures below freezing.
INSERT BATTERIES - MAIN UNIT
1. Remove the battery door.
2. Insert the batteries, matching the polarities
(see FIG. 2).
3. Press RESET.
4. Close the battery door.
5. Place the main unit within 30 m (98 ft) of
the remote outdoor sensor.
6. Wait while the sensor reception icon is
blinking, it is searching for sensor.
7. To show the outdoor temperature, make
sure the number in the sensor reception
icon is the same as the selected channel
in the remote outdoor sensor. If not, press
CH to select the number.
NOTE
Displays when batteries are
low.
LOCATION
MEANING
Indoor temperature
area
Main unit batteries low
Outdoor temperature
area
Sensor batteries low
NOTE Press RESET after each battery
change.
SENSOR DATA TRANSMISSION
The main unit can collect data from up to 3
sensors.
To search for a sensor:
Simultaneously, press and hold MEM and CH
for 2 seconds.
The sensor reception icon
in the main unit
shows the status:
ICON DESCRIPTION
Main unit is searching for
sensor(s)
A sensor has been found
The sensor cannot be found
TIP The transmission range may vary depend-
ing on many factors. You may need to experiment
with various locations to get the best results.
CLOCK
To set the clock:
1. Press and hold MODE.
2. Press or to change the settings. (Press
and hold to change the setting quickly.)
3. Press MODE to confi rm.
4. The settings order is: 12 / 24 hr format,
hour, minute, year, day-month format,
month, day and language.
NOTE
The language options are English
(E), German (D), French (F), Italian (I), and
Spanish (S).
To select display mode:
Press MODE to choose between clock with
seconds, clock with weekday and calendar.
ALARM
To set the alarm:
1. Press AL to view alarm display. shows
when the alarm time is displayed.
2. Press and hold AL.
3. Press / to set hour / minute. (Press
and hold to change the setting quickly.)
4. Press AL to confi rm. indicates alarm is
ON.
To toggle alarms ON / OFF:
1. Press AL to display alarm time.
2. Press AL again to turn alarm ON / OFF.
1
2
3
4 6
5
2
1
5
6
7
8
3
4
2
3
4
5
1