


1
© Copyright 2011 Printed
ZST40 & ZST48 Mulching Baffle Kit
Land Pride Zero Turn Mower
9/14/11
Manual No. 357-554M
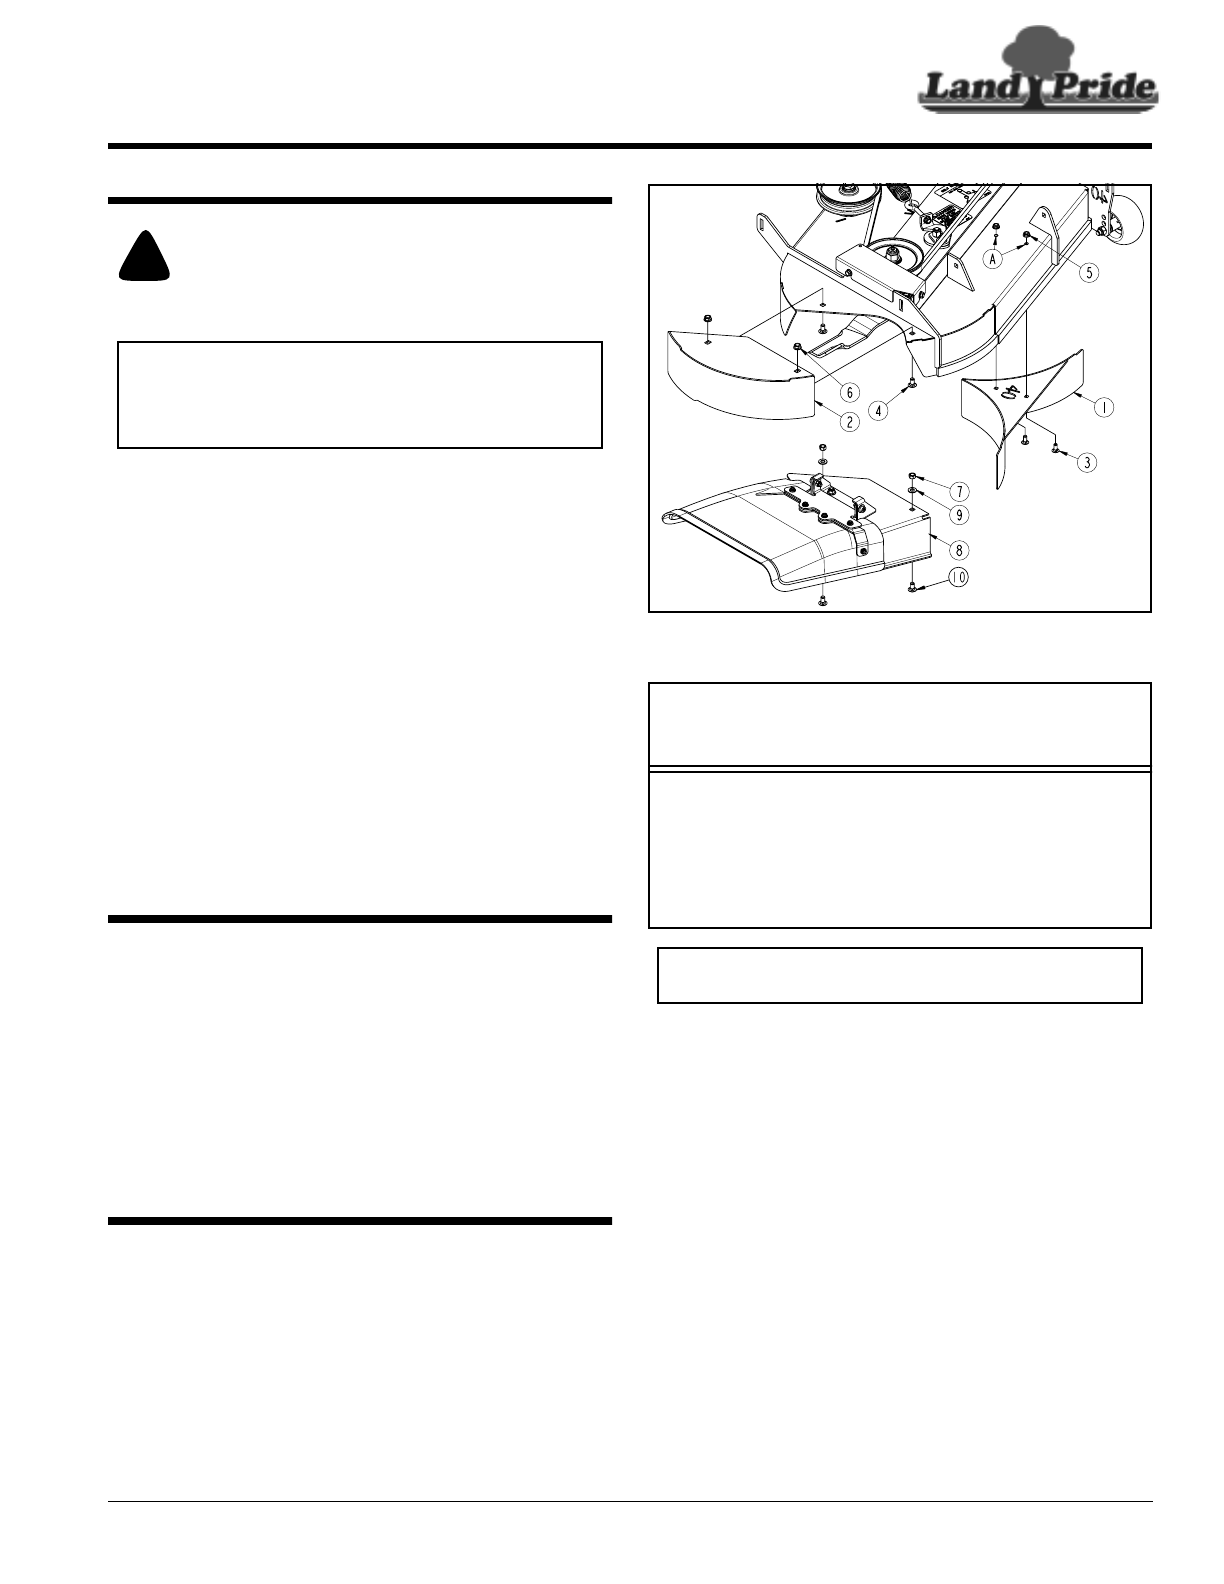
ZST40 Mulching Baffle Kit Shown
Figure 1
2. Remove floor platform and raise front end of mower
enough to allow room to install baffles under the deck.
Refer to Figure 1:
3. Remove hex top lock nuts (#7), flat washers (#9),
carriage bolts (#10), and discharge chute (#8). Store
removed parts in a safe location for reinstallation
should the baffles ever be removed.
4. Locate two pilot holes (A) which have knock-outs
in the deck. Punch-out these holes. Make sure
knock-outs are completely removed.
5. Attach mulching baffle (#1) to the deck with
5/16"-18 x 3/4" GR5 carriage bolts (#3) and secure
with hex whiz nuts (#5). Tighten nuts to 17 ft-lbs.
6. Attach mulching plug (#2) to the deck with two
3/8"-16 x 3/4" GR5 carriage bolts (#3) and hex flange
nuts (#6). Tighten nuts to 31 ft-lbs.
7. Lower unit down and reconnect spark plug wires.
27905
357-461A ZST40 MULCHING BAFFLE KIT
Your Kit Includes: (Mulching Blades Not Included)
Item Qty. Part No. Part Description
1 1 357-447H BAFFLE, MULCH, 40
2 1 357-448H MULCH PLUG, 40
3 2 802-092C RHSNB 5/16-18X3/4 GR5
4 2 802-149C RHSNB 3/8-16X3/4 GR5
5 2 803-043C NUT HEX WHIZ 5/16-18 PLT
6 2 803-068C NUT HEX FLANGE 3/8-16 PLT
357-354M THIS MANUAL
IMPORTANT: Be sure to properly block mower up
so it can not move after it is raised.
Before You Start
Your Land Pride Mulching Baffle Kit is exclusively
designed for the ZST Series Land Pride Zero Turn
Mowers. Please read these installation instructions and
the vehicle Operator’s Manual thoroughly before
beginning. Especially read information relating to safety
concerns. Also included in the Operator’s Manual is
important information on operation, adjustment,
troubleshooting, and maintenance for this attachment.
Some manual sections do not apply to all accessories.
A separate Parts Manual for replacement parts can be
purchased from your nearest Land Pride dealer or
downloaded free of charge from our web site at
www.landpride.com. Have model and serial numbers
handy when placing an order.
Manual Part Numbers:
• Operator’s Manual . . . . . . . . . . . . . . . . 357-505M
• Parts Manual . . . . . . . . . . . . . . . . . . . . . 357-505P
General Information
These assembly instructions apply to the following
Mulching Baffle Kits listed below.
357-461A . . . . . . . . . . . . . . . . . . . . . . . . MULCH KIT, 40 IN
357-484A . . . . . . . . . . . . . . . . . . . . . . . . MULCH KIT, 48 IN
Tools required
When you see this symbol, the subsequent
instructions and warnings are serious - follow
without exception. Your life and the lives of
others depend on it!
!
IMPORTANT: Before you begin, read these
instructions and check to be sure all parts and tools
are accounted for. Please retain these instructions
for future reference and parts ordering information.
• Safety glasses
• Work gloves
• Drive Punch
• Hammer
• 9/16" wrench
• 1/2" wrench
• Torque wrench with 1/2" & 9/16" sockets
ZST40 Mulching Kit Assembly
ZST40 . . . . . . . . . . . . . . . . . . Kit No. 357-461A
A detailed listing of parts for this ZST40 Mulching Baffle
Kit is provided on this page. Use the parts list as a
checklist to inventory parts received. Please contact
your local Land Pride dealer for any missing hardware.
For mulching blade information, see “Mulching Blades”
on page 2.
1. Park mower on a flat surface, move control levers
fully out, set park brake lever to on, shut engine off,
remove key, and remove spark plug wires from spark
plugs.