


1
© Copyright 2005 Printed
All Rotary Cutter Series - Kit Part No. 318-586A
Rotary CutterBlade Bolt Kit
8/01/06
Manual No. 318-000M
!
DANGER!
Always disconnect main driveline from tractor PTO before
servicing underside of cutter deck. Cutter can be engaged if
tractor is started resulting in damage to the cutter, bodily injury
or death.
Tools required:
1. Align dishpan blade bolt hole with access hole in
deck.
2. Place tractor gear selector in park and/or set brakes,
shut engine off and remove ignition key.
3. Disconnect main driveline from tractor PTO and
secure cutter deck in the up position with solid
supports before servicing underside of cutter.
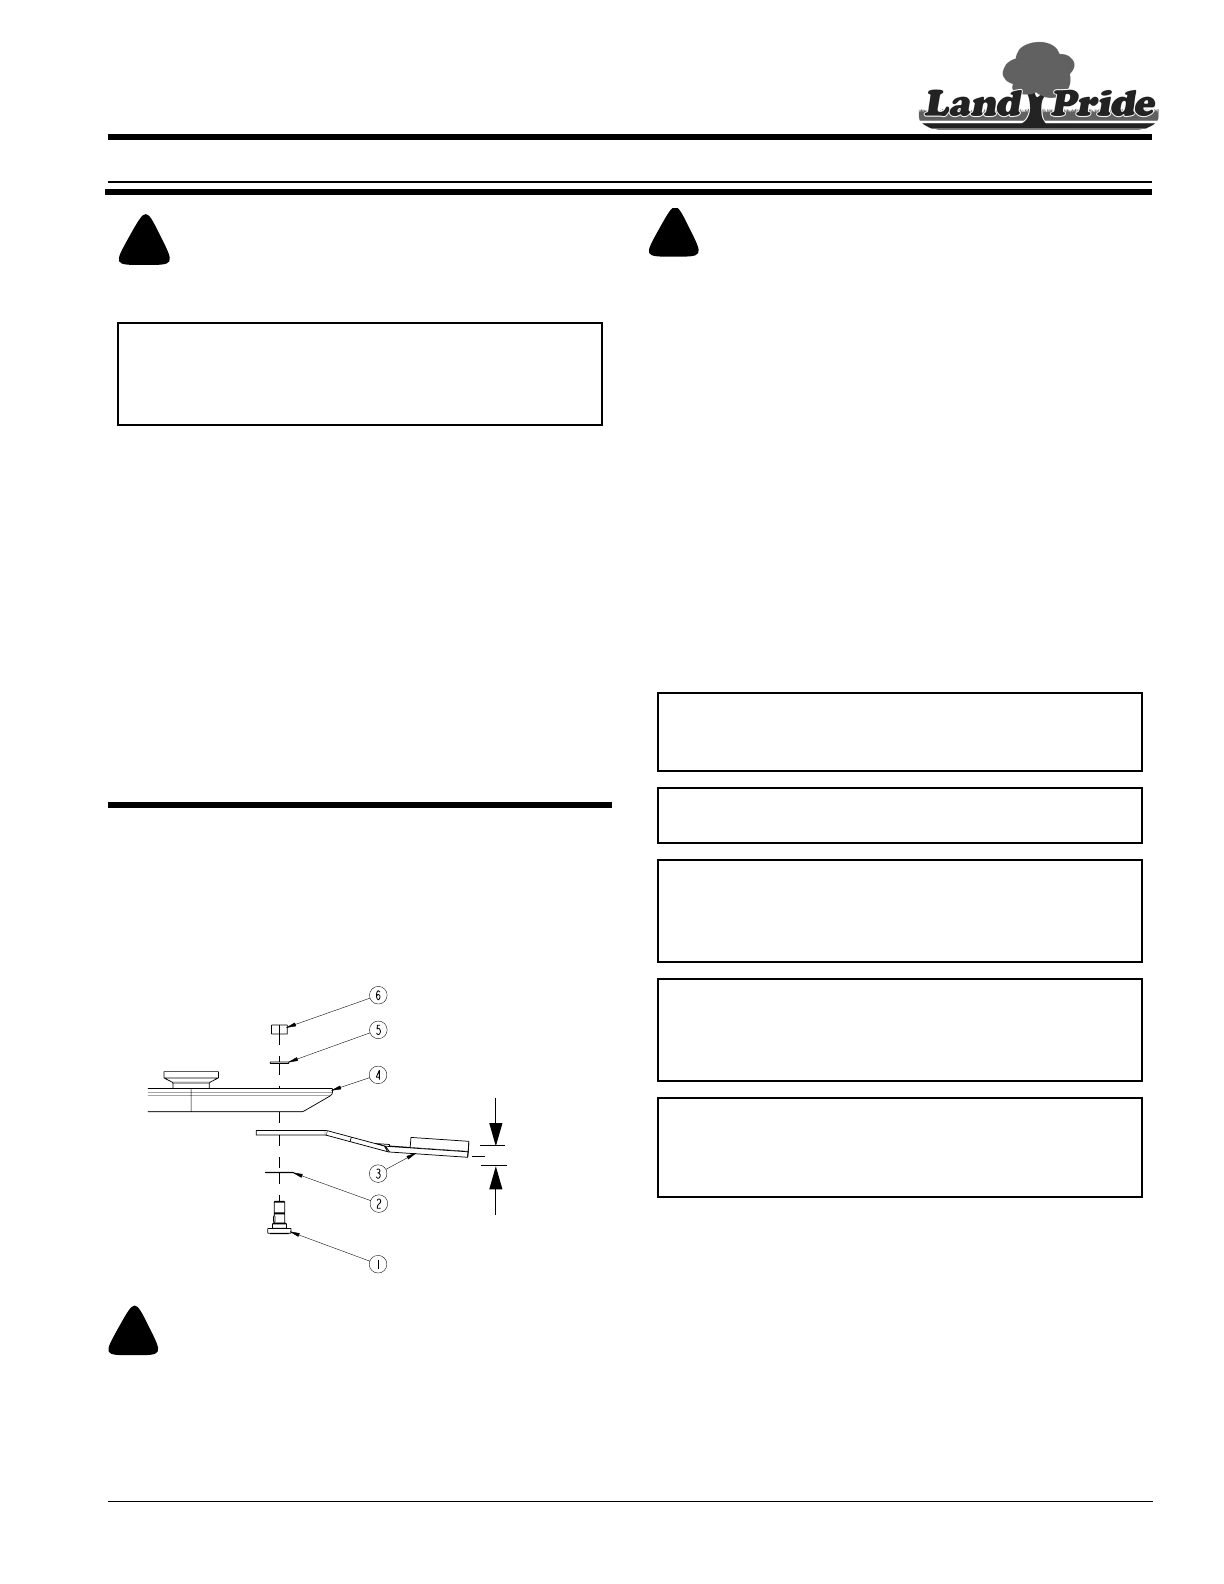
4. Start by assembling blades without shim (#2). Insert
blade bolt (#1) through blade (#3), dish pan (#4) and
flat washer (#5). Temporarily secure blade with a
used 1 1/8"-12 nut. Draw nut up snug. Do not
tighten.
5. Check blade deflection. If deflection is greater than
3/4", remove blade bolt and reassemble as before
except include shim (#2) in the assembly. Select
shim thickness based on deflection. The greater the
deflection, the thicker the shim.
6. Once blade deflection is correct, replace used nut
with new locknut (#6) and torque to 450 ft. lbs.
• Safety Glasses
• Work Gloves
• Flat Tip Screwdriver
• Used 1 1/8"-12 Nut
• 1 11/16" Socket
• 10" Socket Extension
• Torque Wrench
(450 ft. lbs. Capacity)
IMPORTANT: Replacement blades should be
ordered in pairs. Order only genuine Land Pride
blades. Other blades may not meet specifications.
IMPORTANT: Both blades should weigh the same
with not more than 1 1/2 oz. difference.
IMPORTANT: Refer to your Operator’s Manual or
deck decal for direction of blade rotation to ensure
correct blade placement. Cutter blades must be
installed with cutting edge leading in rotation.
IMPORTANT: Shim (#2) below may or may not be
required. If blade deflection is less than 3/4" without
a shim, then the shim is not used. However, a shim
is required if blade deflection is greater than 3/4".
IMPORTANT: Locknuts can loose their ability to lock
properly once removed. Therefore, always use a
used blade nut or plain nut in steps 4 & 5 below and
then replace used nut with new locknut in step 6.
Your Blade Bolt Kit is exclusively designed for your Land
Pride Rotary Cutter. Please read these installation
instructions and your Rotary Cutter Operator’s Manual
thoroughly before beginning. Especially read information
relating to safety concerns.
A separate Parts Manual for your Rotary Cutter is
available free of charge at www.landpride.com or can be
purchased from your local dealer. Have model and serial
numbers handy when placing an order.
A detailed listing of parts for this accessory kit is listed
below. Use the list as a checklist to inventory parts
received. Please contact your local Land Pride dealer for
missing hardware.
!
WARNING!
Always secure cutter deck in the up position with solid supports
before servicing underside of cutter. Never work under
equipment supported by hydraulic jacks. Hydraulic jacks can
drop equipment if controls are actuated or if hydraulic lines
burst. Either situation can drop the cutter instantly even when
power to the hydraulic system is shut off.
When you see this symbol, the subsequent
instructions and warnings are serious - follow
without exception. Your life and the lives of
others depend on it!
!
IMPORTANT: Before you begin, read these
instructions and check to be sure all parts and tools
are accounted for. Please retain these instructions
for future reference.
Land Pride Blade Bolt Kit No. 318-586A
Item Qty Pt No Description
1 1 802-277C BLADE BOLT 1 1/8-12 x 3 7/16 W/ KEY
2 1 312-075D BLADE SPACER 16 GA. (.060")
2 1 312-082D BLADE SPACER 18 GA. (.048")
2 1 312-089D BLADE SPACER 20 GA. (.036")
2 1 312-808D BLADE SPACER 24 GA. (.024")
5 1 804-147C WASHER FLAT 1 HARD ASTMF436
6 1 803-170C NUT HEX TOP LOCK 1 1/8-12 PLATE
N/A 1 318-000M MANUAL, BLADE BOLT KIT
3/4" maximum
blade deflection
when blade
bolts are tight