


1
New
Moon
Waning
Crescent
First
Quarter
Waxing
Gibbous
Waxing
Crescent
Last
Quarter
Full
Moon
Waning
Gibbous
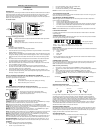
LCD
display
Function
keys
WIRELESS 915 MHz WEATHER STATION
WS-9257U-IT
Quick Setup Guide
INTRODUCTION
Congratulations on purchasing this weather station with wireless 915 MHz transmission of outdoor
temperature/humidity and display of indoor temperature/humidity and air pressure history. Clock
function with quartz accuracy including calendar display and time alarm. In addition, weather
forecast, sunrise/ sunset time as well as the moon phase are displayed. This innovative product is
ideal for use in the home or office.
The weather station
The outdoor thermohygro transmitter
Remote transmission of outdoor temperature to Weather Station by 915 MHz
Water resistant casing
Wall mounting case
Mounting at a sheltered place. Avoid direct rain and sunshine
INITIAL SET UP
Do Not Mix Old and New Batteries
Do Not Mix Alkaline, Standard, or Rechargeable Batteries
1. Insert the batteries into the thermohygro transmitter. Keep the transmitter 5-10 feet from the
Weather Station during set up.
2. Within 45 seconds, insert batteries into the Weather Station. Once the batteries are in place
all segments will light up briefly. The time will be displayed as 12:00. If this is not displayed
within 80 seconds, remove the batteries from both units for 2 minutes and start again from
step 1.
3. The weather station will start receiving data from the transmitter. The outdoor temperature
and signal reception icon will be displayed. If this is not displayed within 80 seconds,
remove the batteries from both units for 2 minutes and start again from step 1.
4. Allow the weather station and the transmitter to remain 5-10 feet apart for 15 minutes after
set up to establish a strong connection.
5. To ensure sufficient 915 MHz transmission after set up, the distance between the
transmitter mounted outside and the weather station inside should not exceed 330 feet
(100 meters) distance (open air, no obstructions).
6. Test the weather station and the transmitter in the positions they will be located for one
hour before permanently mounting. If the outdoor temperature signal goes to dashes restart
from step 1 and try a new location.
INSTALL AND REPLACE BATTERIES IN THE TEMPERATURE TRANSMITTER
The outdoor temperature transmitter uses 2 x AAA, IEC LR3, 1.5V batteries. To install and replace
the batteries, please follow the steps below:
1. Remove the cover.
2. Insert batteries, observing the correct polarity (see marking).
3. Replace the battery cover on the unit.
INSTALL AND REPLACE BATTERIES IN THE WEATHER STATION
The weather station uses 2 x C, IEC LR14, 1.5V batteries. To install and replace the batteries,
please follow the steps below:
1. Remove the cover at the back of the weather station.
2. Insert batteries, observing the correct polarity (see marking).
3. Replace the compartment cover.
MANUAL SETTINGS
Press and hold the SET key for 5 seconds to enter the manual setting mode.
CONTRAST: LCD and a number will flash. Press and release the + key or MIN/MAX key to adjust
the contrast. Press and release the SET key to continue to the next item.
DST: dSt and ON or OFF will flash. Press and release the + key or MIN/MAX key to adjust
Daylight Saving Time on or off. Press and release the SET key to continue to the next item.
HOUR: The Hour will flash. Press and release the + key or MIN/MAX key to adjust the hour. Press
and release the SET key to continue to the next item.
MINUTES: LCD and a number will flash. Press and release the + key or MIN/MAX key to adjust
the minutes. Press and release the SET key to continue to the next item.
YEAR: The will flash. Press and release the + key or MIN/MAX key to adjust the year (the year will
only show in the program menu). Press and release the SET key to continue to the next item.
MONTH: The Month will flash. Press and release the + key or MIN/MAX key to adjust the month.
Press and release the SET key to continue to the next item.
DATE: The Date will flash. Press and release the + key or MIN/MAX key to adjust the date (day of
the week will set itself). Press and release the SET key to confirm and continue to the next item.
RELATIVE PRESSURE: The relative pressure number will flash. Press and release the + key or
MIN/MAX key to adjust the relative pressure. Press and release the SET key to confirm and exit.
ALARM SET:
The alarm time can be set when pressing the ALARM key:
Hold the ALARM key until the alarm hour digits flash.
Use the + key to set the alarm hour.
Press the ALARM key again so the minute digits flash.
Use the + key to set the alarm minutes.
Confirm with the ALARM key, to exit the Alarm setting.
NOTE: The maximum alarm ring duration is 2 minutes.
ACTIVATE/DEACTIVATE ALARM:
Press and release the ALARM key to activate or deactivate the alarm. The alarm icon (((●))) will
show on the LCD if the alarm is activate.
VIEW AND RESET THE MIN/MAX READINGS:
VIEW: To toggle between the MIN/MAX data for indoor temperature and outdoor temperature
press and release the MIN/MAX key.
Once to show the MAX indoor temperature data.
Twice to show the MIN indoor temperature data.
Three times to show the MAX outdoor temperature data with the recorded time and date
Four times to show the MIN outdoor temperature data with the recorded time and date
A five times to return to normal display with current data.
RESET: Hold the MIN/MAX button for 5 seconds to reset both indoor and outdoor min/max data.
LOW BATTERY INDICATORS
Low battery indicator will show on the LCD when the batteries of weather station or transmitter
require changing.
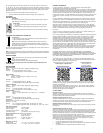
THE MOON PHASE ICONS
The weather station displays 8 different moon phase icons. The current moon phase is indicated
with a bar segment according to the set calendar.
DISPLAY MODES:
Between the sunrise and sunset time below the moon phase, press and release the SUN button to
toggle between the displays of:
Hours of sunlight
Location
Month, Date
Seconds
Pressure number display: Press and release the SET button to switch from Relative Pressure
(rel) to Absolute Pressure reading (abs).
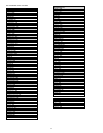
SUNRISE/SUNSET LOCATIONS
Press and hold the SUN key for 5 seconds to enter the location for sunrise/sunset times. Please
use the location most directly in a North/South direction of your location if your location is not
listed. Location list is at the end of this guide.
Select a country, state and city:
1. Once “USA” or “CAN” is selected, press the SUN key to enter the state setting.
2. The state code (2 letters abbr.) will flash. Press the + key or the MIN/MAX key to select the
state.
3. After the state has been selected, press the SUN key to enter the city setting.
4. The 3 letters city abbr. will flash. Use the + key or MIN/MAX key to select the city.
5. Confirm with the SUN key. The city’s sunrise, sun duration and sunset time will display in a
few seconds.
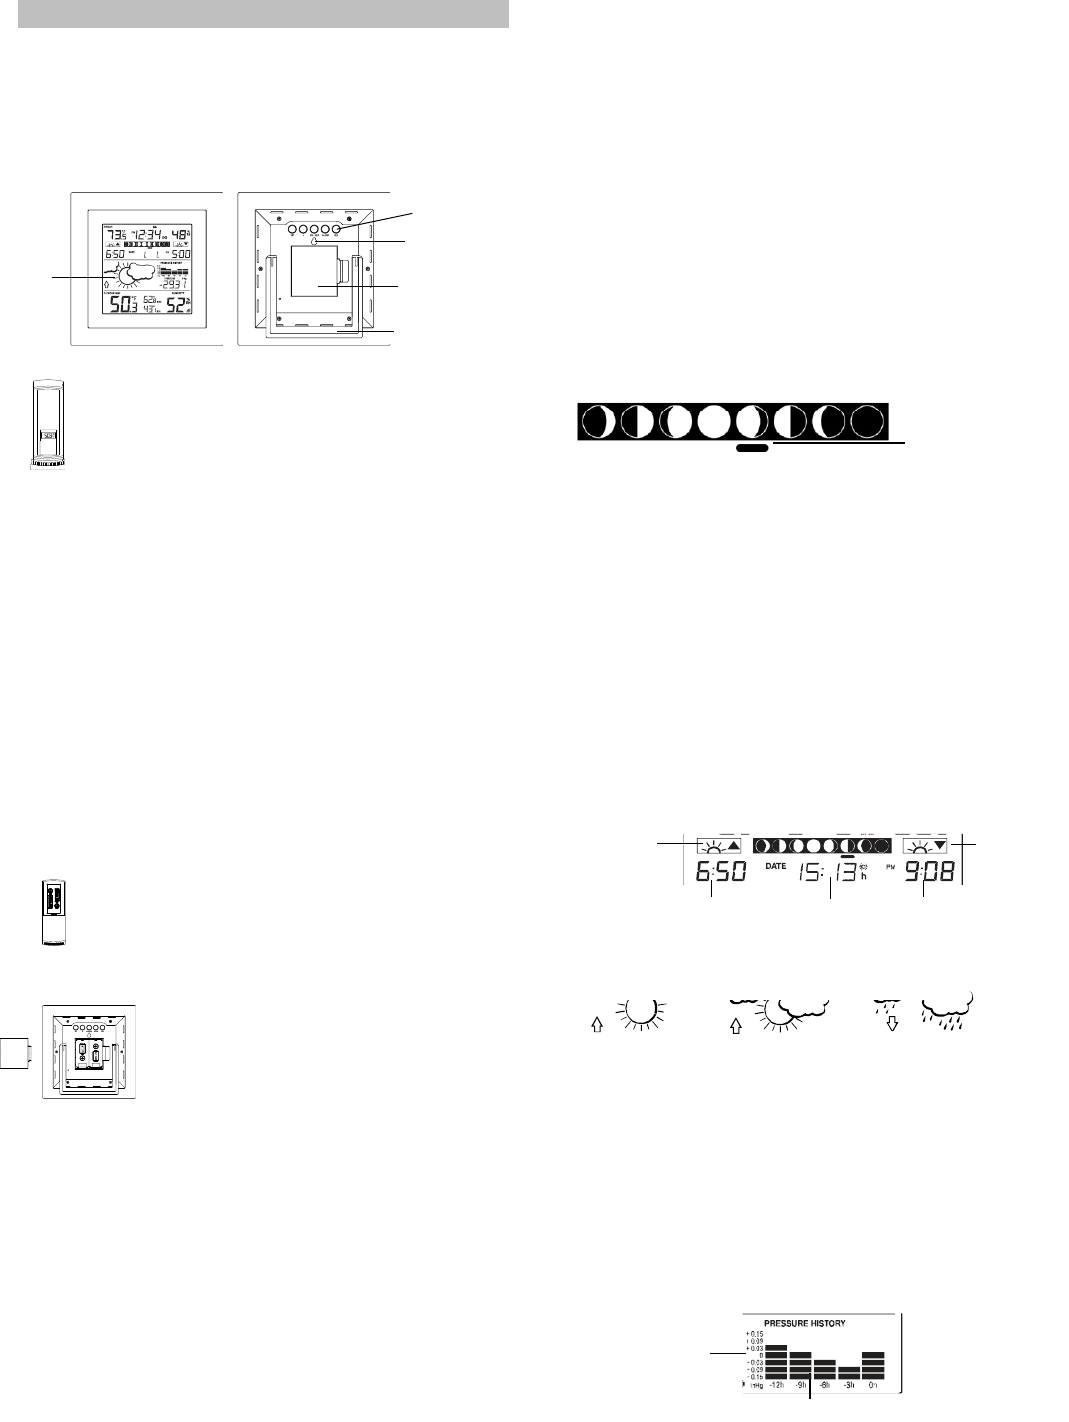
WEATHER FORECASTING ICONS
Weather icons display in any of the following combinations:
For every sudden or significant change in the air pressure, the weather icons will update
accordingly to represent the change in weather. The icons displayed forecasts the weather in
terms of getting better or worse and not necessarily sunny or rainy as each icon indicates. For
example, if the current weather is cloudy and the rainy icon is displayed, it does not mean that the
product is faulty because it is not raining. It simply means that the air pressure has dropped and
the weather is expected to get worse but not necessarily rainy.
Note: After set up, readings for weather forecasts should be disregarded for the next 48 hours.
This will allow sufficient time for the Weather station to collect air pressure data at a constant
altitude and therefore result in a more accurate forecast.
WEATHER TENDENCY INDICATOR
Working together with the weather icons is the weather tendency indicator (located on the left of
the weather icons). When the arrow points upwards, it means that the air pressure is increasing
and the weather is expected to improve, but when arrow points downwards, the air pressure is
dropping and the weather is expected to become worse.
AIR PRESSURE HISTORY
The bottom right section of the LCD shows the air pressure history bar graph.
Air pressure trend over the last 12 hours
Sun with cloud
Cloud with rain
Sunset time of selected city
Sunrise time of selected city
Sun duration
(hours : minutes)
Sunset icon
Sunrise icon
Air pressure unit in inHg
A bar segment indicates
the current moon phase
Hanging
hole
Battery
compartment
Foldout
stand
SUN SUN/CLOUDS CLOUDS/RAIN