


4
A. SET-UP OF MULTIPLE SENSORS
1. Remove all the batteries from the receiver and sensor(s) and wait 60 seconds. During these
60 seconds, press any button 20 times to discharge any excess power.
2. Insert the batteries to the first sensor.
3. Within 2 minutes of powering up the first sensor (Temperature sensor with probe), insert the
batteries to the Weather Station. Once the batteries are in place, all segments of the LCD will
light up briefly. Following the indoor temperature/humidity and the time as 12:00 will be
displayed, and the signal reception icon will flash. If they are not shown in LCD after 60
seconds, remove the batteries and wait for at least 60 seconds before reinserting them.
4. The outdoor temperature from the first sensor (channel 1) should then be displayed on the
Weather station. If this does not happen after 2 minutes, the batteries will need to be removed
from both units and reset from step 1.
5. If the temperature probe has been used, the outdoor temperature from channel 2 will then be
displayed. Otherwise, the outdoor temperature will display “---“.
Note: The temperature probe from the first sensor will always occupy “channel 2”. Channel 2 can
only be used for the temperature probe. If you choose not to use the temperature probe, Channel
2 will display “---“.
6. Insert the batteries to the second sensor as soon as the outdoor temperature readings from
the first sensor are displayed on the Weather station.
NOTE: You must insert the batteries into the second sensor within 30 seconds of
reception of the first sensor.
7. The outdoor temperature from the second sensor and the "channel 3" icon should then be
displayed on the Weather station. If this does not happen after 2 minute, the batteries will need
to be removed from all the units and reset from step 1.
Note: only the readings from the internal sensor of the second sensor will be displayed in “channel 3”
IMPORTANT: Transmission problems will arise if the setting for additional sensors is not
followed as described above. Should transmission problems occur, it is necessary to
remove the batteries from all units and start again the set-up from step 1.
B. VIEWING AND OPERATING WITH MULTIPLE TEMPERATURE SENSOR UNITS
1. To view the temperature of a different remote temperature sensor unit, press and release the
SET/CH button. A shift from one “boxed” number to the next should be observed in the
OUTDOOR LCD.
2. To determine which remote temperature sensor reading is displayed on the 3 channels, match the
temperature displayed on each channel, with the corresponding temperature displayed on the
LCD of each remote temperature sensor.
3. To view the Minimum/Maximum temperature: first select which remote temperature sensor to read
data from (indicated by the “boxed” number), then press the SET/CH button. Pressing this button
once will display the minimum temperature, and the date and time the data was recorded.
Pressing this button a second time (while “MIN” is still displayed, otherwise press the button twice)
will display the same data for the maximum recordings.
4. To reset the Minimum/Maximum readings, press and hold the MIN/MAX/+ button for 5 seconds,
this will reset all the minimum and maximum data from all sensors.
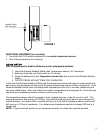
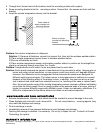
MOUNTING
THE REMOTE TEMPERATURE SENSOR
1. Remove the mounting bracket/stand from the temperature sensor.
2. Place the mounting bracket over the desired location.
3. The mounting bracket can attach to the sensor in the middle of the back or on the bottom.