


1
Wireless Color Weather Station
Model: S84193 | Quick Setup Guide
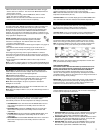
La Crosse Technology® introduces a Wireless Color Weather Station
that provides precise, real-time weather data straight from your
backyard. New—Monitor forecast and temperature trends and set
high/low temperature alerts. Animated color forecasts react to changing
barometric pressure. Monitor in/out temperature and humidity with daily
min/max records—all on one easy-to-read display with adjustable
brightness. Wireless transmission range of over 200 feet (60 meters) in
open air, from transmitter to weather station.
Wireless Color Weather Station
Setup Instructions Step-by-Step
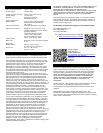
STEP 1:
• Insert the 5-volt A/C power adapter into the
designated area on the weather station.
• Insert the A/C power adapter into a wall outlet for
continuous backlight (ON/OFF), and dimmer
feature.
STEP 2: (optional battery operation)
• Remove battery cover from the weather
station: Slide tab left and pull out to remove the cover.
• Insert 3 NEW AAA batteries (not included)
into the back of the weather station. Observe
the correct polarity (see marking inside the
battery compartment).
• The weather station will light up and show,
indoor temperature, humidity and time.
• (Press and release the HI/LOW/OFF button to illuminate the backlight
for 10 seconds when using only battery power.)
• Do Not Mix Old and New Batteries
• Do Not Mix Alkaline, Standard, Lithium or Rechargeable
Batteries
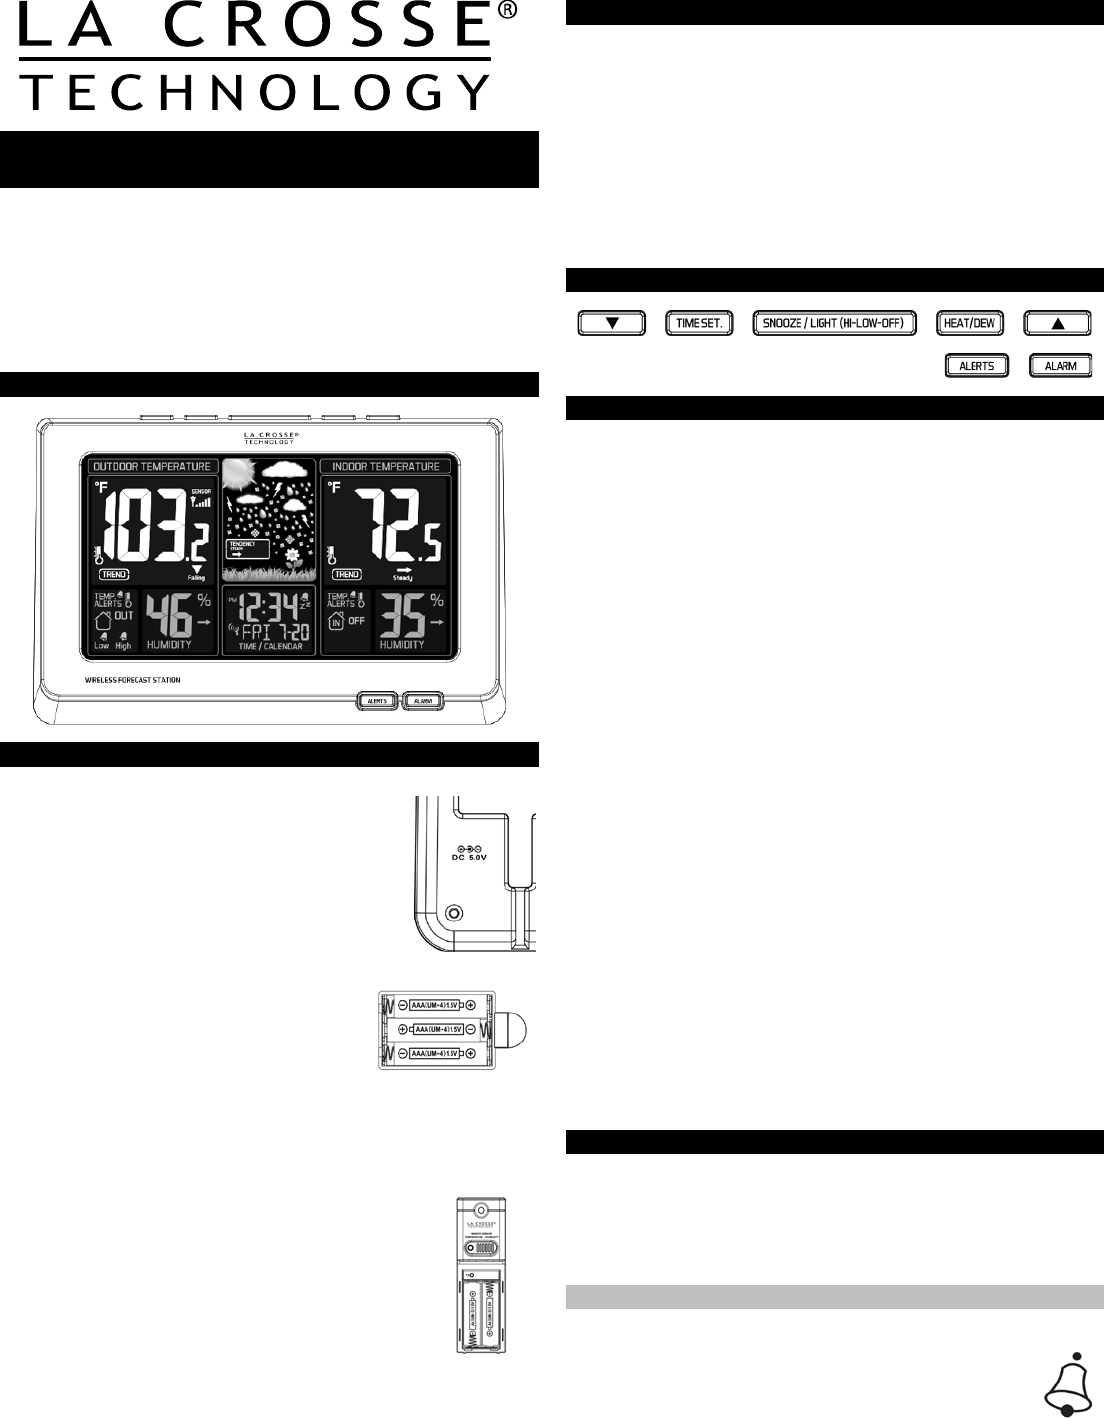
STEP 3:
• Ensure that the transmitter is within 10 feet of the
weather station.
• Remove battery cover from transmitter: Slide the battery
cover down and lift off the front.
• Insert 2 NEW AA batteries (not included) into the
TX141TH-B transmitter. Observe the correct polarity.
• Within 3 minutes, the weather station will show readings
in the Outdoor temperature area on the LCD.
Note: Use Alkaline batteries (or Lithium for temperatures below - 20°F /-
28.8°C).
Troubleshooting
• If the weather station does not show the outdoor temperature after
three minutes, open the battery cover of the outdoor transmitter to
reveal the TX button. Push down on the TX button for three seconds to
send a wireless signal to the weather station.
• Hold the HEAT/DEW button for three seconds so the weather station
searches again for the outdoor transmitter.
• If the outdoor temperature does not show up after a second attempt,
remove the A/C power adapter and all batteries from both units and
start the setup process again.
• For optimal 433 MHz signal reception, the outdoor transmitter should
be placed within 200 feet (60 meters) from the indoor weather station.
Buttons
Program Menu
The TIME SET button will move through the program menu. To change
a value use the ARROW buttons.
• WWVB ON/OFF: Hold the TIME SET button five seconds so WWVB
and the word ON will flash. Press and release either ARROW button to
turn this to OFF if you do not wish WWVB time reception. Confirm with
the TIME SET button and move to time zone.
• TIME ZONE: EST will flash. Press and release the ARROW buttons to
select a different Time Zone: AST=Atlantic, EST= Eastern, CST=
Central, MST= Mountain, PST= Pacific, AKT= Alaska, HAT=Hawaiian
time zone. Confirm with the TIME SET button and move to DST.
• DAYLIGHT SAVING TIME: DST will flash and the word ON. Press and
release the ARROW buttons to turn this to OFF if you do not observe
DST. Confirm with the TIME SET button and move to 12/24 hour time.
• 12/24 HOUR TIME: 12H will flash. Press and release the ARROW
buttons to select 24H. Confirm with the TIME SET button and move to
the hour.
• HOUR: The hour will flash. Press and release the ARROW buttons to
select the correct hour. Confirm with the TIME SET button and move to
the minutes.
• MINUTES: The minutes will flash. Press and release the ARROW
buttons to adjust the minutes. Confirm with the TIME SET button and
move to the year.
• YEAR: The year will flash. Press and release the ARROW buttons to
select the correct year. Confirm with the TIME SET button and move to
the month.
• MONTH: The month will flash. Press and release the ARROW buttons
to select the correct month. Confirm with the TIME SET button and
move to the date.
• DATE: The date will flash. Press and release the ARROW buttons to
select the correct date. Confirm with the TIME SET button and move to
F/C.
Note: The Day of the Week will set automatically when the year, month
and date are set.
• FAHRENHEIT/CELSIUS: °F will flash. Press and release the ARROW
buttons to select Fahrenheit or Celsius. Confirm with the TIME SET
button and exit.
Alarm Set
• ALARM HOUR: Hold ALARM button for three seconds to enter alarm
setting mode. The alarm hour will flash. Use the ARROW buttons to
set the hour. Press and release the ALARM button.
• ALARM MINUTE: The alarm minutes will flash. Use the ARROW
buttons to set the minutes. Press the ALARM button to exit.
Alarm Activate/Deactivate
• Press and release the ALARM button once to show Alarm Time.
• Press and release the ALARM button repeatedly to activate
or deactivate the alarm.
• The alarm icon appears when alarm is activated.