


3
INDOOR HI alert will flash. Press the ARROW buttons to set the alert
value, and press the TEMP ALERT button to confirm. Then press the
TEMP ALERT button again switch to INDOOR LOW setting.
INDOOR LO alert will flash. Press the ARROW buttons to choose the
value, and press the TEMP ALERT button to confirm and exit.
Note: After selecting temperature alert values use the next step to turn
individual alerts ON or OFF.
Temperature Alerts ON/OFF
In normal mode, hold then release the TEMP ALERT button to toggle
between:
o Outdoor HI
o Outdoor LO
o Indoor HI
o Indoor LO
Press the MAX TEMP button to turn the selected alert ON. The alert
icon appears when alarm is activated.
Press the MIN TEMP button to turn the selected
alert OFF.
Note: When no temperature alerts are set the
Temperature Alert area will show ALERTS OFF.
Temperature Alert Sounds:
When temperature alert sounds the corresponding alert icon will
flash.
The alert beeps once every minute, until the temperature is out of
alert range.
Press any button to stop alert. The alert symbol will still show.
Turn alert OFF: In normal mode, hold and release the TEMP ALERT
button to select the alert to turn off. With HI or LO alert selected, press
the MIN button to turn that alert OFF.
MIN/MAX TEMPERATURES:
The Forecast Station will show the daily minimum and maximum
temperatures each day starting at midnight (12:00 AM). The Forecast
Station automatically resets the min/max temperatures at midnight
(12:00 AM).
View MIN data: Press and release the MIN TEMP
button to view the minimum Indoor and Outdoor
Temperatures.
Reset MIN data: Hold the MIN TEMP button for 5
seconds and the Indoor and all Outdoor Minimum Temperatures will
be reset. The temperature area will show dashes briefly then return to
current temperatures.
View MAX data: Press and release the MAX TEMP
button to view the maximum Indoor and Outdoor
Temperatures.
Reset MAX data: Hold the MAX TEMP button for 5
seconds and the Indoor and all Outdoor Maximum
Temperatures will be reset. The temperature area will show dashes
briefly then return to current temperatures.
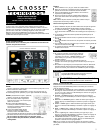
WEATHER FORECAST ICONS:
The Forecast Station predicts weather condition of the next 12-hours
based on the change of atmospheric pressure with 70-75% accuracy.
Note: As weather conditions cannot be 100% correctly forecasted we
are not responsible for any loss caused by an incorrect forecast.
The forecast station samples the barometric pressure every twelve
minutes. These samples are averaged hourly and daily then stored in
nonvolatile memory.
The three hour pressure icon change is based off of the last four
average hourly readings.
THIS STATION LEARNS!
The forecast station calibrates barometric pressure based on its
location over a period of time to generate an accurate, personal
forecast. Please allow 3 to 4 weeks for barometer calibration.
IMPORTANT: As the forecast station builds memory, it will compare the
current average pressure to the past forty day average pressure for
increased accuracy. The longer the forecast station operates in one
location the more accurate the forecast icons will be.
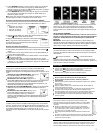
FORECAST TREND ICON:
The forecast trend arrows in the upper right corner of the forecast
display indicate the rising or falling pressure trend.
Rising Pressure Falling Pressure
The up trending arrow indicates the weather is improving. The down
trending arrow indicates the weather may worsen. When there is no
arrow the pressure is steady.
LOW BATTERY:
When this icon appears in the indoor (IN) reading section, replace
the batteries in the Forecast Station.
When this icon appears in the outdoor (OUT) readings section,
replace the batteries in the outdoor transmitter.
CARE AND MAINTENANCE:
Do Not Mix Old and New Batteries
Do Not Mix Alkaline, Standard, Lithium or Rechargeable
Batteries
Do not expose the forecast station to extreme temperatures, vibration
or shock.
Keep forecast station dry.
Clean forecast station with a soft damp cloth. Do not use solvents or
scouring agents.
The forecast station is not a toy. Keep it out of reach of children.
The forecast station is not to be used for medical purpose or for public
information, but is determined for home use only.
The specifications of this forecast station may change without prior
notice.
Improper use or unauthorized opening of housing will void the
warranty.
POSITION THE FORECAST STATION:
Choose a location for the forecast station that is within range
of the outdoor transmitter. The forecast station has a built in
base stand to sit on a table or desk.
Choose a location 6 feet or more from electronics such as
cordless phones, gaming systems, televisions,
microwaves, routers, baby monitors, etc., which can
prevent signal reception.
Be aware of electrical wires and plumbing within a wall.
Best reception is achieved when the front or the back of the
forecast station is facing the outdoor transmitter. This allows a larger
portion of the antenna to receive a signal.
POSITION THE OUTDOOR TRANSMITTER:
Once the Forecast Station shows the outdoor temperature/humidity,
place it and the transmitter in the desired locations and wait
approximately 1-hour before permanently mounting the transmitter to
ensure that there is proper reception. The transmitter should be
mounted vertically, in a shaded, protected area, at least 6 feet from the
ground to avoid damage and ensure accurate readings. The transmitter
is water resistant, not waterproof and should not be placed anywhere it
will become submerged in water or subject to standing water or snow.
Choose a location for the transmitter that is within range of the Forecast
Station and under an overhang for accuracy.