


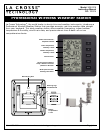


Model: 308-2316 www.lacrossetechnology.com/support Page | 5
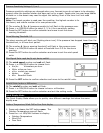
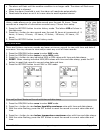
Step 4: Remove the wind speed sensor/showerproof casing from the
thermo-hygro sensor to reveal the two ports (for the wind sensor and
rain sensor cords)
Step 5: Connect the attached cables of wind and rain sensors to the correct
ports of the thermo-hygro sensor. The cords should click into place.
Double-check the rain and wind cords are in the correct marked port.
Step 6: Insert 3 x AA, 1.5V Alkaline batteries into the back of the weather
station. Observe the correct polarity.
Step 7: Open the battery cover of the thermo-hygro sensor located below the
two ports, and insert 2 x AA, 1.5V Alkaline batteries. Observe the
correct polarity. The red LED will light up for 4 seconds. Replace battery
cover.
Step 8: Do not press buttons or move the sensors or weather station for at least
10 minutes to avoid signal interruption.
WWVB Signal Search: The thermo-hygro sensor will transmit weather data within the first 24
seconds. Then, the sensor will start radio controlled time (WWVB) reception. During the time
reception period (maximum 5 minutes), no weather data will be transmitted. The LED indicator
will be blink 5 times once WWVB signal is received. Weather data will be sent again once the
WWVB search finished. If the WWVB time signal is not received, the thermo-hygro sensor will
search every 2 hours until received. Weather data will be transmitted when not in search mode.
Restart: If there is no outdoor temperature or wind data after 10 minutes, remove batteries
from the weather station & outdoor sensor and press a button 20 times. After 15 minutes, return
to Step 1 above.
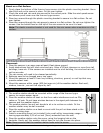
Sensor Mounting and Placement
The Wind speed/Thermohygro sensor and the Rain sensor may be mounted on a wooden pole
(not included) with the U-bolts (included) or mounted on a flat surface.
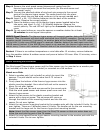
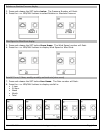
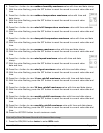
Mount on a Pole:
1. Select a wooden pole (not included) on which to mount the
sensors. The pole should not be more that 0.75 inches in
diameter.
2. Firmly place the bottom of the thermo-hygro sensor into the
plastic mounting bracket. Use a short bolt and nut to secure in
place. Do not over tighten.
3. Check the wind and rain cord are secured to the correct ports.
Slide the wind speed sensor and shower proof cover over the
thermo-hygro sensor.
4. Attach the rain sensor to the plastic mounting bracket and
secure with a long set screw. The set screw will come up
through the bottom of the mounting bracket and into the rain
sensor. Do not over tighten.
5. Attach the rain sensor mounting bracket to the wooden pole with the included U-bolts. Do not
over tighten. There are 2 different sizes of U-bolts. The smaller set for the rain mounting
bracket and the larger set for the thermo-hygro/wind mounting bracket.
Note: Attach the Rain sensor lower than the Wind/TH sensor so that rain water does not
follow the cord into the port of the TH sensor.
6. Attach the wind speed/thermo-hygro sensor mounting bracket to the wooden pole with the
included U-bolts. Do not over tighten.